Sunday, 25 October 2015

Editing Workshop 3: Fairly Legal

For our third edit workshop we began to look at editing clips that had dialogue. We used clips from a piece called Fairly Legal. The tools we had looked at previously were to be used as part of this process.

I began by looking through the shots to listen to the dialogue, look at the angles and shot sizes and to get a general idea of the storyline. Next I put the wide two shot into the timeline to use as a basis for audio. I then watched this take back and put markers on points where I thought I could cut another shot in. I then put together a radio edit by placing in the shots I wanted (using the markers for reference) but only lining up the audio. I did this so I could fix the cuts later and just focus on one thing at a time. Next I began to use the ripple edit and rolling edit tools to fix the cuts and make the flow of the video a lot better. I watched it back a couple of times to see if the cuts were very noticeable and then went back through to fix anything that different feel right.  For one of the shots (near the start when the female character is about to pick up the paperwork) I had to use the rate stretch tool to slow it down a little because the take was too short. I needed the character to pick up the paperwork at a specific moment and to do this I had to slow the clip down. Finally I levelled out all the audio (as some takes were quieter than others) and exported the video. Here is the final version:


I like the final product I got and I think it did feel like something I could imagine seeing on tv, in terms of how it was cut together. I think this session was a success.

Story-Telling: First & Second Draft

Now that I had finalised all the main points and moments for my idea, I began writing the script. I started by writing all the scenes I had already thought the most about, these were my moments. I then added other scenes in around those and hoped it made up 10 pages. Lucky for me it did. This was the first draft, it was awful as you would expect a first draft to be. Most of the dialogue didn't make sense and it was a bit to tell not show.

For the second draft I went back through the script and took out the bits I didn't like anymore. I either then replaced them with something better or used the free space to improve a different and more important scene. I worked on all the dialogue and tried to make it as minimal as possible. I tried to make everything make sense and make it a bit less of a telling script and more of a showing script. I also worked on some of my location descriptions at the start of each scene and I worked on the character descriptions too.

I then looked back over it and found more things to change. Onto the next draft!...

Camera Workshop 4: Crossing The Line

For our fourth camera workshop we were back in Studio 5. This was our last camera workshop so it was time to use all of our new skills and create one final piece. We were given a script and a brief which said we had to create a sequence about the 180 degree rule. This sequence had to include at least 3 or 4 different shots and of course, we could not break the rule.

Before shooting anything I looked at the script and thought about how it could be shot, then I asked the actors (my classmates) to act out the scene so I could look at how they do it and decide where I could put the camera. After watching them I decided to shoot handheld and use a lav mic and a boom mic to capture audio. I shot from a few angles (over the shoulder, wide, two shot...) and asked them to act out the full scene each time so I had a few takes of the same dialogue to work with. Before each take I asked my boom operator if the sound was good, once she confirmed, I started to film. Once I was happy with the footage I shot one angle of character 1 waiting for character 2 to arrive and one angle of character 1 looked at the 180 degree line (added in post) after character 2 had left. Next it was time to edit.

Whilst editing I started with the two shot and worked around that. I put together a radio edit first to ensure all the dialogue lined up and worked, and then I went back through and fixed the visuals with the ripple edit and rolling edit tools. Next I used After Effects to add in my 180 degree line for the final shot. And then finally I fixed the audio levels and added some music. I had some issues with audio because some of my clips had a lot of background noise. I had to just work around this and do my best to cover it up and hide the transitions between different takes of audio. Before exporting I decided to change the opening of the clip and remove the arrival of character 2. Instead I started it from the line of dialogue "So I think we should talk about crossing the line". I did this because I felt the arrival wasn't shot very well (my own fault) and so didn't fit nicely into the edit. This change did take me under the 1min minimum for the project but it's a choice I had to make for it to work. Here is the final version:


I am very pleased with the final version and happy with the decisions I made in terms of angles and shot types, and cuts in the edit. I think this was a successful and fun workshop.

Camera Workshop 3: Sound & Shooting on Location

For our third camera workshop we looked at sound and shooting on location. We began by going back over the kit and what comes in the bag just to double check everyone knows. Ferg then showed us some of the sound equipment that is available to us, this includes:

  • Rode NTG Mics
  • Lavalier Mics (Clip-on mics)
  • Blimps (boom mic housing)
  • Dead Cats & Dead Wombats (wind protection)
  • Boom poles
There is a lot of sound equipment which means we have a good selection to choose from when it comes to deciding how to record audio on a shoot. We continued with the session by splitting into pairs and setting up an interview like situation to help us look at using the boom mics. For my shoot I asked my partner, Cheyenne, some questions. I started but asking her to speak whilst I worked on the audio controls, adjusting them to a good level (so the levels hit about -12db). Once that was complete I started my interview. Here is some of the final product:


Looking back at it I think the audio is okay but I may have had the levels up too high as there is a lot of background noise. Next time I think I will spend a little more time working on the controls (maybe looking in the on screen menus) to ensure there is less background noise (if possible).

Next we moved onto shooting on location. This meant we had to think about health and safety and think about how to shoot audio on location. For my shoot I chose to use a clip on mic instead of a boom mic because it gave my actor (me) the ability to move more and stand quite far away from the camera (something I am thinking about utilising in my story-telling project).  Before starting I patrolled the area and looked for any hazards. I spotted one, a hole in the group, and maybe everyone on my crew aware of it. I also covered it up for safety. Once potential hazards were identified and the audio and camera where set up, we began shooting. Whilst shooting I did stray into areas I had not done health and safety checks on and unfortunately it did mean I almost tripped up. I should have thought more about where I was filming whilst I completed my checks to ensure this potential accident never occurred. Unfortunately, due to a low battery in the mic receiver, a lot of my sound was not recored so I had to scrap the footage. This is something I will have to think about to ensure it doesn't happen again.

Overall I enjoyed the session and I learnt a few things about what I should and shouldn't do next time.

Editing Workshop 2: Delicious Piece

For our second editing workshop we began looking at some of the tools that Premiere Pro has and how they can help ease the editing process. We used footage from a short documentary type piece about fair trade coffee beans called Delicious Piece.

During the workshop we looked at a number of the tools and what they do:

1. Selection Tool: Used for selecting items on the timeline and for moving them around on the timeline
2. Ripple Edit Tool: Change the length of clips. Timeline jumps to fill gap.
3. Rolling Edit Tool: Edit two clips at once. Edit ending of one whilst editing start of another.
4. Rate Stretch Tool: Increase or decrease speed of a clip
5. Razor Tool: Cut a clip.
6. Pen Tool: Create points on audio clips where you can adjust certain values of it like volume.
7. Hand Tool: Move around timeline.
8. Zoom Tool: Zoom in and out on the timeline.


I think these tools make the editing process so much easier and I will use them a lot in the future. I am slowly learning how to use this software properly and I think I'm picking it up well.


Here is the final product from this workshop:


Even though this session wasn't really about what the video looked like I still spend some time thinking about how I'd edit the clips together. For example, the opening credit sequence was much longer than it appears and, so it would fit with the music and voice over, I cut it into three shorter segments and re-edited it together. I also made some decisions about which shots to use whilst the narrator was speaking. For example, using the map graphics whilst he was talking about the locations. Overall I am happy about the final product.

Wednesday, 21 October 2015

Story-Telling: Storyboards & Trailers

STORYBOARDS

For this session we spent some time learning about storyboards and trailers. We began by looking at storyboards and how we can include them in our work. We looked at some detailed examples from big hollywood movies like this one:

Indiana Jones and the Raiders of the Lost Ark
Looking at this storyboard you can easily imagine what the scene would look like as part of the movie and that's the whole idea of a detailed storyboard. However, not all storyboards have to be detailed. We looked at some less detailed examples from big hollywood productions like this one:


This storyboard is not very detailed but you still get an idea of what the final image might look like, something which can come in handy when shooting the script. Next we looked at the different styles of storyboard that can be used. These are:
  • Graphic- Detailed drawings
  • Diagrammatical- Basically stickmen
  • Plan view- Birds eye map
  • Or even just Photographs
Storyboards are not essential in the production of a film but they can help when it comes to designing a shot and setting up a frame size. In production they are often used as a reference point. In pre-production they can be used to help decide how a scene should be shot. In production they can be used to guide setting up shots. And in post-production they can be used by editors to help visualise the final product. They are not essential to a production but can be very helpful. If one is not used, you should at least have a shot list.

Next we looked at the type of language that is used in production and on storyboards:

  • Shot sizes: Birds-eye view or Angels Perspective (from above), Extreme Long Shot (ELS), Long Shot (LS) or Wide Shot (WS), Medium Shot (MS), Close Up (CU) and Extreme Close Up (ECU).
  • Camera Movement: Tilt Shot (up or down), Crane Shot, Pan Shot (right or left), Tracking Shot (on rails) and Dolly Shot (not on rails).
  • Others: Two shot (two people), Low Angle, High Angle, Over the Shoulder (OTS) and Stedicam Shot.
TRAILERS

Finally we looked at trailers and how they are used. We viewed a couple of good examples including the trailers for Psycho (1960) and Jaws (1975). Trailers are designed to hook an audience by using the most exciting/dramatic/comedic/shocking moments from a production. Often music and voice overs are also mixed in. A few things to consider when producing a trailer are:
  • What is the story?
  • When is it on?
  • Who is it aimed at?
We were given the task of making our own trailer using footage from the short film Soft by Simon Ellis. This is what I produced:


It took me a while to create the trailer because I couldn't decide on what music to use. I think music is very important in trailers and so, after watching the film again, it is often my starting point. I eventually decided I wanted the music to contrast with the visuals. I thought about using a Frank Sinatra song and eventually decided to use That's Life. I think the song fits well because for some people this kind of situation is "life". I wanted the song to contrast with and also reflect on the story involved. Overall I think the trailer came out pretty good. I found the session very useful and informative, however for my own project I will be shooting the opening two minutes, not a trailer.


Sunday, 18 October 2015

Story-Telling: Idea Changes

Before starting on the writing process I wanted to change a few elements of my idea and the overall flow of the story.

The changes I have made involve the opening sequence. I decided that it needed to be a moment that people would remember and a moment that kicked the story off. The initial idea involved the main character, Dylan, rushing across the hospital grounds and into the hospital. I have decided to change this and add a bit of irony and drama to the scene. Just outside the hospital entrance Dylan is now going to be hit by a vehicle (maybe an ambulance). Then the story is going to go back to a period 5 minutes earlier when he was in the waiting room with his sister. This is where the actual meeting will begin. Dylan will then leave in anger and head away from the hospital. He will then receive a phone call about his fiancée being in the final stages of her birth. He then rushes back to the hospital, where he is hit. The film then continues from after the incident as he struggles to walk into the hospital. He makes he way to the delivery room, still in pain, because he doesn't want to miss the birth. The story ends with him walking into the delivery room where the sounds of a baby crying can be heard, a sign that the baby has been born.

I have made these changes to the story because I wanted to add a moment people will remember and add more action to help cut down on the amount dialogue needed to progress the story. I also wanted to make it even harder for Dylan to make it to the birth of his son. I felt he needed more of a challenge.

I hope these changes improve the story and help me write a better story.

Story-Telling: Research for my Story

Because my entire story is based in and around a hospital and about young parents I thought it best I do some background research before I began writing the script.

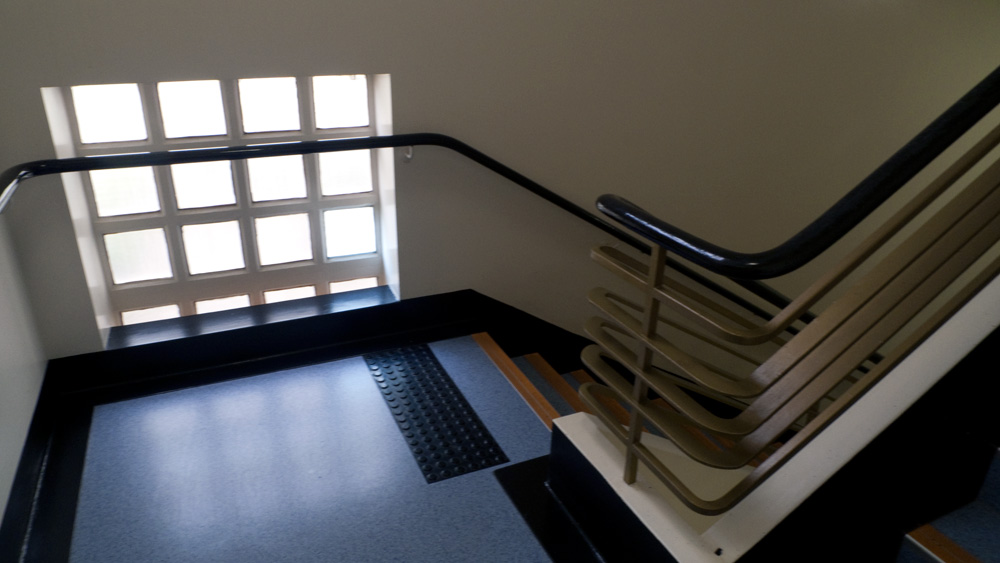
I began by doing some research on the hospital environment itself. I looked into what a hospital sounds and feels like. I even visited my local hospital. I need to recreate this feeling on screen and in the way I describe the locations in the script. I found that hospitals have a very clean feeling and tend to be quiet in most areas. The corridors some areas are busy, but others are not. The stair wells, something I want to use, are clean and echoey. I looked at how the delivery wards feel. There is still a quiet element but the sounds of women giving birth do tend to fill the area. The waiting room has a tense atmosphere with people nervously waiting to meet newborns. Nurses and midwives roam the corridors moving between rooms, checking on the expectant parents.

To find out more about the delivery room I watched a few episodes of a show called One Born Every Minute on Channel 4. In this show they have placed cameras all around a hospital delivery ward to capture the incredible things that go on. In the show you get to see the full process that takes place on the ward. This starts with the soon to be parents arriving and ends with them leaving, hopefully with a newborn, however sometimes this is not the case. Miscarriage is a heavy topic and something some of my family members have been through. I have decided not to include this in my story. The show deals with these real stories in a manner which still lets the audience see pretty much everything, even the birth. We get to see the challenges these parents face and we get to see how the fathers deal with it, something that relates heavily to my own story. Watching the show has really helped me think about how my character would react to the birth of his son and how both parents would be feeling on the day of the birth. It's a huge mix of emotions that I have to get across in the way I write the script and the way my actors say the lines.

My research into the hospital environment has really helped me think about where I could shoot the story and how I could describe the environment in my script. This research was essential and I'm glad I have carried it out.

Hear are some photos of the kind of environment I'm aiming for:
Hospital corridor

Hospital Stairwell
Hospital Waiting Room

Entrance to a delivery ward

Story-Telling: The Most Beautiful Thing (Short Film)

I recently discovered this heartwarming short film on YouTube and I'm so happy I found it because it gave me some inspiration for my own story.

The short film is question is called The Most Beautiful Thing:


It's about a shy young guy who falls in love with a deaf girl. He struggles to find a way to ask her to prom and after witnessing her being kissed by another guy, he thinks he has no chance. However, as he walks away from her, she shouts and explains to him what happened. He then signs back and asks her to go to prom. The two of them then hug passionately as the film ends.

It's a wonderful story and I enjoyed every second of it. The film itself won an award and the actor won an award too.

I have taken some inspiration from this film in terms of the minimal dialogue and the way in which it was shot. I loved how the writer was able to tell such a brilliant story without actually using that much dialogue. For my own story I need to think of a way of telling it using minimal dialogue. I also like the way the film was shot; it had a very light and calm feel to it, something I'd like to come across in my own project.

It's a brilliant film and I'd highly recommend you check it out!

Tuesday, 13 October 2015

Story-Telling: Screenwriting using Final Draft

In the industry professional screenwriters use a piece of software called Final Draft to write their scripts. As part of our course we spent some time learning how to use this software. We first spent some time with Simon who showed us how to format certain aspects (of which Final Draft does a lot of for you) of the script. Next we were given a task:

  • Write a 3 page script about a journey using our ride to Uni each morning as inspiration.
For this task with worked in pairs and I partnered with Ida. We first spent some time thinking of an idea and mind mapping some possible "moments". After writing a few things down we came up with what we thought was a good idea:

  • The Wonderful, Incredible, Amazing, Spectacular, Supernatural, Awesome Journey To Uni: Josh and Ida are running late on the train and as a result of this they miss their bus. Luckily the Gummy Bear Pilot and his Candy Helicopter come to the rescue. However, the pilot turns out to be a ghost and the helicopter begins to plummet. There is only one marshmallow parachute left, who will survive?...
The idea was very odd but creative and the dialogue was a mix of awful jokes and silly humour. It was very fun to write and I had a great time working with Ida. We worked very well together and our good senses of humour helped us keep it entertaining. We spent most of the time laughing at how bad our jokes were!

I found Final Draft really easy to use and I think it's a brilliant piece of software, I can see why all screenwriters use it. I think our final script was really good and I loved the dialogue we came up with. At first I really didn't think we could fill 3 pages but in the end I think we could have written even more.

Once we finished the script we handed it to Simon who read it and then wrote some feedback on it. He said he liked the dialogue but thought that we needed to write more about what the audience sees and more about the characters themselves. Looking back on it now I have to say I agree, our script did need some more descriptions of locations and how certain objects, like the Candy Helicopter, appeared on screen. I think we focused on the dialogue so much that we forgot about expanding on the actions.

Overall it was a great task and I enjoyed working with Ida. I look forward to writing my full 10 page script.

Here are the final marked pages of our script:


TITLE PAGE

PAGE 1

PAGE 2

PAGE 3


Monday, 12 October 2015

Editing Workshop 1: I Think

I personally have only had a little bit of experience working with Premiere Pro, so this editing workshop was very uselful. For editing I normally use Sony Vegas Pro and I was relieved to find that the two programs do have some similarities. Also I have used After Effects a lot before and some of the keyboard shortcuts are similar.

For the workshop we had to edit together a collection of footage given to us by Ferg. There was no right or wrong way to edit it together, it was down to us to use the narration provided to decide how it should flow. This was my final product:


I cut the footage together using some basic transitions. I took inspiration from a film called The Taking of Pelham 123, in terms of how I layered the shots of subways trains. I put a few jump cuts in and added the jazz style background music, changing its length to fit certain points in the footage. I looked for certain cues in the footage, e.g. the character looking up at something, to help me decide how certain shots could be cut.

Inspiration: Taking of Pelham 123


Overall I was pleased by the final product and glad I had a chance to develop the little skill I had when it comes to using Premiere Pro. I hope by the end of these workshops I will be able to use Premiere like a professional.

Sunday, 11 October 2015

Camera Workshop 2: Creating a Sequence

We recently spent the day on the set of Later with Jools Holland (Studio 5 @ Maidstone Studios) carrying out our second camera workshop. For this workshop we were asked to create a sequence based around someone walking to a chair and sitting on it. We used the Sony XDCAM PMW-200 to shoot our footage. I then took my footage and edited it in Premiere Pro. This was the end result:


This task helped me work on my directing skills because I had to direct my partner and tell them how I wanted them to act the scene out and how I was going shoot it. It also helped me work on my camera skills because I had to frame each shot before pressing the record button. And finally it let me learn more about Premiere Pro as it is a program I am not too familiar with.

Some photos from my time in Studio 5:


Wednesday, 7 October 2015

Camera Workshop 1: Rack Focus & Framing

For this session we spent the day in studio 2 learning how to use the Sony cameras. The cameras we used were the Sony XDCAM PMW-100 and the Sony XDCAM PMW-200.

Sony XDCAM PMW-100

Sony XDCAM PMW-200
For the first activity we practiced setting up focus. We used a "Rack Focus", which is when the focus switches between two subjects in the same frame. This involved us setting up the camera, framing the shot and then using the focus ring to switch focus between the two subjects. For a greater depth of field we could also use the zoom ring or zoom lever. This is the result of that task:


For the next activity we practiced framing. To do this we had to create a short piece about a bag. We were given a list of shot types we could use and we had to incorporate at least 5. Once we had shot all the footage we edited it together. This is the result of that task:


The session was very useful and helped me develop my camera and teamwork skills. I think the work I produced from this session was of a good standard and demonstrated that I had learnt something.

Thursday, 1 October 2015

Story-Telling: The Pitch

Title: "The Meeting" or "Due date" or something like that.

Genre: Drama

After finally coming up with an idea I was able to develop it and come up with this 25 word pitch:

"An expectant father rushes to be at his fiancée's side, but will recent conflicts destroy hopes of this being the happiest day of his life?"

or to be super short

"Relationship on the rocks and a baby on the way"


Outline:

An expectant father rushes to the hospital after hearing that his fiancée has gone into labour. After arriving at the delivery room he is saddened to hear that, as a result of recent conflicts, she does not want him in there. He heads to the waiting room where his sister is sitting. The two wait in an awkward silence until she pipes up and explains that she thinks what he did was wrong (without saying what he did). He decides he doesn't want to listen to her and leaves. He thinks about what he has done as he walks down the long corridors, it upsets him. He goes to the vending machine, the machine isn't working (more conflict, cliché). He is upset, angry and confused. He breaks down. Over the tannoy he is called to the delivery room. He goes in only to find that his fiancée has given birth without him. Will the birth of their son bring the two young parents back together?

Character:
  • Expectant father
  • Sister
  • Mother and child (not seen, only heard)
Goal:
  • Be at the birth and meet new born son
  • Fix relationship with the mother
Conflict:
  • The mother doesn't want him in the delivery room
  • The sister isn't making the situation any easier
  • He doesn't know what to do
Change:
  • His opinion of his sister and her opinion of him
  • The relationship between him and his fiancée
  • He accepts that he was wrong
Character Profiles

Expectant Father:
  • Name: Dylan Sharp
  • Age: 20-25
  • Occupation: Unemployed
  • Nationality: British
  • Hometown: Maidstone
  • Siblings: 1- Rachel Sharp
  • Height: About 5 foot 11, 5 foot 12
  • Where's glasses (stereotype: indicates some intelligence)
  • Costume design: Wearing black trousers and a red t-shirt (favourite colour). Covered up with a dark jacket. Dark shoes. Overall dark theme.
  • Flaws: Doesn't like others telling him what to do. Struggles to open up about his feelings.
  • Best quality: Deep down he is actually a really nice guy who just wants to be an amazing dad.
  • Speech patterns: repeats himself a lot.
Sister:
  • Name: Rachel Sharp
  • Age: 18-23
  • Occupation: Customer Service Advisor (people trust her opinion of things)
  • Nationality: British
  • Hometown: Maidstone
  • Siblings: 1- Dylan Sharp
  • Height: Shorter than Dylan
  • Costume design: Bright and colourful
  • Flaws: Always say's the wrong thing at the wrong time. Doesn't know when something should be left until later on.
  • Best quality: Honest (although sometimes too honest). Kind.
Locations
Waiting room
Hospital corridor
Reference Scene: Knocked Up Birth Scene