Here is the final cut of my fiction adaptation production:
Showing posts with label fiction adaptation. Show all posts
Showing posts with label fiction adaptation. Show all posts
Saturday, 17 December 2016
Friday, 16 December 2016
Fiction Adaptation: Project Evaluation

FICTION ADAPTATION PROJECT EVALUATION
PRE-PRODUCTION
I started this unit, with one idea in my head. I wanted to do animation, and so I kept this in mind when choosing the poem. My first poem choice was 'Wish You Were Here' by Emrys Plant. After some trial and error, I quickly decided that attempting animation would not be a good idea for me. Because of this change, I also decided to choose a new poem, 'Poem Heard on Heart 105' by Ross Sutherland. When I first read that poem, I found it easy to imagine the imagery that could match it. This was my final poem choice.
My first idea for this poem was to attempt a 'one shot' film. I wanted to use the camera to explore the interior of a car, and tell a story using the words from the poem. I did some research into director Alan Clarke to help build on this idea. During this time, I was also able to talk to Ross on the phone, and ask him a few questions about the poem, and the story behind it. I found this really helped with the development of my ideas. After a few brainstorms, and a feedback session, I decided to change my idea one last time. My final idea involved following the story of a boy who had been left alone in a car for a few minutes. It has a sinister twist, because the car comes to life, and a mysterious figure tortures the boy. I will then incorporate elements of the poem into this story.
For my cast I decided to use my mum, and my brother. My mum will play the parent, and my brother will play the child. I wanted their on screen relationship to feel real, and as they are a real mother and son, I thought casting them would work out well. Neither of them are actors, and so I had to keep in mind that they may not always understand my directions.
For my locations, I decided to use a location I had previously scouted for another unit, an empty industrial area near my house. It is empty on weekends, and the owner was fine with me filming there. It has a sinister vibe that I thought would work great for the final film.
During the pre-production process, I also spent some time researching the horror genre, including watching a few short horror films set inside cars, and looking into the use of sound in horror. I found all of this research helped me when writing my script, as well as when I was producing the shot list. As well as this, I also looked into story telling with cinematography, as I felt it would help me understand how to transform my poem, into a visual piece.
I think my strength during the pre-production process was my research skills. I found all of the research I conducted really helped me when I was coming up with the idea, writing the script, and creating the shot list. My weaknesses during this part of the project was my organisation skills. I am normally an organised person, but I feel on this occasion, I let other opportunities take priority, and I didn't spend enough time getting prepared for the filming day.
PRODUCTION
To see more about the filming day: Filming
I knew I only needed to spend one day filming, as my script wasn't very long, and I was only using one location, and, for a majority, one actor. I spent the day before preparing the steadicam as I knew it would take a while to set up. In the end it took about 2-3 hours, so I'm glad I did it the day before, and not on the day of filming.
The filming day went really well, even though I wasn't as prepared as I should have been. My brother was really good, and he followed my directions really well, although it did take some time for him to get used to the camera. We spent the first few hours filming my 5 main shots, which made up a majority of my coverage for the scenes. As the film was set in one small location, it wasn't too difficult to film, but at the same time, it allowed me to be creative with my shots. After this we spent time getting all of the extra shots I needed, as well as all of my close ups, and wide shots of the location. We finished the shoot by filming all of the steadicam shots, and recording all of the sound effects.
Overall, the filming went really well and I was able to get all of the coverage I needed. My cast were really good, and they were able to understand all of my direction. My location worked really well and I think the choice of setting the film inside a car worked out nicely, and gave me the opportunity to be really creative with my shots.
My main strength during this part of the project was my directing. I was able to direct two non-actors, and get what I needed out of them to make each scene work. My brother took all of my advice on board, and delivered a good performance. My weakness during this part of the project, again has to be my organisation. All though all the filming went well, I still feel I should've been more prepared for it, and I shouldn't have left everything until a few days before.
POST-PRODUCTION
To see more about the editing process: Rough Cut and Fine Cut
For this project, the post-production process only involved editing the rough and fine cuts, as I had already acquired a recording of the poem, and I had recorded all of my sound effects during the filming process.
I found the editing process quite easy, I had already planned in advance how I wanted to edit this film together, and I kept that in mind during the filming process to ensure I had the right coverage. My favourite part of this process was the sound design. I learnt a lot about sound design during the directions unit when I had to recreate my entire environment as the sound I recorded was unusable. I had a similar with this unit, because all of my sound was ruined by the sounds of me directing my brother during the scenes. Luckily, I had planned for this, and so I had recorded some atmos sound during the filming process. I was able to recreate the environment in post-production, and in the end it worked really well.
Editing the rough and fine cuts together was a simple process, and I was able to assemble, fine tune, colour and level my final cut in a few days. Editing is always my favourite part of the process, and I really enjoyed it on this occasion.
I'd say my main strength during this part of the project was my ability to edit together a good rough cut, in a short space of time. I have really honed in my editing skills now, and I am able to put a good video together in a short space of time, which allows me time to work on other things. My main weakness, was my colour correcting skills. This is something I need to work on, as I tend to over do it. However, on this occasion I feel eventually it worked out nicely.
OVERALL EVALUATION: CRITICAL REFLECTIONS
Strengths-
- My contextual research skills made the pre-production process on this project flow better. I was able to use research into other productions to back up my own ideas, and help me develop new ones. I was also able to apply the information I had learnt about cinematography, and the steadicam, during the filming process to help my camera operator get the shots I was aiming for.
- My editing skills were also another strength. I was able to quickly put a good rough cut together, which was essential as I filmed two days before my rough cut viewing, and I wanted them to be able to view a cut that was as close to what I wanted as possible.
- My sound design skills helped on this unit, especially as having a complex sound track was part of the brief. I was able to recreate my environment in sound, and use the right foley and sound effects to build up that environment. My use of certain sound effects in the film, helps the poem fit in, and prevents it from getting lost in the visuals.
- My communication skills aided me during the pre-production process as I was able to contact my poet and learn more about the poem, which ultimately helped me come up with ideas.
- I feel my directing abilities helped me during the filming process, as I was able to successfully direct two non-actors, and get them to give me what I was looking for on screen.
Weaknesses-
- My main weaknesses on this unit was my organisation skills. I spent too much time focussing on other projects, and not enough time focusing on this one during the pre-production process. This lead to me only deciding what it was I was filming, a few days before the shoot day, which is not a good position to be in. This is unlike me, and something I work on fixing.
- I also feel I should've tried to work with actors for this unit. Although my cast were good, I feel I should have allowed myself to develop my experience working with actors.
- Although this isn't part of the production, I also feel another one of my weaknesses was my essay writing skills. I feel the final essay I produced could've been better, and lacked depth. I should work on my essay writing skills for future occasions.
Possible developments-
- If I were to do this again, I would:
- Hire professional actors as my cast.
- Be more organised and prepared for my filming days.
- Spend more time working on getting the essay right, instead of focusing most of my time on the production process, or other projects.
CONCLUSION
Overall, I am very happy with the final production, it's a shame I can't say the same for the essay. The film I produced visually looked nice, and I feel it represented the poem really well. I hope the poet agrees with my opinions on the film. This project allowed me to be creative, and develop my editing and sound design skills. To summarise, I am proud of the final film I have produced, and despite the few weaknesses in organisation, this project ended up being not as bad as I thought it might be.
Sunday, 11 December 2016
Fiction Adaptation: Fine Cut Feedback
After I had finished editing the fine cut, I showed it to Helen and Sam for some feedback.
FINE CUT FEEDBACK
We watched through the film again, and then afterwards I went back through and pointed out where I had made changes. Feedback was mostly positive, however Sam mentioned how I could slightly adjust the positioning of the opening shot, however, Helen liked it as it was. I mentioned how I would like to change the unit intro music as I don't feel it matches my film, Helen and Sam agreed.
To form the final cut I will:
- Change the unit intro music to something that matches the tone more, maybe a radio static sound effect I have used later in the film.
Overall they are very happy with the film, and no other changes need to be made.
FINE CUT FEEDBACK
We watched through the film again, and then afterwards I went back through and pointed out where I had made changes. Feedback was mostly positive, however Sam mentioned how I could slightly adjust the positioning of the opening shot, however, Helen liked it as it was. I mentioned how I would like to change the unit intro music as I don't feel it matches my film, Helen and Sam agreed.
To form the final cut I will:
- Change the unit intro music to something that matches the tone more, maybe a radio static sound effect I have used later in the film.
Overall they are very happy with the film, and no other changes need to be made.
Thursday, 8 December 2016
Fiction Adaptation: Editing Fine Cut
To prepare for the fine cut feedback, I have re-edited my film
EDITING FINE CUT
I began my removing all of the text, apart from the title, as this was the main suggestion after the rough cut viewing. I also changed the fonts.
Next I removed all of my ambience audio, as I personally didn't like how it sounded. I then downloaded some artificial ambience from the YouTube Audio Library and placed into the timeline, replacing all of the original ambience.
After this I started working on some of my cinematic hits and impacts, as during the rough cut viewing, it was discovered that they were hard to hear without headphones or good speakers. I went through the edit, and replaced all of them with new hits and impacts, checking that you could hear them through the mac speakers, instead of through my headphones.
Next I went through the edit and re-fine tuned some of my cuts, to fit all the new sound effects. And finally, I added a new recording of the poem, which I had recorded whilst it was playing out of the speakers of a car. This helped to sell the idea that it was playing out of the radio during the scene. To build onto this, I added in a few extra sound effects that related to the poem, to ensure it didn't get lost in the film.
I am very happy with the new fine cut, and I'm glad I made the suggested changes.
EDITING FINE CUT
I began my removing all of the text, apart from the title, as this was the main suggestion after the rough cut viewing. I also changed the fonts.
Next I removed all of my ambience audio, as I personally didn't like how it sounded. I then downloaded some artificial ambience from the YouTube Audio Library and placed into the timeline, replacing all of the original ambience.
After this I started working on some of my cinematic hits and impacts, as during the rough cut viewing, it was discovered that they were hard to hear without headphones or good speakers. I went through the edit, and replaced all of them with new hits and impacts, checking that you could hear them through the mac speakers, instead of through my headphones.
Next I went through the edit and re-fine tuned some of my cuts, to fit all the new sound effects. And finally, I added a new recording of the poem, which I had recorded whilst it was playing out of the speakers of a car. This helped to sell the idea that it was playing out of the radio during the scene. To build onto this, I added in a few extra sound effects that related to the poem, to ensure it didn't get lost in the film.
I am very happy with the new fine cut, and I'm glad I made the suggested changes.
Fiction Adaptation: Rough Cut Feedback
After I had finished editing the rough cut, I showed it to Helen and Sam for some feedback.
ROUGH CUT FEEDBACK
We watched through the full film once, and then went back through it slowly, to highlight any good or bad areas. Feedback was mostly positive, and there are not many changes that need to be made. They like the cinematography, colouring, and sound design. They also thought it worked really well as a short film, and could stand alone without the poem.
These were the changes they suggested:
- Change the titles font to something a bit simpler, and less show offy.
- Work on the sound design as some sounds were hard to hear.
- Try to add more poem related sounds to ensure the poem doesn't get lost.
- Think more about how I can incorporate text into the film.
- Try recording the poem playing out of a car stereo, and see how that sounds.
I will now work on making these suggested changes, and form a fine cut.
ROUGH CUT FEEDBACK
We watched through the full film once, and then went back through it slowly, to highlight any good or bad areas. Feedback was mostly positive, and there are not many changes that need to be made. They like the cinematography, colouring, and sound design. They also thought it worked really well as a short film, and could stand alone without the poem.
These were the changes they suggested:
- Change the titles font to something a bit simpler, and less show offy.
- Work on the sound design as some sounds were hard to hear.
- Try to add more poem related sounds to ensure the poem doesn't get lost.
- Think more about how I can incorporate text into the film.
- Try recording the poem playing out of a car stereo, and see how that sounds.
I will now work on making these suggested changes, and form a fine cut.
Fiction Adaptation: Editing Rough Cut
Once all the filming for this unit was complete, it was time to edit. I haven't gone into too much detail, as this blog post would be ridiculously long with all the fine tuning involved.
EDITING ROUGH CUT
I began the editing process by importing all of my footage into Adobe Premiere Pro. Next I used the bins to organise all of the footage and audio that I had captured. For example, I split my shots up into footage, and sound effects. I also created a series of sequences for different purposes: Final_Rough Cut, Rushes, Sound Effects, and the End sequence.
Next I watched all my footage back, creating in and out points on the takes I liked, and inserting them into my rushes sequence so I could find them easily when putting the assembly cut together. I also watched all the clips I used to capture sound effects. I separated the sound from those clips and inserted them into the sound effects sequence.
EDITING ROUGH CUT
I began the editing process by importing all of my footage into Adobe Premiere Pro. Next I used the bins to organise all of the footage and audio that I had captured. For example, I split my shots up into footage, and sound effects. I also created a series of sequences for different purposes: Final_Rough Cut, Rushes, Sound Effects, and the End sequence.
 |
| My bins |
 |
| My sequences |
Assembly
After I had viewed everything back, I began to assemble the footage. Whilst doing this, I turned all the sound off, as I just wanted to focus on cutting together the visuals. I'll do the sound later. I started to put my shots in order, using all my favourite takes from the rushes sequence. I didn't worry about fine tuning any cuts yet. I also didn't insert the poem yet, I'll do that when I'm working on sound design.
Fine Tuning
Next I watched the sequence back and began fine tuning the cuts, using the ripple delete and rolling edit tools. I adjusted some of the cutting points, and replaced some of my takes with others from the rushes. By this point I could see that my project was currently 1 1/2 minutes below the minimum time length, so I went back through the sequence and added in a few shots to extend the time. Once this was complete, I could start working on the sound design.
Sound Design
To begin this process I turned all the sound levels back up, and straight away I could hear a lot of me directing my brother as we filmed. I removed the sound from all of my shots, and decided to build up the world from scratch.
I started with the ambience (i.e inside and outside the car). I had recorded some ambience during the filming process, so I layered these under the footage, and cut it up so it fit with the cuts between the outside of the car, and the inside of the car.
Next I started working on the foley sound effects. Again I had recorded these during the filming process, so I knew they would work with my visuals. I layered them over the ambience sound effects and again cut them to match the footage.
As there is no music in the film, I didn't need to add any music tracks. Finally, I added a series of cinematic impacts and hits, to highlight certain moments in the film when the audience has to focus on a certain element on screen.
Before finishing, I added a recording of the poem to the timeline, and cut it to fit the timing of the shots in the film. I used the EQ audio effects, to attempt to make it sound like it was coming from the radio in the car.
After I had completed all the sound design, I used the clip and track mixers to balance and level everything.
 |
| Using the track mixer |
Colour Correction & Grading
Now I had the sound and visuals completed, I began to colour correct and grade the footage. I started this process by first correcting the footage using the Lumetri Scopes and the RGB curves. I went through each shot and balanced the RGB levels, and the black and white levels, by adjusting the shadows, midtones, and highlights. Once I was happy with the levels, I moved onto grading.
 |
| Colour correcting |
In terms of colour grading, I wanted to make the footage slightly darker, and greyer, with a bit more contrast, and a faded look To achieve this I used the Lumetri Colour tools. I went through the settings adjusting the blacks, whites, contrast, levels, curves, and I added a slight vignette to draw attention to the centre of the screen.
 |
| Before and after correction and grading |
After I had finished colour correcting and grading, I finalised the rough cut.
Finalising
To finalise the rough cut I added some text layers to help emphasise some lines in the poem. I also added some credits to the end of the film, and I added an aspect ratio letterbox. And once this was done, the rough cut was complete.
 |
| Adding text |
 |
| The final timeline |
Fiction Adaptation: Filming
Now all the pre-production was complete, it was time to film.
FILMING: 'POEM HEARD ON HEART 105'
To prepare, I spent two hours the day before balancing the steadicam so I could attach the camera and go when it came to filming. It was a tedious, and lengthy task, but in the end it was worth it as I got some good shots.
Before filming began, I got my mum to move the car into position, as I'd be filming the driving shots at the end of the day as the sun was setting. After this I called my brother over to the location and we rehearsed the scenes a couple of times, running through the action, and camera positions.
Next we set up for all the shots filmed from the side, which make up a majority of the shots. Once set up, we ran through the whole script a couple of times, getting a few takes with different camera movements, and frame sizes. Then we set up for all the front shots, which would be filmed from the windscreen. Again we ran through the whole script, getting a couple of takes with different camera movements, and frame sizes.
After this, we moved onto filming all the other shots I needed to ensure I had enough coverage, this included all the detail shots, and close ups. We filmed some from the back seat looking into the front. Some through the rear of the car for all the scenes involving the boot, and some through the opposite side of the car from earlier.
Once all the main shots were complete, we moved onto all of the wide shots of the location. I asked my brother to run through the scenes a couple of times inside the car, so I could get some wide shots from outside the car. After all of these shots were complete, I got into costume as the creepy figure, and we filmed all of the shots involving me. This included the final shot of the film, which is filmed through the rear view mirror. For this, we had to set up a tripod in the drivers seat, and point the camera at the rear view mirror, so it could film out the rear of the car.
Next, we set up the steadicam rig, which wasn't difficult as I had prepared it the day before. I used this to film a few wide shots of the car, and some shots of the boy character climbing from the front of the car, to the back. And finally, I used it to film one of the most important shots of the film, which involves the camera flying through the car, and up to the boy who is sitting in the drivers seat. We did a few takes of this, as the steadicam was hard to operate.
After this, we then set up the audio recorder and recorded all the sound effects I needed to complete the scene. This included the knocking sounds in the boot and outside the car, and the sounds of doors opening, and doors locking. Finally, I grabbed a clean plate of ambience sound inside, and outside the car, and the sounds of my brother moving around in the car as per the script, because I needed to cover up the sounds of my directing him during filming.
Finally, I called my mum back to the location, and filmed her shots, which included a wide of the car driving into position, and a close up shot of her getting out of the car. After this was complete, filming was over.
Overall, I think filming went really well. Both my cast members were really good, and my crew were great too. I was able to film everything I needed and after reviewing the footage, I was really happy with every shot. It was a great shot, and I'm really happy with how it went.
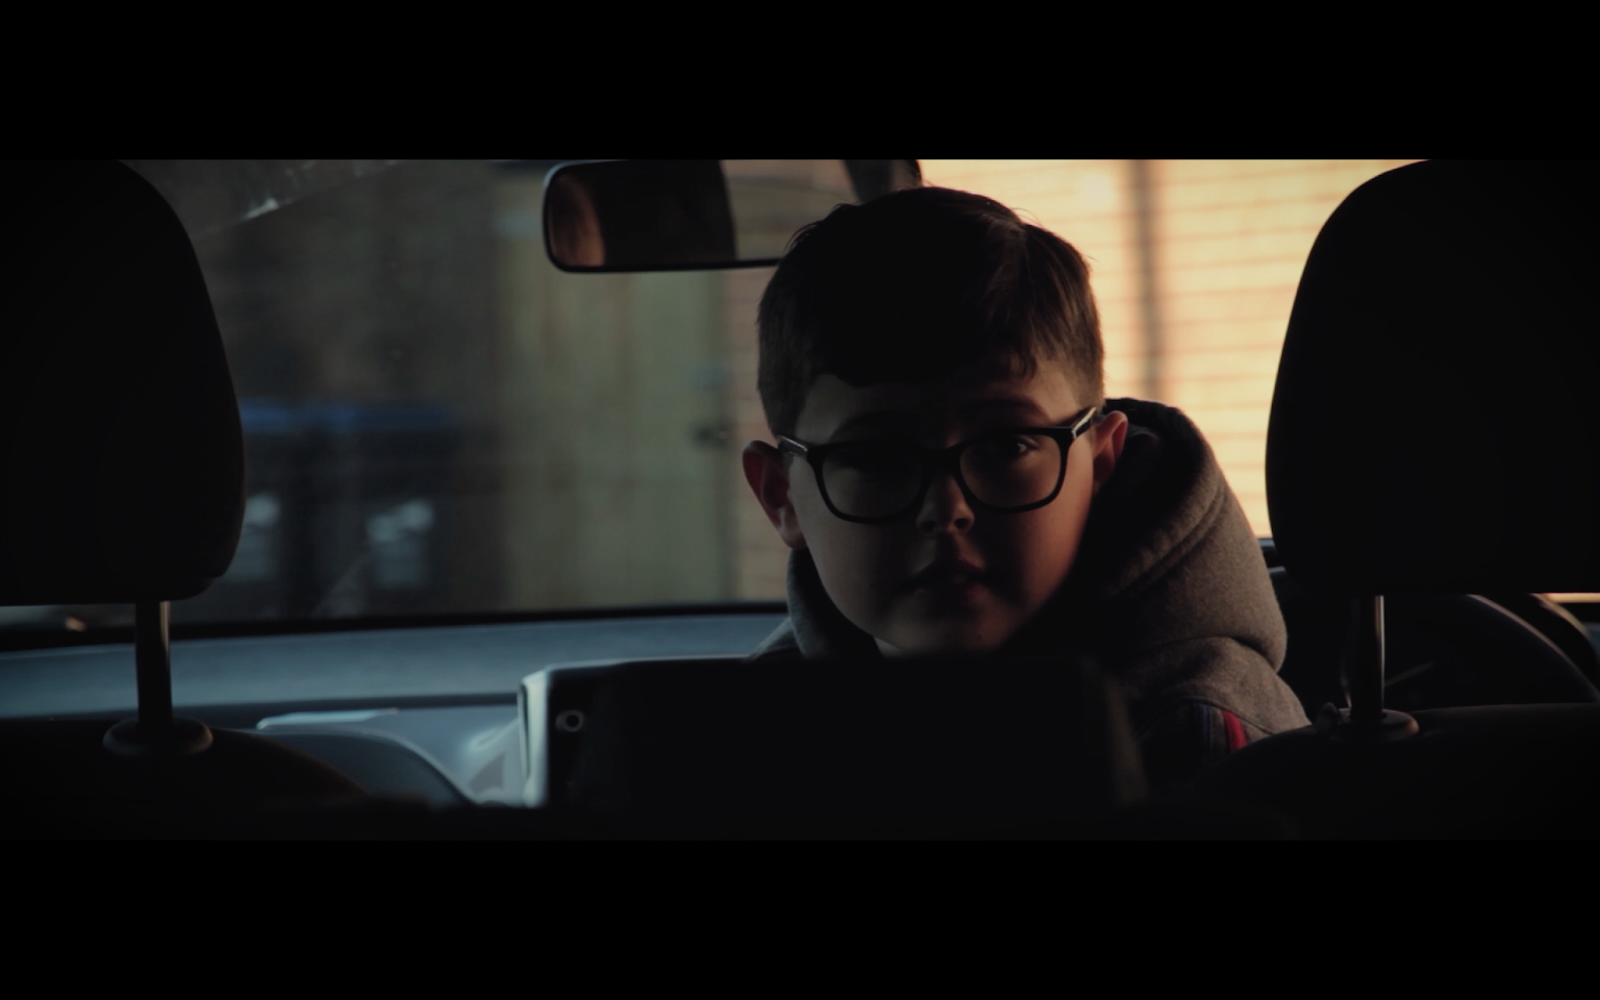
Below are a few colour graded frames from the shoot:


FILMING: 'POEM HEARD ON HEART 105'
To prepare, I spent two hours the day before balancing the steadicam so I could attach the camera and go when it came to filming. It was a tedious, and lengthy task, but in the end it was worth it as I got some good shots.
Before filming began, I got my mum to move the car into position, as I'd be filming the driving shots at the end of the day as the sun was setting. After this I called my brother over to the location and we rehearsed the scenes a couple of times, running through the action, and camera positions.
Next we set up for all the shots filmed from the side, which make up a majority of the shots. Once set up, we ran through the whole script a couple of times, getting a few takes with different camera movements, and frame sizes. Then we set up for all the front shots, which would be filmed from the windscreen. Again we ran through the whole script, getting a couple of takes with different camera movements, and frame sizes.
After this, we moved onto filming all the other shots I needed to ensure I had enough coverage, this included all the detail shots, and close ups. We filmed some from the back seat looking into the front. Some through the rear of the car for all the scenes involving the boot, and some through the opposite side of the car from earlier.
Once all the main shots were complete, we moved onto all of the wide shots of the location. I asked my brother to run through the scenes a couple of times inside the car, so I could get some wide shots from outside the car. After all of these shots were complete, I got into costume as the creepy figure, and we filmed all of the shots involving me. This included the final shot of the film, which is filmed through the rear view mirror. For this, we had to set up a tripod in the drivers seat, and point the camera at the rear view mirror, so it could film out the rear of the car.
Next, we set up the steadicam rig, which wasn't difficult as I had prepared it the day before. I used this to film a few wide shots of the car, and some shots of the boy character climbing from the front of the car, to the back. And finally, I used it to film one of the most important shots of the film, which involves the camera flying through the car, and up to the boy who is sitting in the drivers seat. We did a few takes of this, as the steadicam was hard to operate.
After this, we then set up the audio recorder and recorded all the sound effects I needed to complete the scene. This included the knocking sounds in the boot and outside the car, and the sounds of doors opening, and doors locking. Finally, I grabbed a clean plate of ambience sound inside, and outside the car, and the sounds of my brother moving around in the car as per the script, because I needed to cover up the sounds of my directing him during filming.
Finally, I called my mum back to the location, and filmed her shots, which included a wide of the car driving into position, and a close up shot of her getting out of the car. After this was complete, filming was over.
Overall, I think filming went really well. Both my cast members were really good, and my crew were great too. I was able to film everything I needed and after reviewing the footage, I was really happy with every shot. It was a great shot, and I'm really happy with how it went.
Below are a few colour graded frames from the shoot:




Fiction Adaptation: Passenger (Another Short Horror Film With A Similar Name)
As part of my pre-production for this unit, I watched a couple of short horror films with similar themes to my idea, to help with my story/script development. Below is one of those films, with a similar name to another one I have written about.
PASSENGER (ANOTHER SHORT HORROR FILM)
'Passenger' is another short horror film about someone, in their car, in the middle of nowhere, being tormented by a mysterious figure. Like the other film I have looked at, it's not super scary, but it has some good elements that I would like to incorporate into my own film.
This is what I liked about the film:
- The use of audio on the radio to unintentionally build tension.
- The use of the sound of an electric chair mechanism to build tension.
- A slight ringing noise added in during tense moments to help build suspense.
- In one shot, they use the rear view mirrors to show the audience the character's perspective of one of the scary moments.
- The car engine won't start, which helps build tension.
- The sounds of the character breathing heavily help build up suspense during a tense moment of the film.
- An atmospheric rumble in the background helps to again build tension.
- A final scare to end the film.
Unfortunately, I don't think the ending of this film is very good, however, I do think it uses sound very well throughout to build suspense and tension, and ultimately make the scenes scarier than they are. I will try to incorporate these ideas into my project.
PASSENGER (ANOTHER SHORT HORROR FILM)
'Passenger' is another short horror film about someone, in their car, in the middle of nowhere, being tormented by a mysterious figure. Like the other film I have looked at, it's not super scary, but it has some good elements that I would like to incorporate into my own film.
This is what I liked about the film:
- The use of audio on the radio to unintentionally build tension.
- The use of the sound of an electric chair mechanism to build tension.
- A slight ringing noise added in during tense moments to help build suspense.
- In one shot, they use the rear view mirrors to show the audience the character's perspective of one of the scary moments.
- The car engine won't start, which helps build tension.
- The sounds of the character breathing heavily help build up suspense during a tense moment of the film.
- An atmospheric rumble in the background helps to again build tension.
- A final scare to end the film.
Unfortunately, I don't think the ending of this film is very good, however, I do think it uses sound very well throughout to build suspense and tension, and ultimately make the scenes scarier than they are. I will try to incorporate these ideas into my project.
Fiction Adaptation: The Passenger (Short Horror Film)
As part of my pre-production for this unit, I watched a couple of short horror films with similar themes to my idea, to help with my story/script development. Below is one of those films.
THE PASSENGER (SHORT HORROR FILM)
'The Passenger' is about a girl who is stuck in the middle of nowhere when her car breaks down, however, she isn't alone, as a mysterious figure torments her. It's not the scariest horror film ever, but it has a few elements in it, that I would like to incorporate into my own film.
This is what I like about this film:
- I like the lighting inside the car. The use of a slight underlight adds a sinister tone to the car interior.
- At one point it cuts to a wide shot of the location. A black figure then passes the camera. I like how this was done, and the use of a loud, sudden sound, adds tension to the scene.
- When the character first discovers that something is going wrong, we see the discovery from her perspective.
- After that moment, it cuts to a wide shot with a fisheye lens. This distorted view of the situation, provides an uneasy feeling.
- An atmospheric sound is used in the background to help build tension.
- The side mirrors on the car are used at one point to show a character's reaction to something.
- The rear view mirror is then used to show us the character's perspective of the situation behind her.
- Sound is used very carefully in this film, to build suspense, and aid the scary moments.
Overall, as I said, it's not the scariest film ever, but it does use some good shots, and some good sounds to aid the story, and build tension and suspense. There are a few elements I would like to incorporate into my story, like car doing things on its own, and the use of the car mirrors to reflect the situations we are filming.
Fiction Adaptation: Sound In Horror

For this unit, I have chosen to attempt horror. Horror relies more on sound, than visuals, so I have done some research into the use of sound in horror movies.
SOUND IN HORROR
There are two ways that sounds can be scary: by being sudden, or by generating a 'frightful' tone. Sound causes a reaction in the brain, in terms of fear, that is very different from the reaction the brain experiences when seeing something scary. Sound information also travels faster than visual information. Essentially, sounds are scarier than images.
Being scared is part of our human biology, and relates to need to survive. Sounds that makes us scare, warn us, and act as a first defence against predators. Your sense of sound becomes more sensitive when your visual ability is removed. It is clear sound is more important, and effective than visuals, and this is why sound in horror is essential. You can't just scare someone with a scary image, it's the sound that goes with it, that ultimately makes a human fear it.
Sound can be used to build tension, and it's this tension that can make a visual scary payoff more effective. Without sound, you may not know that any tension is being built up.
A study in 2010 found that horror movie sounds were made up of nonlinear sounds, like frequency jumps, nonstandard harmonies, noise/chaos, and instruments/voices pushed beyond their normal range.
This small, but important piece of research, tells me a lot about how important sound will be in my film, to ensure I built tension, and have effective, and scary payoffs.
Images:
Sources:
Fiction Adaptation: Storytelling with Cinematography
As part of my pre-production for this unit, I wanted to develop my knowledge of storytelling with cinematography, and expand on what I had learnt in Mike Rymer's workshops.
STORYTELLING WITH CINEMATOGRAPHY
I feel that for this unit the way I use the camera to tell a story is very important. This unit it all about adapting a poem and turning it into a visual piece, so the way we use the camera to do this is an essential thing to keep in mind.
To develop my knowledge on this element, I watched a few videos by a YouTube channel called DLSRguide. I have been watching this channel for a few years, but I hadn't seen these videos before.
STORYTELLING WITH CINEMATOGRAPHY
I feel that for this unit the way I use the camera to tell a story is very important. This unit it all about adapting a poem and turning it into a visual piece, so the way we use the camera to do this is an essential thing to keep in mind.
To develop my knowledge on this element, I watched a few videos by a YouTube channel called DLSRguide. I have been watching this channel for a few years, but I hadn't seen these videos before.
Camera Movement
This video explores motivated camera movement, and why you might choose to move the camera for certain shots. This is what I learnt from the video:
- Camera movement can be motivated by an emotion.
- A track towards an actor (or push in) can be used to highlight emotion/reaction.
- Camera movement can be motivated by something else moving on screen. This can help a camera move look natural. Without movement on screen, it can draw a lot of unwanted attention to the camera movement.
- The camera often follows something else on screen. It's movement has some sort of motivation.
- Camera movement can also be used to hide or reveal something on screen. For example, and jib up to reveal something in the distance. This allows the audience to discover something at the same time the actor on screen does.
"On it's own camera movement is worthless. But, when you combine it with the performance of the actors and all the information you've already given the audience, it can be very powerful"
Composition & Framing
This next video is about different camera techniques that can have different effects on an audience. It also looks at how filmmakers can use composition and framing to get across complex emotions and ideas.
This is what I learnt from this video:
- It is important to consider the depth of a frame. This is the difference between the foreground, midground, and background elements.
- This can be achieved by using a natural frame in the foreground, like a doorway. This can help add depth, and makes it richer and more pleasing to the eye.
- You can choose to avoid depth and have flat images, which can help convey loneliness or detachment, or for a character who has a boring lifestyle.
- Audiences have an expectation to see depth in a film, because it's a cinematic convention.
- The size of something in the frame is directly reflecting how important it is to the film.
- This idea can also be used to show the relationship between characters.
- Think about contrast. This can help you show the audience where to look, or focus when watching a film.
- This can help you decide if you want your character to stand out, or blend in.
- Shot type is also important. You'd usually open with an establishing shot, but you can be unconventional and jump straight in with a close up to disorientate the audience.
- Wide shots can also be used to show body language, or props, or costume. If you had a close up, you might not be able to see all these things.
- Close ups allow the audience to personal and intimate with the audience.
- Frame balance, like using the rule of thirds, is important to consider.
- Try to keep the camera on a level horizon, unless you're using it as a storytelling device.
- Give your characters a reasonable amount of looking room, and head room.
- The position of characters on screen can say a lot about relationships.
- The height of the camera can also be important. Looking down on an actor can make them seem vulnerable, whereas looking up to a character can make them seem heroic and important.
This is what I learnt from this video:
- It is important to consider the depth of a frame. This is the difference between the foreground, midground, and background elements.
- This can be achieved by using a natural frame in the foreground, like a doorway. This can help add depth, and makes it richer and more pleasing to the eye.
- You can choose to avoid depth and have flat images, which can help convey loneliness or detachment, or for a character who has a boring lifestyle.
- Audiences have an expectation to see depth in a film, because it's a cinematic convention.
- The size of something in the frame is directly reflecting how important it is to the film.
- This idea can also be used to show the relationship between characters.
- Think about contrast. This can help you show the audience where to look, or focus when watching a film.
- This can help you decide if you want your character to stand out, or blend in.
- Shot type is also important. You'd usually open with an establishing shot, but you can be unconventional and jump straight in with a close up to disorientate the audience.
- Wide shots can also be used to show body language, or props, or costume. If you had a close up, you might not be able to see all these things.
- Close ups allow the audience to personal and intimate with the audience.
- Frame balance, like using the rule of thirds, is important to consider.
- Try to keep the camera on a level horizon, unless you're using it as a storytelling device.
- Give your characters a reasonable amount of looking room, and head room.
- The position of characters on screen can say a lot about relationships.
- The height of the camera can also be important. Looking down on an actor can make them seem vulnerable, whereas looking up to a character can make them seem heroic and important.
"Be really intentional with your cinematography choices"
Storytelling with Cinematography
The final video is about the core of visual filmmaking, and it explores the quote:
"Cinema is a matter of what's in the frame and what's out" - Martin Scorsese
This is what I learnt from this video:
- The writing and visuals help aid good storytelling.
- Everything within the frame is important: dialogue, characters, location, angles, etc...
- It doesn't matter how well you film something, if there is no story, no conflict, it's not interesting.
- A good frame will tell you everything you need to know, without having seen anything else.
- Good cinematography can allow you to use good visual perspective tricks, to misdirect an audience.
"Make the most of what the audience can see, and what the characters can't see"
All three of these videos have inspired me to think differently about how I am going to film this project. I will think carefully about every shot, and ensure each frame has meaning. I will look at how I can use the camera to reveal details about the story, and how I can show the audience something the character can't see. I will also think about motivated camera movement and how I can incorporate it into my story. I hope that all of the ideas featured in these videos, come across in my final project.
Videos:
Wednesday, 7 December 2016
Fiction Adaptation: Casting/Characters
For my script I need to cast a young boy, and a mother, so I have decided to use my little brother, and my mum.
CASTING/CHARACTERS
The young boy is the main character in this story. He is about 12 years old. He used to his mother leaving him alone for a few minutes in the car, she has done it a few times. Normally whilst he is waiting for her, he likes to sit back, relax, put the radio on and listen to some music. After pulling up in a side alley, his mother has quickly gone to get something, and so he has been left alone for a few minutes. But, he is not alone.
For this part I have chosen to cast my younger brother, Alfie.
I have chosen to cast him because he fits the role perfectly. He is a young boy, aged 12, who I believe my audience would feel scared for if they saw him left alone in an empty car park. Working with child actors can also be a very difficult process, so I thought casting a family member would make production a little easier. I will still be paying him however.
Below is the artist contract his parent (my mum) signed:

The mother is a secondary character. She is in her 30s-40s. She has left her son in the car a few times whilst she quickly grabs something from the shops, so leaving him in the car on this occasion is normal for her. However, she doesn’t like leaving him all the time, it’s just easier, and because someone is in the car, she doesn’t need to find somewhere to park up, she can quickly leave the car in this back alley. She is always worried that something could happen, unfortunately, on this occasion, something terrible does happen.
For this part I have chosen to cast my mum, Claire.
I have chosen to cast her for this part because I feel she fits the character. She is a mother, and this really is her son. The character is not as important as the boy, and so I didn’t want to spend money hiring an actor who is going to appear on screen for a few seconds. I also needed someone who could drive the car I am using, and my mum is insured to drive my chosen vehicle. I also beleive the mother and son connection will be more believable as my cast are actually mother and son.
CASTING/CHARACTERS
Son/Boy
The young boy is the main character in this story. He is about 12 years old. He used to his mother leaving him alone for a few minutes in the car, she has done it a few times. Normally whilst he is waiting for her, he likes to sit back, relax, put the radio on and listen to some music. After pulling up in a side alley, his mother has quickly gone to get something, and so he has been left alone for a few minutes. But, he is not alone.
For this part I have chosen to cast my younger brother, Alfie.
I have chosen to cast him because he fits the role perfectly. He is a young boy, aged 12, who I believe my audience would feel scared for if they saw him left alone in an empty car park. Working with child actors can also be a very difficult process, so I thought casting a family member would make production a little easier. I will still be paying him however.
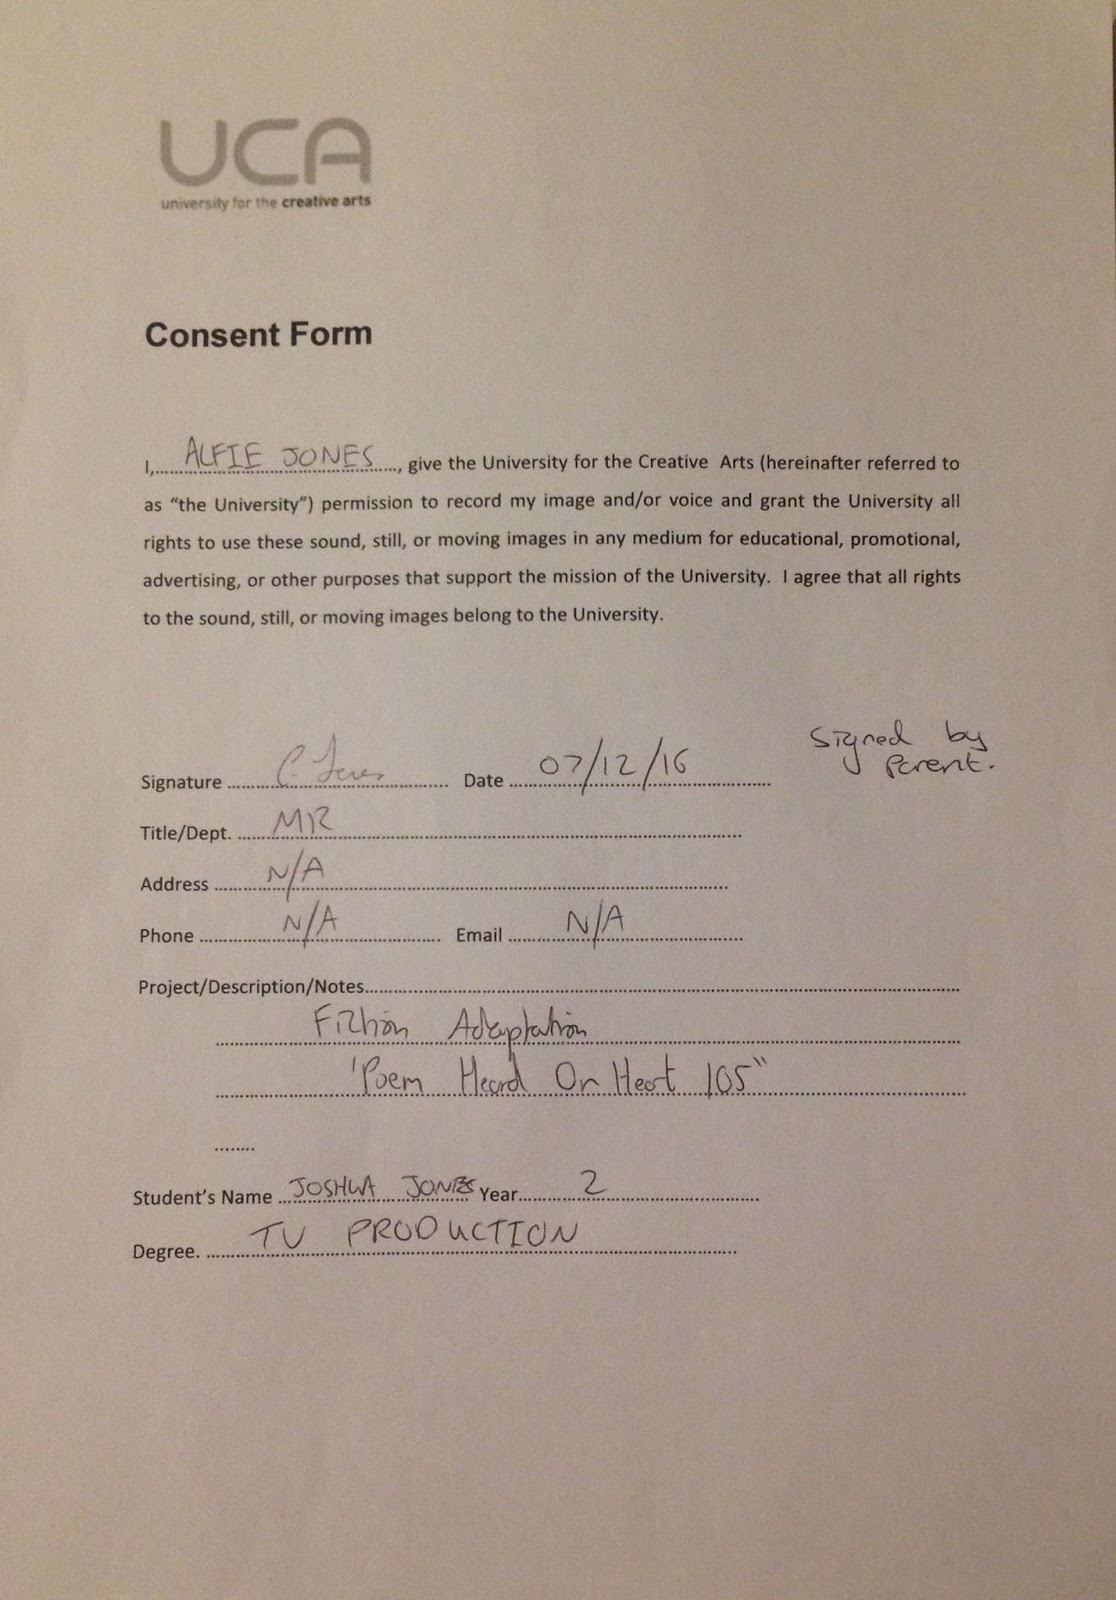
Below is the artist contract his parent (my mum) signed:
Mother
The mother is a secondary character. She is in her 30s-40s. She has left her son in the car a few times whilst she quickly grabs something from the shops, so leaving him in the car on this occasion is normal for her. However, she doesn’t like leaving him all the time, it’s just easier, and because someone is in the car, she doesn’t need to find somewhere to park up, she can quickly leave the car in this back alley. She is always worried that something could happen, unfortunately, on this occasion, something terrible does happen.
For this part I have chosen to cast my mum, Claire.
I have chosen to cast her for this part because I feel she fits the character. She is a mother, and this really is her son. The character is not as important as the boy, and so I didn’t want to spend money hiring an actor who is going to appear on screen for a few seconds. I also needed someone who could drive the car I am using, and my mum is insured to drive my chosen vehicle. I also beleive the mother and son connection will be more believable as my cast are actually mother and son.
Below is the artist contract she signed:


Creepy Figure
The creepy figure is the character that is torturing this poor boy, and controlling the car. He watches the events unfold before eventually closing in, and ending the boys life. He is dressed in dark clothing, and has his face covered up.
For this part, I have cast myself. It's a little directors cameo. I have no real reason for casting myself, it was mostly because I didn't want to hire an actor to play the role. It doesn't require anyone/anything specific, so I can easily play the part. The characters face is not seen.
-------------------------------------------
I will now work with my two cast members to prepare them for their roles. I will focus more of my time on preparing my younger brother, as it is essential that the terror his character is feeling, comes across well on screen, and to achieve this, he needs to know everything about this story.
Fiction Adaptation: Poem VS Script
As part of this project, I need to ensure that my poem doesn't get lost in my film, so below I have broken down how I have incorporated elements of the poem into my script. On the left, lines from the poem. On the right, how they are incorporated into the script.
POEM VS SCRIPT
 By spending some time examining how the poem and my script compare, it will hopefully ensure that the poem is not lost in the final production.
POEM VS SCRIPT

Fiction Adaptation: Plan View (Camera Positions)
To go with my shot list, I created a plan view of the camera positions so that on the day of filming, I could quickly set up each shot because I have thought about it before hand.
PLAN VIEW (CAMERA POSITIONS)
Below are the plan views for both EXT, and INT shots:


These two plan views will be very useful during the filming day.
PLAN VIEW (CAMERA POSITIONS)
Below are the plan views for both EXT, and INT shots:
EXT. CAR PARK OUTSIDE BUILDING- AFTERNOON

INT. CAR- AFTERNOON

These two plan views will be very useful during the filming day.
Fiction Adaptation: Shot List/Framing
As part of the pre-production for this unit, I have created a shot list to go with my camera script, and plan view.
SHOT LIST/FRAMING
This shot list will help my camera operator, and myself, understand what it is I want and need to film to ensure I have enough coverage of my scenes. It will also help me plan my filming day, as I know what shots I need to get, and how I am planning on getting them. And finally the shot list helps any others working on the project understand what framing I’m looking for, which is good for helping actors prepare for certain scenes.
For the shot list I have decided to film the entire script in about 5 shots, all with different frame sizes. I will then shoot all the additional shots I need afterwards to ensure I have enough coverage for each separate scene. By doing this, I save time by not having to keep setting up the same frame each time I come to a new part of the script. Instead I’ll film all the scenes with the same frame, at the same time. So although my shot list has about 28 shots in it, some of them have the same frame, and so can be filmed at the same time.
In terms of framing, I have decided to keep each shot very tight, and close to the action. Even the wide shots of the location feel quite tight. I want the shots to make the location, and the interior of the car, look small and claustrophobic, because it is, and I want that to come across on screen. I want the audience to feel like they’re trapped in the film, just like the boy is, and I feel a tight frame will help achieve this effect. I would also like a majority of the shots to have a shallow depth of field so use the settings on the camera to achieve this.
This shot list will prove very helpful on filming day. Below are a few screenshots:


SHOT LIST/FRAMING
This shot list will help my camera operator, and myself, understand what it is I want and need to film to ensure I have enough coverage of my scenes. It will also help me plan my filming day, as I know what shots I need to get, and how I am planning on getting them. And finally the shot list helps any others working on the project understand what framing I’m looking for, which is good for helping actors prepare for certain scenes.
For the shot list I have decided to film the entire script in about 5 shots, all with different frame sizes. I will then shoot all the additional shots I need afterwards to ensure I have enough coverage for each separate scene. By doing this, I save time by not having to keep setting up the same frame each time I come to a new part of the script. Instead I’ll film all the scenes with the same frame, at the same time. So although my shot list has about 28 shots in it, some of them have the same frame, and so can be filmed at the same time.
In terms of framing, I have decided to keep each shot very tight, and close to the action. Even the wide shots of the location feel quite tight. I want the shots to make the location, and the interior of the car, look small and claustrophobic, because it is, and I want that to come across on screen. I want the audience to feel like they’re trapped in the film, just like the boy is, and I feel a tight frame will help achieve this effect. I would also like a majority of the shots to have a shallow depth of field so use the settings on the camera to achieve this.
This shot list will prove very helpful on filming day. Below are a few screenshots:


Fiction Adaptation: Risk Assessments
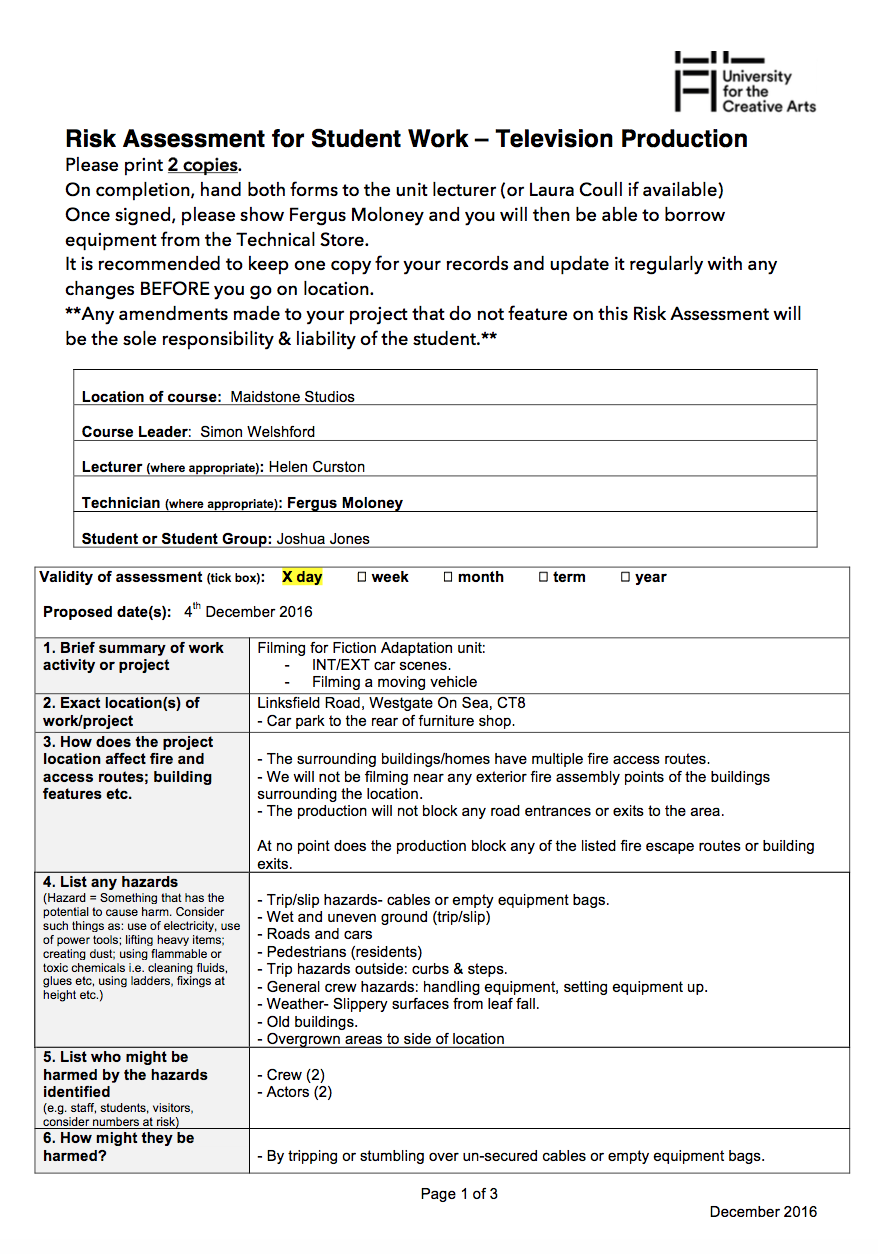
As part of the pre-production for this unit, I have produced a risk assessment for my filming day and chosen location.
RISK ASSESSMENTS
To prepare for this risk assessment, I scouted out my chosen location, and made a note of all potential hazards, which included:
- Trips/slips- cables, equipment bags, wet/uneven ground, curbs, steps.
- Roads and cars.
- Pedestrians.
- General crew hazards- handling equipment, setting equipment up.
- Old buildings.
- Overgrown areas surrounding the location.
When producing the risk assessment I had to think carefully about how I could prevent any risk, these prevention (or control) measures included:
- Keeping equipment bags off set.
- Making everyone aware of the hazards (safety talk)
- Proper supervision.
- Removing obvious trip hazards.
- Keeping an eye out for vehicles and wearing high visibility jackets.
- Ensuring everybody wraps up warm to avoid related illnesses.
- And more listed in the screenshots below.
All safety measures will be adhered to during filming. The risk assessment was signed off, and so filming can go ahead.


RISK ASSESSMENTS
To prepare for this risk assessment, I scouted out my chosen location, and made a note of all potential hazards, which included:
- Trips/slips- cables, equipment bags, wet/uneven ground, curbs, steps.
- Roads and cars.
- Pedestrians.
- General crew hazards- handling equipment, setting equipment up.
- Old buildings.
- Overgrown areas surrounding the location.
When producing the risk assessment I had to think carefully about how I could prevent any risk, these prevention (or control) measures included:
- Keeping equipment bags off set.
- Making everyone aware of the hazards (safety talk)
- Proper supervision.
- Removing obvious trip hazards.
- Keeping an eye out for vehicles and wearing high visibility jackets.
- Ensuring everybody wraps up warm to avoid related illnesses.
- And more listed in the screenshots below.
All safety measures will be adhered to during filming. The risk assessment was signed off, and so filming can go ahead.

Fiction Adaptation: Costume Design
Costume design in this project isn't as important as in other projects, however I had a few thoughts I wanted to note down.
COSTUME DESIGN
Son/boy:
For the boy, I want to ensure his character only wears dark/grey colours, and no bright colours. The film is supposed to have a scary tone, and I feel bright colours will not work for this. Darker colours will help connote the dark, fearful feeling the film is intended to have.
Creepy figure:
I want the creepy figure to also dress in dark colours, to add some mystery. Every inch of skin needs to be covered in black clothing so the audience can't see any details about this character. I want him to wear a pair of large boots, like hiking boots, or builders boots. This will give the character a heavy feel. His footsteps should create a sound with big boots, but he is actually very silent, and the boy in the car never hears him coming. He will also wear black jeans, a black jacket with the hood up, and black gloves. He will also have his face wrapped up in a black scarf so the audience, and his victims can't see his face. And finally I want him to carry a heavy hammer, which is his murder weapon. It shows he likes to kill his victims in a brutal manner with a few hits to the head.
COSTUME DESIGN
Son/boy:
For the boy, I want to ensure his character only wears dark/grey colours, and no bright colours. The film is supposed to have a scary tone, and I feel bright colours will not work for this. Darker colours will help connote the dark, fearful feeling the film is intended to have.
Creepy figure:
I want the creepy figure to also dress in dark colours, to add some mystery. Every inch of skin needs to be covered in black clothing so the audience can't see any details about this character. I want him to wear a pair of large boots, like hiking boots, or builders boots. This will give the character a heavy feel. His footsteps should create a sound with big boots, but he is actually very silent, and the boy in the car never hears him coming. He will also wear black jeans, a black jacket with the hood up, and black gloves. He will also have his face wrapped up in a black scarf so the audience, and his victims can't see his face. And finally I want him to carry a heavy hammer, which is his murder weapon. It shows he likes to kill his victims in a brutal manner with a few hits to the head.
 |
| Black hooded jacket |
 |
| Black jeans |
 |
| Black hiking boots |
 |
| Black gloves |
 |
| Black scarf for the face |
Fiction Adaptation: Moodboard
To help prepare for filming this project, I have put a moodboard together to give people a good idea of the colours, style and themes I am aiming for. The moodboard is made up of images and screenshots from films.
MOODBOARD

In this moodboard I have included images of:
- People inside cars at sunset
- A scared child in a car
- Empty car parks
- Car interior details
This moodboard will hopefully help me maintain the current vision I have in my head for this film.
MOODBOARD

In this moodboard I have included images of:
- People inside cars at sunset
- A scared child in a car
- Empty car parks
- Car interior details
This moodboard will hopefully help me maintain the current vision I have in my head for this film.
Tuesday, 6 December 2016
Fiction Adaptation: Car Park Location & Car
For my film, I needed a car, and a creepy looking, empty car park.
CAR
A needed a car that was reasonably spacious on the inside, so an actor, and a camera could easily move around. The first car that came to mind, was my grandads one, which I used in my Directions Unit for Breaking Bad. This car has a lot of space on the inside and is very bright. This would make filming and lighting very easy and would be a practical choice. I decided to use this car.
CAR
A needed a car that was reasonably spacious on the inside, so an actor, and a camera could easily move around. The first car that came to mind, was my grandads one, which I used in my Directions Unit for Breaking Bad. This car has a lot of space on the inside and is very bright. This would make filming and lighting very easy and would be a practical choice. I decided to use this car.
 |
| The car in Joshua Jones Directs Breaking Bad |
CAR PARK
For the car park location, I immediately thought of a location I had scouted for my Directions Unit, which is an empty industrial area near my house. During weekdays it is used as a carpark, and when it's empty on a weekend, it does have a creepy vibe. There is enough room for me to get some good wide shots of the location, and I think, once colour graded, it will look really nice and sinister on camera. I will use this location for the film.
 |
| The sinister car park location |
 |
| Birds eye view of the location |
Now I have decided on the car, and the location, I will work on sorting out permissions.
Fiction Adaptation: Script Draft 3
With my idea finalised, I have created a third draft of my script.


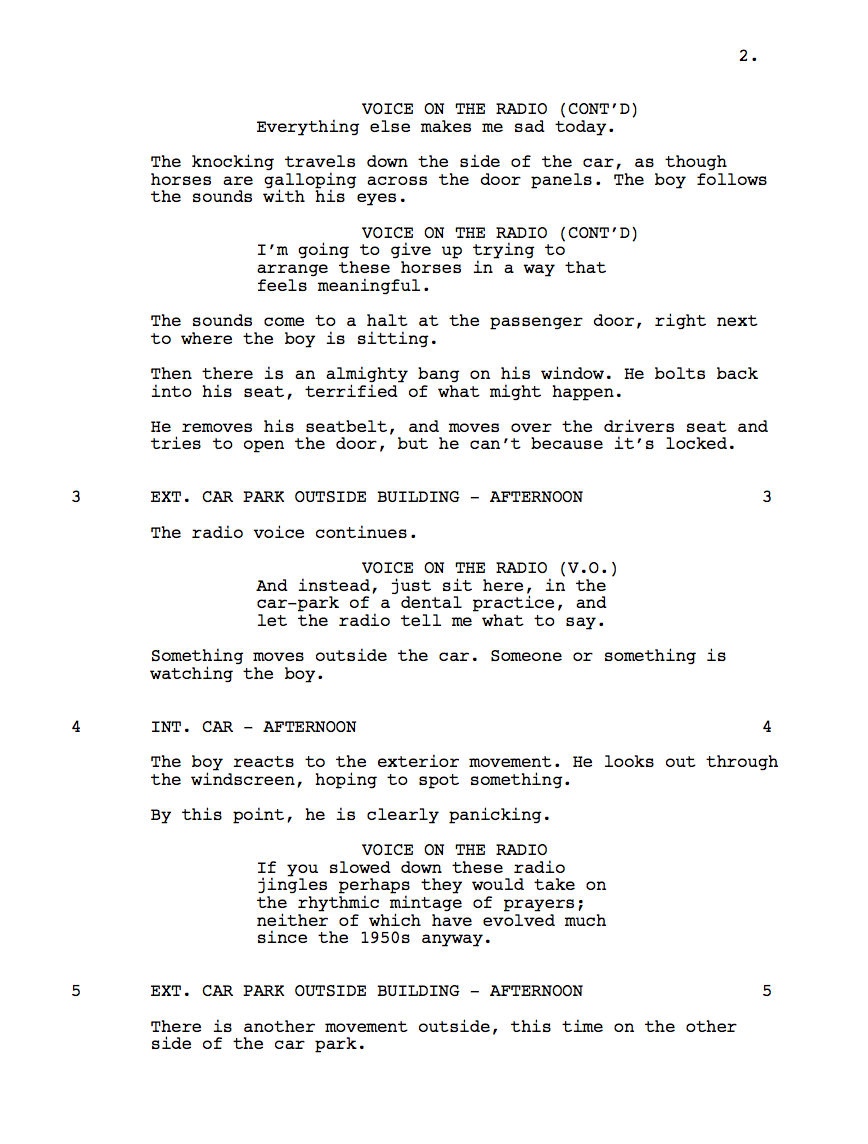
SCRIPT DRAFT 3
For this third draft, I have removed all elements from my previous idea, apart from the opening scene when the car drives into the car park, and the mother gets out. That scene still works for this new idea. I have also removed the woodland location as this is no longer needed. Both characters from the original idea are still present.
I have added in a few tense moments that help build onto the terrifying environment this script is supposed to exist in. These include:
- Knocking sounds on the door panels and roof.
- A boot that opens itself, and slams shut unexpectedly.
- Doors that lock themselves.
- A mysterious figure lurking around outside the car.
- Doors that open on their own.
- A final sequence filmed using the reflection off the rear view mirror.
My new locations are:
- INT. CAR- AFTERNOON
- EXT. CAR PARK OUTSIDE BUILDING- AFTERNOON
This script also includes a few camera movements to help me when I work on my shot list, and to help my visualise my scenes.
Currently, after reading the script through a few times, I can't see any changes that I need to make, so this will probably be the final version I use for the film.
Below are some screenshots of the first few pages: