Here is the final cut of my Drama- "Joshua Jones Directs Breaking Bad"
Friday, 26 February 2016
Directions: The Self-Portrait
Here is the final cut of my Self-Portrait: "Static- A Self-Portrait Directed by Joshua Jones"
Directions: Project Evaluation
PRE-PRODUCTION
For my final part of pre-production on the drama I broke down the script and started working on costume design.
Whilst doing all of this, I spent some time doing pre-production work on my Self-Portrait. Before thinking about what I was going to do, I spent some time researching Self-Portrait films. I found four very interesting portraits that all had different themes and styles. Not too long after completing my research, I had an idea, which I wrote about here.
After I knew what my idea was, I began carrying out research to help aid me. I looked at a few Film Riot tutorials on some smoke and lighting techniques, as they linked to my initial ideas. I then spent some time preparing for the shoot. This involved creating mood boards; looking through old photo albums; rebuilding sets and props from old projects; writing a script; testing some shots; and creating a shot list.
Overall I think my pre-production process was very effective in aiding the final product. I did more pre-production on these two films, than I have ever done on anything before. I think my additional research into techniques and television programmes helped me direct my own vision, as it allowed me to think about what has been done before and how I could work with it, and re-imagine it. I think my research into other self-portraits helped me understand what a self-portrait was and what they tended to be about. This allowed me to develop my own ideas. And finally I think all of the pre-production paperwork I did helped me stay organised and helped me keep my actors up to date, which ultimately meant that the shoot day went very smoothly.
Once all of my pre-production was complete, it was time to start production. I had created scripts; shot lists; character profiles; costume design documents and more, so I knew I was ready to start filming.
Filming got off to a bad start because bad winds had mucked up train times, meaning my camera op and one of my actors were late. However, because I had created a pretty tight schedule, I was able to see what I could move around to keep us on track.
After arriving at the location we set up, I briefed the cast and crew, and we got started. We had a couple of rehearsals and then Gus, my actor, was ready to go. Chris was brilliant and we were able shoot all of his half of the scene on ahead of schedule, which meant we had time for a few extra shots.
Not long after finishing with Chris, Philip, my second actor, arrived early. After a short break, I briefed the cast and crew and we got started. For this part of the scene we had to shoot all of the shots that had both actors in them. Once this was done, Chris headed home and we took lunch.
After lunch we began shooting Philip's half of the scene. Unfortunately due to extreme wind, we had to change his location in the scene, which meant some of our shots from earlier in the day were unusable. After running Philip through the scene, we began shooting. He was great and again we finished early, meaning we had time to get extra coverage. Then we were done with Scene 2.
That afternoon we headed to our second location and began shooting Scene 1. It was still very windy, so I knew I wouldn't get any usable sound. Luckily, there was no dialogue in this scene, so if I didn't get any sound, it wasn't a major issue.
After running Philip through the scene, we began shooting, starting with the interior shots. Once these were complete, we moved outside and shot the second half of the scene. After running Philip through this part of the scene, we began filming and not long after that we were done, with two hours to spare. We grabbed a few extra shots, packed up, and headed off. The next day I did come back to the location to grab another shot, as one from the shoot day wasn't usable.
To see more about filming the Self-Portrait, go here.
The next day, I began filming my Self-Portrait. I began by setting up the location. I used my bedroom but I didn't want it to look how it normally does. I removed a lot of things to make space; I then hung up old photos; I placed a few of my film props around the room; I used some lamps and LED strips to light the room; and finally I filled the room with fog.
Once the room was set up I began filming. I went around my room, filming each section. It was pretty simple, I didn't try and do anything too crazy. For the final shots, that I am in, I asked my brother to operate the camera, as he knows my shooting style. Finally, I sat down and shot the stop-motion opening, which took a while. After all of this, I was done.
Overall I think filming for both films went really well. I didn't really encounter any major issues, apart from the wind during the drama filming. I had to think on my feet at all times when shooting the drama, to come up with ways to work around the wind. I decided I would do a complete sound edit in post, meaning I didn't worry about capturing too much sound on location, apart from the dialogue. I think I was a good director. The actors said afterwards that I did a good job and that they hadn't worked with anyone like me before, but they enjoyed it. I think they always knew what was going on and they knew the characters and the script inside out. For the Self-Portrait I think I did a good job maintaining one vision throughout, even the parts I didn't shoot, and I beleive this is because of my directing abilities, which I have learnt throughout this unit. Overall I think production for both films couldn't have gone better.
I started this unit knowing I wanted to direct Breaking Bad, and so I was constantly think about which scenes I could do. I spend some of my christmas holiday rewatching every episode of Breaking Bad. As I did this I kept a list of every scene I could choose. By the time we started term 2, I had decided which scenes I was going to do, which can be found here. Now that I had chosen my scenes, I had to start writing the script and start thinking about preparing for the shoot. I started to think about how I could apply my own vision to the show and my initial idea was to direct it as though it was a British adaptation.
Next I wrote the script and started looking for possible locations. I found the script writing very easy as all I had to do was watch my chosen scenes back and write down what I could see and hear. However, I did have to think carefully about scene descriptions as I had to come up with them myself and adjust them so they fitted my idea of the scene, not the original. In terms of locations, I was looking for an industrial site and a small, quiet street.
Next I began looking for actors to play my characters. To do this I posted an ad on Casting Call Pro. I also decided what my final locations would be and started writing the second draft of my script. A few weeks are posting my ad, I had my final cast. Over the next few weeks I began working on preparing for the shoot. I made and bought props; I prepared call sheets and shot lists; and I created character profiles.
Whilst doing all of this I was constantly carrying out research to help develop my knowledge and skills. I looked at directors like Steven Spielberg and J.J. Abrams; and I looked at tv shows like Better Call Saul and The Walking Dead. I also spent some time looking at Breaking Bad's visual style, sound design and directors. And finally I continued to use Film Riot tutorials to develop my practical/production skills.
Throughout the pre-production process I spent some time taking part in workshops to help develop my camera/sound/lighting skills and my directing skills. This included workshops on using the Canon 7D camera; workshops on using location lighting kits; and directing workshops with Steve Finn.
Throughout the pre-production process I spent some time taking part in workshops to help develop my camera/sound/lighting skills and my directing skills. This included workshops on using the Canon 7D camera; workshops on using location lighting kits; and directing workshops with Steve Finn.
For my final part of pre-production on the drama I broke down the script and started working on costume design.
Whilst doing all of this, I spent some time doing pre-production work on my Self-Portrait. Before thinking about what I was going to do, I spent some time researching Self-Portrait films. I found four very interesting portraits that all had different themes and styles. Not too long after completing my research, I had an idea, which I wrote about here.
After I knew what my idea was, I began carrying out research to help aid me. I looked at a few Film Riot tutorials on some smoke and lighting techniques, as they linked to my initial ideas. I then spent some time preparing for the shoot. This involved creating mood boards; looking through old photo albums; rebuilding sets and props from old projects; writing a script; testing some shots; and creating a shot list.
Overall I think my pre-production process was very effective in aiding the final product. I did more pre-production on these two films, than I have ever done on anything before. I think my additional research into techniques and television programmes helped me direct my own vision, as it allowed me to think about what has been done before and how I could work with it, and re-imagine it. I think my research into other self-portraits helped me understand what a self-portrait was and what they tended to be about. This allowed me to develop my own ideas. And finally I think all of the pre-production paperwork I did helped me stay organised and helped me keep my actors up to date, which ultimately meant that the shoot day went very smoothly.
Once all of my pre-production was complete, it was time to start production. I had created scripts; shot lists; character profiles; costume design documents and more, so I knew I was ready to start filming.
Filming got off to a bad start because bad winds had mucked up train times, meaning my camera op and one of my actors were late. However, because I had created a pretty tight schedule, I was able to see what I could move around to keep us on track.
After arriving at the location we set up, I briefed the cast and crew, and we got started. We had a couple of rehearsals and then Gus, my actor, was ready to go. Chris was brilliant and we were able shoot all of his half of the scene on ahead of schedule, which meant we had time for a few extra shots.
Not long after finishing with Chris, Philip, my second actor, arrived early. After a short break, I briefed the cast and crew and we got started. For this part of the scene we had to shoot all of the shots that had both actors in them. Once this was done, Chris headed home and we took lunch.
After lunch we began shooting Philip's half of the scene. Unfortunately due to extreme wind, we had to change his location in the scene, which meant some of our shots from earlier in the day were unusable. After running Philip through the scene, we began shooting. He was great and again we finished early, meaning we had time to get extra coverage. Then we were done with Scene 2.
That afternoon we headed to our second location and began shooting Scene 1. It was still very windy, so I knew I wouldn't get any usable sound. Luckily, there was no dialogue in this scene, so if I didn't get any sound, it wasn't a major issue.
After running Philip through the scene, we began shooting, starting with the interior shots. Once these were complete, we moved outside and shot the second half of the scene. After running Philip through this part of the scene, we began filming and not long after that we were done, with two hours to spare. We grabbed a few extra shots, packed up, and headed off. The next day I did come back to the location to grab another shot, as one from the shoot day wasn't usable.
To see more about filming the Self-Portrait, go here.
The next day, I began filming my Self-Portrait. I began by setting up the location. I used my bedroom but I didn't want it to look how it normally does. I removed a lot of things to make space; I then hung up old photos; I placed a few of my film props around the room; I used some lamps and LED strips to light the room; and finally I filled the room with fog.
Once the room was set up I began filming. I went around my room, filming each section. It was pretty simple, I didn't try and do anything too crazy. For the final shots, that I am in, I asked my brother to operate the camera, as he knows my shooting style. Finally, I sat down and shot the stop-motion opening, which took a while. After all of this, I was done.
Overall I think filming for both films went really well. I didn't really encounter any major issues, apart from the wind during the drama filming. I had to think on my feet at all times when shooting the drama, to come up with ways to work around the wind. I decided I would do a complete sound edit in post, meaning I didn't worry about capturing too much sound on location, apart from the dialogue. I think I was a good director. The actors said afterwards that I did a good job and that they hadn't worked with anyone like me before, but they enjoyed it. I think they always knew what was going on and they knew the characters and the script inside out. For the Self-Portrait I think I did a good job maintaining one vision throughout, even the parts I didn't shoot, and I beleive this is because of my directing abilities, which I have learnt throughout this unit. Overall I think production for both films couldn't have gone better.
POST PRODUCTION
To see more about editing the Self-Portrait, go here. To see more about editing the Drama, go here.
To see more about editing the Self-Portrait, go here. To see more about editing the Drama, go here.
I began this process by editing the Self-Portrait, as that required less work. I began the process by assembling a rough cut, which pretty much involved putting the footage in order and fine tuning the cuts. After the rough cut viewing I began working on the sound design, which involved using the clip mixer to mix all of the sound layers together, adjusting balance and dB levels. I also began working on the stop-motion sequence but eventually decided not to use it. Next I added in some glitch effects. And finally I did some colour correction using the RGB curves and Lumetri Scopes. After the fine cut viewing, no changes had to be made.
Next I started working on the drama. I split the piece into separate sequences to make editing it more organised. I then assembled a rough cut, which involved putting all the shots in order and fine tuning the cuts.
Next I started working on the sound design for Scene 1. This was a long process, as I had no sound to use from the shoot day. I downloaded all of my sounds from the YouTube Audio Library. Then I used the clip mixer to mix all of the sounds, along with my music, together, adjust balance and dB levels. Finally I colour corrected and graded all of the footage.
And then did the same for Scene 2. Finally I created my opening titles and closing credits.
After the rough cut viewing, I made a few changes to some cuts and some of the sound design in Scene 1. I also went out a shot an additional shot for Scene 2. Then after the fine cut viewing, I adjusted a few more cuts and the final cut was ready.
Overall I think the post production process went really well. I didn't encounter any major issues. I had a lot of footage to work with, which meant I had lots of angles to choose from. In terms of sound design, I think I did a good job covering the fact that I had no location sound, apart from the dialogue. For both films I think I cut them together very tightly, and I think I was able to maintain my own vision throughout. I'm very happy with the final films.
OVERALL EVALUATION: CRITICAL REFLECTIONS
- Strengths-
- My organisation skills made preparing for the shoot very easy. I was able to produce detailed call sheets and schedules that ensured my cast and crew knew what they were doing at all times. I was able to sort locations out ahead of time, meaning I didn't need to worry about not having anyway to shoot.
- My overall production skills were very good. I ensured everyone knew what they were doing. I rehearsed the scenes with the actors before shooting anything to ensure they knew how I wanted them to act the scene out, which helped keep continuity. I stayed in contact with my DOP at all times to ensure that she knew how I wanted each scene to be shot. I also allowed her to have some creative input as I believe that having input from others, who may see a scene from a different perspective, can be really useful.
- My editing skills came in handy, especially as I had a lot of footage to cut together. My sound design skills were very useful. especially considering the fact that I had no location sound. And finally my colour correction and grading skills came in handy, as I needed to match the Breaking Bad style, not only by framing the shots in a certain way, but by colouring the shots in a certain way as well.
- I think my directing skills were good. I applied everything I learnt throughout the unit. My actors enjoyed working with me and said I was a good director, which is always a positive. Everyone knew what they were doing, and understood my vision. I think this comes across well on screen.
- Weaknesses-
- I think one of my weaknesses was trying to direct my own vision, when I was applying to something that already existed. I found that some of my shots were very similar to the ones used in the original scene, and I believe this was because I couldn't get that image out of my head when deciding on my own framing.
- I should have thought more about sound before booking equipment. I decided not to book out a boom mic, which would have come in handy in the windy conditions I ended up filming in.
- Possible Development- What did I learn?
- If I were to do this again:
- I would book out everything I think I need, and not restrict my equipment because I didn't want to carry too much around.
- I would not spend too much time focusing on the original scene, instead I would try and focus more on my vision of the scene, to avoid and copycat shots.
- And finally, I would try filming something a little more challenging than the scenes I chose. I need to step out of my comfort zone more.
CONCLUSION
Overall I am very happy with the final product. I think I cut together two good films, that I can be proud of. I think the reason for this, is all of the pre-production work I put into this unit, compared to the last unit, where I should have done more research. To summarise, I think the two films are very good, and I think this is down to good sound design; good acting; a great script, written by the brilliant writers of Breaking Bad.
Thursday, 25 February 2016
Directions: The Real Breaking Bad VS My Breaking Bad

Once I had the final cut of my drama, I could compare it to the original scenes from Breaking Bad.
Here are the comparisons (Breaking Bad on the left, my Breaking Bad on the right).
SCENE 1
 |
| Frame match |
 |
| Frame match |
 |
| Frame match |
 |
| Frame match |
 |
| Frame match |
 |
| Classic Breaking Bad Style Wide Shot |
SCENE 2
 |
| Frame match |
 |
| Frame match |
 |
| Frame match |
 |
| Breaking Bad style POV shot |
Directions: Fine Cut Feedback
After taking on all the feedback from the rough cut viewing, I put together a fine cut of my Drama and Self-Portrait, and showed them to Simon for some final feedback:
DRAMA
DRAMA
- Adjust one of the shots when Gus is looking in Walt's direction as the head movement between the two shots does not match.
- Change the point at which the bomb is revealed, as it is currently comes in too early.
- Apart from those small changes, everything else is fine.
SELF-PORTRAIT
- No changes need to be made.
- The sound design is very good.
CHANGES TO MAKE
- Adjust the cutting point on the shots of Gus looking around, so the head movement is the same in both shots.
- Move the reveal of the bomb further down the timeline.
Directions- Rough Cut Feedback
After putting together a rough cut of my Drama and Self-Portrait, I showed them to Simon for some feedback:
DRAMA
SELF-PORTRAIT
CHANGES TO MAKE
DRAMA
- Change a part of the sound design in Scene 1. Currently the ambience is the sound of crickets in the distance. This feels to American, and I have chosen to direct Breaking Bad as though it is British.
- Change the build up music in Scene 1. When Walt walks towards the house, a piece of music helps to build tension. The current track doesn't work very well or fit with the rest of the scene.
- Add a shot of the bomb under the car in Scene 2. If you haven't seen the episode, you don't know there is a bomb under the car, and so I need to show that.
- Edit some of the cuts in Scene 2 to make it even tighter. E.g. As Walt ducks down inside the car, it needs to cut to him quicker.
- Adjust the shot that shows Gus approaching the car as it can confuse the audience a little because of the angle it was shot at.
- Apart from those small changes, everything else is fine.
SELF-PORTRAIT
- Work on the sound design as it currently has no sound at all.
- Apart from that the visuals are absolutely fine. Has a very Spielberg like feel to it.
CHANGES TO MAKE
- Replace the cricket sounds with something more British.
- Replace the build up music in Scene 2 with something that fits better.
- Go out and film a shot of the bomb under the car to add it later.
- Edit some of the cuts, make them tighter.
- Adjust the shot of Gus approaching the car.
- Work on the sound design for the Self-Portrait.
Directions: Editing- Drama
Once all the filming for my Drama was complete, it was time to edit. I have not gone into too much detail here as a lot of the work involved tiny fine tuning details.
EDITING: DRAMA
I began the edit by importing all of my footage into Adobe Premiere Pro. I then used the bins to organise all of the footage and audio. For example, I had a bin for each scene; a bin for all the separate audio; a bin for the sound effects; and a bin for the music. I also created five sequences to work in: Scene 1, Scene 2, Sync Clips, Credits, and Final Cut. Next I went through each clip and created an in and out point for the sections I thought I could use in the final cut.
OPENING TITLES AND CREDITS
EDITING: DRAMA
 |
| Some of the bins |
I began the edit by importing all of my footage into Adobe Premiere Pro. I then used the bins to organise all of the footage and audio. For example, I had a bin for each scene; a bin for all the separate audio; a bin for the sound effects; and a bin for the music. I also created five sequences to work in: Scene 1, Scene 2, Sync Clips, Credits, and Final Cut. Next I went through each clip and created an in and out point for the sections I thought I could use in the final cut.
| The sequences |
SCENE 1
Step 1: Assembly
Next I started to assemble the footage in Scene 1. I didn't worry about fine tuning any cuts yet, I just wanted to get all of my shots in order. I went through the footage and selected the shots I wanted, and then assembled them in the sequence. Whilst I was assembling the footage I noticed that, as I had expected, the extreme wind had ruined all of the sound, even the shots inside the car because we had to shoot from outside the car. I will have to fix this later when working on the sound design.
Step 2: Fine Tuning
Next I watched the sequence back and began fine tuning the cuts, using the ripple delete and rolling edit tools. I adjusted the cuts, and swapped a few shots around. After viewing the opening shot back, I decided it didn't look very good. The wind meant that the shot was very shaky, and so I went back the next day and filmed the shot again, using the same car. Because it is shot from a distance, I didn't need to worry about getting my actor to come back.
Step 3: Sound Design
Next I began working on the sound design. This was a very important step as I had none of my original sound to work with. Before starting, I went out to the car I used are recorded the sounds of the engine being turned on and off, as I didn't do this on the shoot day. I then went onto the YouTube Audio Library and downloaded all of the sounds I thought I could use.
Once I had done all of that, I began putting the sound into the sequence. I started by adding in my ambience sounds which were the sound of crickets in the distance and the sound of a light breeze in the air. Next I added in all the foley sounds, like Walt's footsteps and the sounds of his movement inside the car (e.g. handbrake pull, ignition key turn). Then I added in all the sound effects, like Walt's phone ringing; and the sound of the car as it pulled into frame. Finally I added in the dialogue, which was just Gus's line that is said through Walt's phone.
After I had added all of the sound layers, I had to mix it all together. To do this I used the track and clip mixers. I used them to adjust the balance and dB levels of each audio clip, cutting it in time with the shot changes. I had to think carefully about how I could blend all of the sound layers together so they sound like the how they would all sound if you were there in real life as the scene took place. All the sound you hear when you watch the scene back was added in post as all location sound was unusable.
 |
| Using the clip mixer |
Once I had locked down all of the sound design, I started working on the music. I had chosen two tracks from the original Breaking Bad soundtrack to use. The first track, "Long Walk Alone", was used in the original scene, however the not the entire scene. For the second half of the scene I had to find a different track. I chose to use one entitled "Baby's Coming". I used the clip mixer to mix the two tracks together.
Step 4: Colour Correction & Grading
Now that I had sound and visuals I was happy with, I began colouring the footage. I started this process by first correcting all of the footage. This meant I was adjust the levels to bring the colours back to how they looked in real life, not how the camera saw them. To do this I used the Lumetri Scopes and the RGB Curves. I went through each shot and balanced the RGB levels and the black and white levels. After I had done this, I could see that the colours and the blacks and whites were more true to how they were in real life.
Once I had corrected the footage, I used an adjustment layer and the RGB curves to grade the footage. It's incredible how much grading you can do with just one tool. By adjusting the RGB curves for the highlights, midtones and shadows, I was able to give the footage the look I was hoping for. For this scene I went for a very golden look, as I felt this fit the Breaking Bad style.
 |
| Using the RGB curves and the Lumetri Scopes |
 |
| Before and after colour correction & grading |
And that was it for Scene 1.
SCENE 2
Step 1: Assembly
Before doing anything, I used my sync clips sequence to sync up my dialogue and my footage. I recorded all of Walt's dialogue separately on a clip mic.
Next I started to assemble the footage in Scene 2. I didn't worry about fine tuning any cuts yet, I just wanted to get all of my shots in order. I went through the footage and selected the shots I wanted, and then assembled them in the sequence. For the shots with dialogue, I just copied the clips from the sync clips sequence. Whilst I was assembling the footage I noticed that all of the audio, apart from the dialogue, had been ruined by the wind, something I had expected. This meant, like Scene 1, I would have to do a lot of sound design work.
Step 2: Fine Tuning
Next I watched the sequence back and began fine tuning the cuts, using the ripple delete and rolling edit tools. I adjusted the cuts, and swapped a few shots around. I had to work carefully to cut each shot so the pacing of the scene was right.
Step 3: Sound Design
Once I had a usable set of visuals, I began working on the sound design. This was going to be an important step as I couldn't use any of my original sound. I went onto the YouTube Audio Library and downloaded all of the sounds I thought I could use. I then imported all of my sounds and began adding them to the sequence.
I started by adding my ambience. For this scene I had chosen distant highway and nearby city traffic sound effects. I also decided to add in a distant ambulance and a helicopter flying over, two sounds I heard in the original scene from Breaking Bad. Next I started to add in all of my foley sounds, like Gus's footsteps; and Walt's body movements inside the car. After that I began to add in all of my sound effects, like the sound of Walt's radio turning on.
After I had added all of the sound layers, I had to mix it all together. To do this I used the track and clip mixers. I used them to adjust the balance and dB levels of each audio clip, cutting it in time with the shot changes. I had to think carefully about how I could blend all of the sound layers together so they sound like the how they would all sound if you were there in real life as the scene took place. All the sound you hear when you watch the scene back was added in post as pretty much all location sound was unusable.
Once all of the sound was mixed, I added in a music track. I was able to use the full soundtrack from the original scene. The track is called "Parking Garage Standoff". Because the timing of my scene was slightly different to the original scene, I did have to cut and mix the track so it fitted my cuts and action.
Step 4: Colour Correction & Grading
Same as before, now that I had sound and visuals I was happy with, I began colouring the footage. I started this process by first correcting all of the footage. This meant I was adjust the levels to bring the colours back to how they looked in real life, not how the camera saw them. To do this I used the Lumetri Scopes and the RGB Curves. I went through each shot and balanced the RGB levels and the black and white levels. After I had done this, I could see that the colours and the blacks and whites were more true to how they were in real life.
Once I had corrected the footage, I used an adjustment layer and the RGB curves to grade the footage. By adjusting the RGB curves for the highlights, midtones and shadows, I was able to give the footage the look I was hoping for. For this scene I went for a very grey/light blue look, as I wanted the scene to have an industrial feel to it. I wanted all of the concrete to stand out, and the sky to look natural.
 |
| Before and after colour correction & grading |
OPENING TITLES AND CREDITS
For the opening titles I used After Effects to recreate the Breaking Bad intro and add my own custom text. This can be found here
For the closing credits, I used Premiere to recreate the style of the Breaking Bad credits. This style involves making the first letter of the first name of each person green. This was pretty simple but effective. I then used DaFont to find a font that closely matched the one used in the show.
 |
| Recreating the closing credits |
And that was it. The rough cut was complete.
(UPDATE) EDITING AFTER THE ROUGH CUT FEEDBACK
After receiving feedback on the rough cut, these were the changes I made.
I changed the ambience in Scene 1 to something that was more British sounding. I used the sounds of birds singing in the distance as this was what I could hear when I stood on location in real life. I also changed the build up music to a track called "Searching for Jessie". The music fit the scene better and helped build up the tension very effectively. I then used the clip mixer to mix all the sound again.
I had to make a prop bomb and attach it to the car I used in the scene. I then shot some footage of the bomb so that I could cut it into the scene. I decided to add it in after Walt picks up his walkie talkie. I then used After Effects to add a little red light to the bomb, so the audience knew it was active throughout the scene.
And finally I edited a few of the cuts to make them a little tighter.
(UPDATE) EDITING AFTER THE FINE CUT FEEDBACK
After receiving feedback on the fine cut, these were the changes I made.
I adjust a few more cuts to make the scene even tighter. I also swap two shots around as Gus approaches the car to help avoid any confusion as to which direction he was facing.
And finally, I moved the bomb reveal further up the timeline so it cut in after it is revealed that Gus is approaching a car.
And that was it. the final cut was ready for submission.
 |
| The final sequence for Scene 1 |
 |
| The final sequence for Scene 2 |
 |
| The final cut with both sequences, titles and credits |
Wednesday, 24 February 2016
Directions: Editing- Self-Portrait
Once all the filming for my Self-Portrait was complete, it was time to edit...
EDITING: SELF-PORTRAIT
I began the editing process by importing all of my footage in Adobe Premiere Pro, and reviewing it. I went through each clip and created an in and out points on the sections of the clips I thought I might use in the final cut.
Next I roughly assembled all of the clips in the order I wanted them to play in. I didn't worry about fine tuning the cuts yet because I wanted to get the order right first. After assembling all of the footage, I added in an opening title and a closing credit, which for now was just some plain white text.
Once that was all done I began fine tuning some of the cuts. I went through each shot and adjusted it accordingly, trying to keep some sort of continuity throughout. I didn't worry about any sound design yet because I still needed to think about what I was going to do for that. After I had finished fine tuning the cuts, the rough cut was complete.
I still needed to edit the stop motion part of the film, and work on the sound design.
(UPDATE) EDITING AFTER THE ROUGH CUT VIEWING
After I received feedback on my rough cut, I began working on the sound design, as this was the only thing Simon picked up on. The visual side of things was fine, and needed no adjustment.
I began the second edit by adding in the stop motion part of the film. I put all of the photos together in a separate sequence and then added the sequence into the final edit.
I then used the rate stretch tool to adjust the timing of the stop motion sequence. After viewing the sequence back a couple of times, I decided it didn't fit in with the rest of the film, and so I removed it. Instead I replaced it with a wide shot of the lego set, followed by the shot of the lego man looking up at the photo. I beleive this worked much better than the stop motion sequence.
Next, I added in some glitch effects using some pre made overlays. I added one in under the title and one under the credits. I also added a few in throughout the film to bridge some shots that were in different parts of the room. Then, I added in some cut aways. For example, when the camera dollies toward the TV and the Mac, some film clips and photos from previous projects cut in really quick under a glitch overlay.
Once this was all done, I locked in the visuals and began working on the sound design. I started with my ambience layer, which in this case was a thunderstorm. I chose this because it added an eerie atmosphere to the film. Next I added in some foley sounds, like the sound of the door opening and closing. And finally I added in all of the sound effects, which are the most important part in this case, hence why I did them last. Each section of the film had a different sound effect or effects that helped tell the story. For example, the baby cards have the sound of a baby crying in the background; the photos of me as a baby hooked up to machines have a heart rate monitor playing in the background; and the shots of my film props have a film projector sound playing in the background.
After I had chosen all of my sounds and assembled them in the sequence, I began mixing it all together. To do this I used the track and the clip mixer. I went through each section of sound, adjusting balance and dB level. I had to use the razor tool to cut the sounds up so they fit each clip, meaning I could adjust balance and dB level depending on camera position and movement. For example, as the camera pans away from the baby cards, the sound of the baby fades out to the right of the screen.
Finally, after I had completed all of the sound design, I did some colour correction, using an adjustment layer to edit all the clips at once. I didn't need to grade at all because I think the footage looked they way I wanted it too straight out of the camera. To correct the footage, I used the Lumetri Scopes and the RGB curves. I only made a few small adjustments to the master curve, I didn't mess with the colours because I liked them as they were. In the end all I did was bring down the highlights a little and increase the shadows a little, I didn't change the midtones.
After I had completed all of the colour correction, the fine cut was complete and ready for the fine cut viewing.
(UPDATE) EDITING AFTER THE FINE CUT FEEDBACK
The feedback from the fine cut viewing was very positive. No changes need to be made. The final cut is complete.
EDITING: SELF-PORTRAIT
I began the editing process by importing all of my footage in Adobe Premiere Pro, and reviewing it. I went through each clip and created an in and out points on the sections of the clips I thought I might use in the final cut.
Step 1: Assembly
Next I roughly assembled all of the clips in the order I wanted them to play in. I didn't worry about fine tuning the cuts yet because I wanted to get the order right first. After assembling all of the footage, I added in an opening title and a closing credit, which for now was just some plain white text.
Step 2: Fine Tuning
Once that was all done I began fine tuning some of the cuts. I went through each shot and adjusted it accordingly, trying to keep some sort of continuity throughout. I didn't worry about any sound design yet because I still needed to think about what I was going to do for that. After I had finished fine tuning the cuts, the rough cut was complete.
 |
| The rough cut |
(UPDATE) EDITING AFTER THE ROUGH CUT VIEWING
After I received feedback on my rough cut, I began working on the sound design, as this was the only thing Simon picked up on. The visual side of things was fine, and needed no adjustment.
Step 3: Stop Motion Sequence
I began the second edit by adding in the stop motion part of the film. I put all of the photos together in a separate sequence and then added the sequence into the final edit.
 |
| The stop motion sequence |
Step 4: Effects
Next, I added in some glitch effects using some pre made overlays. I added one in under the title and one under the credits. I also added a few in throughout the film to bridge some shots that were in different parts of the room. Then, I added in some cut aways. For example, when the camera dollies toward the TV and the Mac, some film clips and photos from previous projects cut in really quick under a glitch overlay.
Step 5: Sound Design
Once this was all done, I locked in the visuals and began working on the sound design. I started with my ambience layer, which in this case was a thunderstorm. I chose this because it added an eerie atmosphere to the film. Next I added in some foley sounds, like the sound of the door opening and closing. And finally I added in all of the sound effects, which are the most important part in this case, hence why I did them last. Each section of the film had a different sound effect or effects that helped tell the story. For example, the baby cards have the sound of a baby crying in the background; the photos of me as a baby hooked up to machines have a heart rate monitor playing in the background; and the shots of my film props have a film projector sound playing in the background.
After I had chosen all of my sounds and assembled them in the sequence, I began mixing it all together. To do this I used the track and the clip mixer. I went through each section of sound, adjusting balance and dB level. I had to use the razor tool to cut the sounds up so they fit each clip, meaning I could adjust balance and dB level depending on camera position and movement. For example, as the camera pans away from the baby cards, the sound of the baby fades out to the right of the screen.
 |
| Using the clip mixer |
Step 6: Colour Correction
Finally, after I had completed all of the sound design, I did some colour correction, using an adjustment layer to edit all the clips at once. I didn't need to grade at all because I think the footage looked they way I wanted it too straight out of the camera. To correct the footage, I used the Lumetri Scopes and the RGB curves. I only made a few small adjustments to the master curve, I didn't mess with the colours because I liked them as they were. In the end all I did was bring down the highlights a little and increase the shadows a little, I didn't change the midtones.
 |
| RGB Curves & Lumetri Scopes |
 |
| The Final Edit |
The feedback from the fine cut viewing was very positive. No changes need to be made. The final cut is complete.
Directions: Filming- Self-Portrait
Once I had completed filming my Drama, I focus on filming my Self-Portrait...
FILMING: SELF PORTRAIT
My location for the self-portrait was my bedroom. I wasn't just going to shoot it as it was so I spent a few hours dressing it before I began. I removed anything I didn't want in shot; hung up some old photos; placed a few of my film props around; used some lamps and an LED strip to light the room; and finally filled the room with fog.
Lighting was very important and so I spent a while adjusting the positioning of lamps and an LED strip to ensure it was right for the film. I then filled the room with fog so the lights would stand out more.
Finally, I put a static graphic onto my TV, PC and Mac.
Once I had finished setting my room up, I grabbed the camera, set it up and got started.
I started by shooting the scenes that took place after the initial stop-motion opening, which I was going to do last. I went around the room, filming each detail, in line with the shot list. I used the camera to tell a visual story. I moved around, remembering what the story was supposed to be, to ensure I shot each bit right.
It took me about an hour to do this. Next, I had to shoot the parts of the film that I was in. To do this I asked my brother to operate the camera. I told him what I had been doing and showed him some of the footage I had shot, so he had an idea of the shooting style. I have worked with on many occasions so he knows what my prefered shooting style is.
Once all of this was complete, I put the camera on a tripod and spent some time shooting the stop-motion parts of the video. This took a long time but it had to be done right. Finally, I went round and shot a few pickups I had thought of, and then I was done.
CONCLUSION
Overall I think the shoot went really well, and I think the resulting footage looks really nice. The shoot did take a while, which I should've planned for. I had wait for the sun to go down before I could start filming because the scene was set at night. This meant I ended up filming late into the night, something I wish I hadn't done, because I lost concentration whilst doing the stop-motion part. All in all, I think the footage came out just how I had imagined it, and I'm happy it did. Now it's time to edit...
FILMING: SELF PORTRAIT
My location for the self-portrait was my bedroom. I wasn't just going to shoot it as it was so I spent a few hours dressing it before I began. I removed anything I didn't want in shot; hung up some old photos; placed a few of my film props around; used some lamps and an LED strip to light the room; and finally filled the room with fog.
Lighting was very important and so I spent a while adjusting the positioning of lamps and an LED strip to ensure it was right for the film. I then filled the room with fog so the lights would stand out more.
Finally, I put a static graphic onto my TV, PC and Mac.
 |
| The final set design |
 |
| The final set design |
 |
| The final set design |
I started by shooting the scenes that took place after the initial stop-motion opening, which I was going to do last. I went around the room, filming each detail, in line with the shot list. I used the camera to tell a visual story. I moved around, remembering what the story was supposed to be, to ensure I shot each bit right.
It took me about an hour to do this. Next, I had to shoot the parts of the film that I was in. To do this I asked my brother to operate the camera. I told him what I had been doing and showed him some of the footage I had shot, so he had an idea of the shooting style. I have worked with on many occasions so he knows what my prefered shooting style is.
Once all of this was complete, I put the camera on a tripod and spent some time shooting the stop-motion parts of the video. This took a long time but it had to be done right. Finally, I went round and shot a few pickups I had thought of, and then I was done.
CONCLUSION
Overall I think the shoot went really well, and I think the resulting footage looks really nice. The shoot did take a while, which I should've planned for. I had wait for the sun to go down before I could start filming because the scene was set at night. This meant I ended up filming late into the night, something I wish I hadn't done, because I lost concentration whilst doing the stop-motion part. All in all, I think the footage came out just how I had imagined it, and I'm happy it did. Now it's time to edit...
Directions: Filming- Drama
All the pre-production was complete, which meant it was time to start filming "Joshua Jones Directs Breaking Bad"...
FILMING: SCENE 2
I had chosen to film both scenes in one day, which meant timing and organisation was essential, otherwise I'd run out of daylight. I shot scene 2 first because I needed both actors.
The day started off badly. I woke up to the news that Kent was being hit by 70mph winds, which meant filming outside all day was going to be difficult. Not only that but the wind also affected the trains, meaning my camera op, Ida Frank, was delayed by 20 minutes. Eventually we were able to collect both my camera op and my first actor, Chris Rochester, from the station. We then headed to the first location.
Once we arrived at the location, I asked the actor to sit tight for a few minutes whilst I checked the place out and set up equipment. After that was all complete, I quickly spoke to the manager of the location to check all was okay, and then we began rehearsals. I ran Chris through the scene, blocking out his movement as this was very important. In this scene, Gus, the character he played, notices something odd about his car, and so stays away from it. It was essential that Chris got the movement right, so it was clear that the character was nervous about approaching the car. Also because we were shooting multiple shots, the blocking helped me keep continuity.
Once I had ran Chris through the movements a couple of times, we rehearsed without the cameras and then we began to film. I told Ida what I was looking for and she framed it up perfectly every time. We began by filming the master shots, which were a few tracking shots, both in MS and CU. Next we shot a few pick ups on certain parts of the movement, this included a few shots of Chris standing facing away from the car, looking in the direction of Walt (the other character in the scene who is spying from a distance). The final two shots we did were replicas of two shots in the original scene that I wanted to pay homage too.
We finished ahead of schedule, and my second actor, Philip Holden, turned up early so it was great!
After our break, I explained to Philip what we had shot already and what we were going to shoot next. We were only going to shoot some pick ups on his side of the scene for the moment, not the whole scene. We began by shooting a POV shot of Gus's actions. This was meant to look as though it was shot through Walt's binoculars, so we shot if from a distance. Unfortunately we had an issue with continuity because a lorry that was parked in shot for all the footage we already had, decided to drive off. This was something I would have to think about attempting to cover in post. Finally we shot some shots over Walt's shoulder, of Gus's actions. Once these were complete, we took another break.
I no longer needed Chris so, after we had taken some cast and crew photos, said our goodbyes and recorded some V.O. for Scene 1, he headed off back to London for an audition. The rest of us had lunch, which I had provided by piling food into the back of one of the drivers cars.
During lunch Ida and I spoke about the wind situation. For Walt's side of the scene we needed to record some dialogue and we thought that the wind would ruin that. So I had to think fast and change the scene so we could work around this. I decided that we would place Walt inside a car, unlike the original scene where he is sitting outside hiding behind a wall. This way I knew my audio would be usable, because the actor would be inside and away from the wind.
Before shooting the rest of the scene, I ran Philip through the actions and dialogue, and after a few rehearsals, he was ready. Finally, we shot all of Walt's side of the scene, starting with the master shots, both in CU and MS. For one shot we paid homage to a shot from the original scene. Unfortunately, my OTS shots from earlier we now not usable because of a location change, and I couldn't shoot new ones because Chris had gone. This meant I could do any OTS work. To get around this I ensured I had enough coverage from every other angle. To record Walt's dialogue, we used a concealed clip mic, and in the end the audio was great.
Once this scene was complete, we wrapped up and headed off to the second location.
FILMING: SCENE 1
After a short break at my house, we arrived at the second location, ready to start filming Scene 1. Before we did anything, I got the driver to drive the car into position whilst we filmed it from a distance for our opening shot. Once this one done, I looked around and checked the location to see if it was still the same as I remember it. Everything looked good. After this, I got Philip to sit in the drivers seat. We then ran through the scene, blocking out and rehearsing the scenes. We had to rush a little because we needed to finish filming before the nearby schools finished, as all the kids walking home walk right past our location.
After rehearsals, we began shooting. We started by filming the master shots for the car interior. For each shot we ran through the scene all the way up until Walt leaves the car. Unfortunately, because of a horrible reflection on the windscreen, we couldn't shoot any shots in front of Walt whilst he was in the car, so I had to ensure I got enough coverage from all the other available angles.
Once we had shot all the interiors, we moved outside. It was still very windy, so we had to think carefully about how we could prevent the camera op from being blown over during a take. This meant I had to hold the camera as well for some shots to help with the stability. Before filming I ran Philip through the scene, blocking out his movements. Again, this was important because he had to stop walking towards the house at a certain moment so I could line it up in post with a phone call. He had to be a certain distance away from the house. After this was complete, we began filming, starting with the master shots, which included a tracking shot, and a few MS's and WS's. We managed to finish filming as kids started to appear, and I was happy that we had enough coverage.
Once all the filming was complete, we got back into the car and recorded some audio of Philip moving things in the car, so we could add them in post.
Finally, we wrapped! Philip headed off home and I took Ida back to the station. The shoot was over and I was relieved.
After transferring all the footage to my Mac I realised that the wind had ruined all of our audio, apart from Walt's dialogue in Scene 2. This meant I would have to do a lot of sound design work in post, something I was willing to try.
CONCLUSION
Overall I think the shoot went really well. Even though it was extremely windy, we worked around it and tried our best to not let it affect our coverage, however it did affect our audio. The actors were great. They took everything I said on board and really got into character. I couldn't have asked for two nicer people. Ida was fantastic, all of the footage looked great and that was down to her operation skills. This was my first time directing two professional actors, and I think I did a good job. Now it's time to edit...
 |
| Directing Chris Rochester |
 |
| My amazing cast. Chris Rochester & Philip Holden |
 |
| Cast & Crew |
I had chosen to film both scenes in one day, which meant timing and organisation was essential, otherwise I'd run out of daylight. I shot scene 2 first because I needed both actors.
The day started off badly. I woke up to the news that Kent was being hit by 70mph winds, which meant filming outside all day was going to be difficult. Not only that but the wind also affected the trains, meaning my camera op, Ida Frank, was delayed by 20 minutes. Eventually we were able to collect both my camera op and my first actor, Chris Rochester, from the station. We then headed to the first location.
Once we arrived at the location, I asked the actor to sit tight for a few minutes whilst I checked the place out and set up equipment. After that was all complete, I quickly spoke to the manager of the location to check all was okay, and then we began rehearsals. I ran Chris through the scene, blocking out his movement as this was very important. In this scene, Gus, the character he played, notices something odd about his car, and so stays away from it. It was essential that Chris got the movement right, so it was clear that the character was nervous about approaching the car. Also because we were shooting multiple shots, the blocking helped me keep continuity.
Once I had ran Chris through the movements a couple of times, we rehearsed without the cameras and then we began to film. I told Ida what I was looking for and she framed it up perfectly every time. We began by filming the master shots, which were a few tracking shots, both in MS and CU. Next we shot a few pick ups on certain parts of the movement, this included a few shots of Chris standing facing away from the car, looking in the direction of Walt (the other character in the scene who is spying from a distance). The final two shots we did were replicas of two shots in the original scene that I wanted to pay homage too.
We finished ahead of schedule, and my second actor, Philip Holden, turned up early so it was great!
After our break, I explained to Philip what we had shot already and what we were going to shoot next. We were only going to shoot some pick ups on his side of the scene for the moment, not the whole scene. We began by shooting a POV shot of Gus's actions. This was meant to look as though it was shot through Walt's binoculars, so we shot if from a distance. Unfortunately we had an issue with continuity because a lorry that was parked in shot for all the footage we already had, decided to drive off. This was something I would have to think about attempting to cover in post. Finally we shot some shots over Walt's shoulder, of Gus's actions. Once these were complete, we took another break.
I no longer needed Chris so, after we had taken some cast and crew photos, said our goodbyes and recorded some V.O. for Scene 1, he headed off back to London for an audition. The rest of us had lunch, which I had provided by piling food into the back of one of the drivers cars.
During lunch Ida and I spoke about the wind situation. For Walt's side of the scene we needed to record some dialogue and we thought that the wind would ruin that. So I had to think fast and change the scene so we could work around this. I decided that we would place Walt inside a car, unlike the original scene where he is sitting outside hiding behind a wall. This way I knew my audio would be usable, because the actor would be inside and away from the wind.
Before shooting the rest of the scene, I ran Philip through the actions and dialogue, and after a few rehearsals, he was ready. Finally, we shot all of Walt's side of the scene, starting with the master shots, both in CU and MS. For one shot we paid homage to a shot from the original scene. Unfortunately, my OTS shots from earlier we now not usable because of a location change, and I couldn't shoot new ones because Chris had gone. This meant I could do any OTS work. To get around this I ensured I had enough coverage from every other angle. To record Walt's dialogue, we used a concealed clip mic, and in the end the audio was great.
Once this scene was complete, we wrapped up and headed off to the second location.
FILMING: SCENE 1
After a short break at my house, we arrived at the second location, ready to start filming Scene 1. Before we did anything, I got the driver to drive the car into position whilst we filmed it from a distance for our opening shot. Once this one done, I looked around and checked the location to see if it was still the same as I remember it. Everything looked good. After this, I got Philip to sit in the drivers seat. We then ran through the scene, blocking out and rehearsing the scenes. We had to rush a little because we needed to finish filming before the nearby schools finished, as all the kids walking home walk right past our location.
After rehearsals, we began shooting. We started by filming the master shots for the car interior. For each shot we ran through the scene all the way up until Walt leaves the car. Unfortunately, because of a horrible reflection on the windscreen, we couldn't shoot any shots in front of Walt whilst he was in the car, so I had to ensure I got enough coverage from all the other available angles.
Once we had shot all the interiors, we moved outside. It was still very windy, so we had to think carefully about how we could prevent the camera op from being blown over during a take. This meant I had to hold the camera as well for some shots to help with the stability. Before filming I ran Philip through the scene, blocking out his movements. Again, this was important because he had to stop walking towards the house at a certain moment so I could line it up in post with a phone call. He had to be a certain distance away from the house. After this was complete, we began filming, starting with the master shots, which included a tracking shot, and a few MS's and WS's. We managed to finish filming as kids started to appear, and I was happy that we had enough coverage.
Once all the filming was complete, we got back into the car and recorded some audio of Philip moving things in the car, so we could add them in post.
Finally, we wrapped! Philip headed off home and I took Ida back to the station. The shoot was over and I was relieved.
After transferring all the footage to my Mac I realised that the wind had ruined all of our audio, apart from Walt's dialogue in Scene 2. This meant I would have to do a lot of sound design work in post, something I was willing to try.
CONCLUSION
Overall I think the shoot went really well. Even though it was extremely windy, we worked around it and tried our best to not let it affect our coverage, however it did affect our audio. The actors were great. They took everything I said on board and really got into character. I couldn't have asked for two nicer people. Ida was fantastic, all of the footage looked great and that was down to her operation skills. This was my first time directing two professional actors, and I think I did a good job. Now it's time to edit...
- Photo Credit: Ida Frank-
Sunday, 7 February 2016
Directions: Prop Build
Today I spent some time making two props for my shoot.
Los Pollos Hermanos Air Freshener
In Scene 2, one shot shows that in Gus's car he has a Los Pollos Hermanos Air Freshener hanging from the rear view mirror.
This tells the audience that this is Gus's car, and so I want to include it in my own scene.
I started by recreating the Los Pollos Hermanos logo in Photoshop. I had to do this because I could not find a version of the logo where the two chickens are inside the circle, without their legs layer over the outside of the circle. Here is an example of what I mean.
I then used the screenshot to estimate how big the air freshener was. Once I had done this I resized the logo and printed it out. I then cut it out, traced the circle on a sheet of cardboard, cut that cardboard circle out and stuck the logo onto it. I stuck a logo on both sides, so I could position on screen how I wanted to without having to worry about showing a blank side.
Finally I punched a hole in the top and tied it onto a piece of black string. Here it is:

Walter's Gun
In Scene 1 Walt has a gun. The gun is only seen on screen for a matter of seconds but I felt I better include it as it is important.
Because the gun is only included for a matter of seconds, I didn't want to go out and buy an expensive prop gun. Instead I decided to create a fake one.
I started by printing out two images of the same gun (one reversed). I then cut them out, traced around them on a piece of cardboard and then cut the cardboard out. Finally I stuck the guns onto the cardboard (one on each side), and it was finished.
Although the gun is just an image stuck onto cardboard, I believe if I film it right, and add the right sound effects, I can make it look real. I also think that because it isn't on screen for long, the audience may not even notice that it isn't real.
Los Pollos Hermanos Air Freshener
In Scene 2, one shot shows that in Gus's car he has a Los Pollos Hermanos Air Freshener hanging from the rear view mirror.
 |
| A screenshot from the original scene |
I started by recreating the Los Pollos Hermanos logo in Photoshop. I had to do this because I could not find a version of the logo where the two chickens are inside the circle, without their legs layer over the outside of the circle. Here is an example of what I mean.
 |
| BEFORE |
 |
| AFTER |
Finally I punched a hole in the top and tied it onto a piece of black string. Here it is:

Walter's Gun
In Scene 1 Walt has a gun. The gun is only seen on screen for a matter of seconds but I felt I better include it as it is important.
 |
| A screenshot from the original scene |
I started by printing out two images of the same gun (one reversed). I then cut them out, traced around them on a piece of cardboard and then cut the cardboard out. Finally I stuck the guns onto the cardboard (one on each side), and it was finished.
Although the gun is just an image stuck onto cardboard, I believe if I film it right, and add the right sound effects, I can make it look real. I also think that because it isn't on screen for long, the audience may not even notice that it isn't real.
Directions: Pre-Production- Shot List & Plan View
SHOT LIST
A few days ago I put together a shot list. This will help my camera operator understand what kind of shots I'm looking for. It will also help me visualise the film more during the pre-production process and during the production process. On the shot list I have detailed the scene, shot number, description, framing specs, takes, and additional notes.
CAMERA SCRIPT
I found that creating a camera script really helped me create the shot list. I could physically map out the action in the scene and then place cameras around it. This helped me explain the framing in my shot list, because I had a visual reference. I beleive this will also help my camera operator even more.
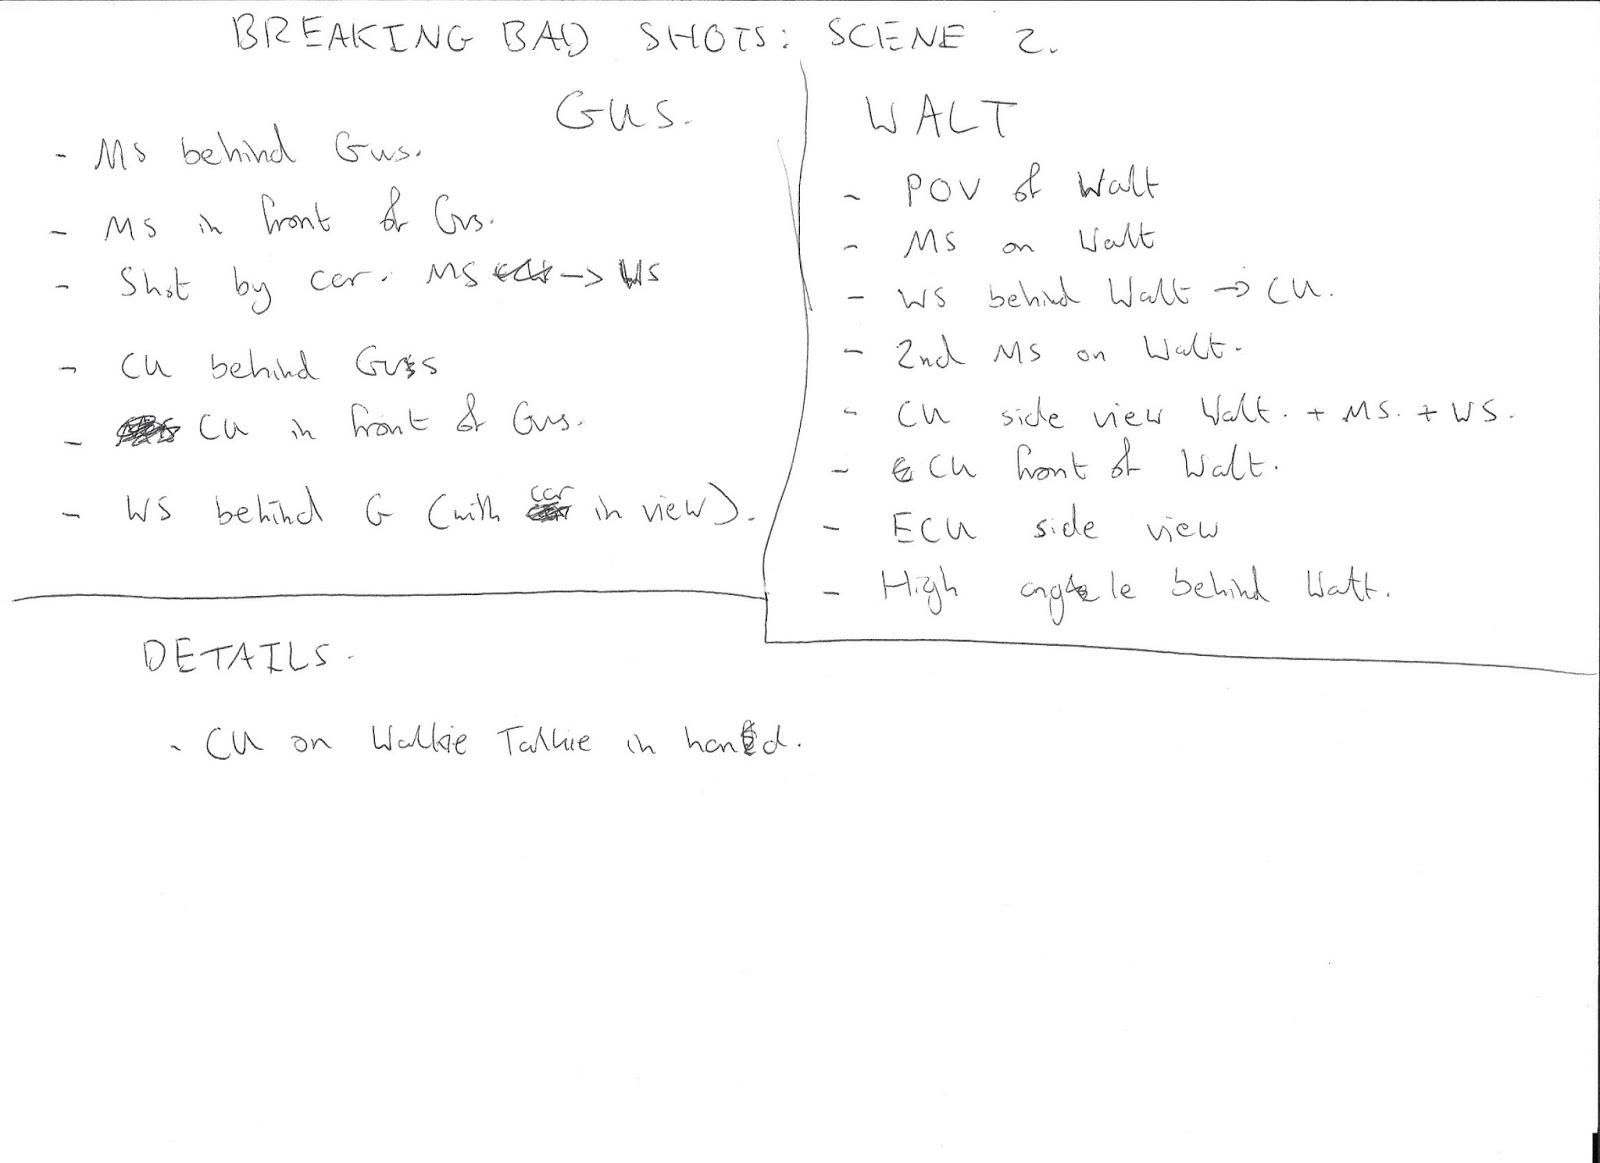
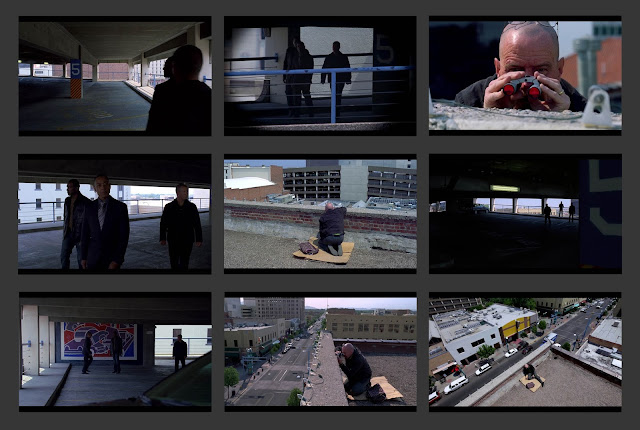
Before I could put together my own camera script, I had to work out how they shot the original scenes in Breaking Bad. Scene 2 is a very action based scene and so it was important that I got it right. So, I watched the scene back and created two camera scripts, one for Gus, and one for Walt, based on what I could see on screen.
I also listed all the separate shots they used and wrote about how they were cut together in the edit.
Using these, I was then able to put my own together, matching the action from the original scene. I then added my own cameras.
And here is the final shot list:


A few days ago I put together a shot list. This will help my camera operator understand what kind of shots I'm looking for. It will also help me visualise the film more during the pre-production process and during the production process. On the shot list I have detailed the scene, shot number, description, framing specs, takes, and additional notes.
CAMERA SCRIPT
I found that creating a camera script really helped me create the shot list. I could physically map out the action in the scene and then place cameras around it. This helped me explain the framing in my shot list, because I had a visual reference. I beleive this will also help my camera operator even more.
Before I could put together my own camera script, I had to work out how they shot the original scenes in Breaking Bad. Scene 2 is a very action based scene and so it was important that I got it right. So, I watched the scene back and created two camera scripts, one for Gus, and one for Walt, based on what I could see on screen.
I also listed all the separate shots they used and wrote about how they were cut together in the edit.
 |
| Camera script for Gus |
 |
| Camera script for Walter |
 |
| A breakdown of the shots |
 |
| A breakdown of how they were edited together |
 |
| Camera script for Walter |
 |
| Camera script for Gus |


Monday, 1 February 2016
Directions: Breaking Bad Style/Editing/Sound Design In S4E2 + S4E12
Before I could begin to think carefully about how I would direct my version of Breaking Bad, I needed to analyse the style and editing in my chosen scenes. I also need to look at the directing, which means I'm mostly looking at what the camera is seeing, and where it is positioned (so how it sees it).
SCENE 1
I began by watching my first scene, where Walt tries to kill Gus in his home.
STYLE/EDITING
I originally chose this as one of my scenes because it gave me the chance to use some trademark "Breaking Bad style" shots, whilst still being able to retain my own vision. Below I have listed the trademark shots that appear in this scene:
POV

As Walt parks up near the house, we cut inside the car and see the house in the distance. We then cut to him and he looks over to the house. It then cuts to a closer shot of the house, and this is Walt's POV. Point of view shots were used a lot throughout the series. A lot of the time, the POV was that of an inanimate object, which is why the camera was placed in unusual positions.
NO FACES

As Walt walks over to the house, we as an audience only see the back of his head. We don't see Walter's face until he is stopped by his ringing phone. The director made a choice, and that choice was to not show the emotion on Walt's face as he walked over to the house. No showing or highlighting the faces of the main characters was a common technique used during the production of Breaking Bad.
WIDE SHOT

Wide shots were used a lot throughout the series, and they were used with good intention. In this shot, the director has chosen to cut to a wide shot when Walt pulls his phone out his pocket. This shot helps to highlight the fact that there is nobody around, and yet Gus knows Walt is there and interrupts his mission with a phone call.
BIRD'S EYE VIEW

At the end of the scene the director has chosen to use a bird's eye view shot. These were used a lot throughout the series. In this scene it helps to highlight the fact that there is nobody around. It also makes Walt look very small and defenceless, which helps to represent how he feels after being defeated by Gus, again.
Editing is something I need to think really carefully about. Even though I haven't shot anything yet, the way in which I plan to edit the scenes together is still something I need to be constantly thinking about. This help me to work out how much coverage I need to get and how long I should hold each shot for. It will also help me set the pace for each scene, something that is very important, especially considering how tense both of my scenes are.
In this scene the editing sets a reasonably slow pace. The shots don't cut too quickly, most are held for more than 5 seconds. And when Walt walks towards the house, that shot is held for almost 30 seconds. Although this sets up a slow pace, this intense, and constantly building music, helps to increase the pace of the scene without having to increase the pace of the cuts. I will need to keep this in mind when I am shooting this scene.
In terms of sound design, this scene relies of ambience and music. The ambience helps to build the nighttime setting. The sounds of crickets in the background, a sound used to represent silence, highlight the fact that Walt is alone on the street. The use of natural sounds throughout the scene, like Walt's seatbelt, the car door and the engine, help to build onto the realistic and natural feel that the show has, and I beleive this helps heighten the intensity of the scene. And finally the music helps build the tension all the way up to the point when Walt's phone rings, when it suddenly cuts out. When Walt puts his hat on, what can only be described as a "Breaking Bad sound" plays, that fits into their convention of using music that adds to the dark humour the show possesses.
SCENE 2
Next I watched my second scene, where Walt tries to kill Gus for a second time.
STYLE/EDITING
I originally chose this as one of my scenes because it gave me the chance to use some trademark "Breaking Bad style" shots, whilst still being able to retain my own vision. Below I have listed the trademark shots that appear in this scene:
NO FACES

As the scene begins, they have chosen not to show Gus's face. His face is not revealed until seconds before he starts to realise something is wrong. No showing or highlighting the faces of the main characters was a common technique used during the production of Breaking Bad.
POV

As the scene progresses, we cut to a POV shot. We see Gus through a pair of binoculars. These binoculars belong to Walt, who is spying on Gus. It then cuts to Walt, who is hiding behind a wall, looking through the binoculars. We know straight away that we're spying on Walt, because the composition of the shot suggests so. Then, by cutting to Walt, the director tells us it is Walt who is spying. All of that is done without any dialogue; it's done using the camera. A lot of the time, the POV was that of an inanimate object, which is why the camera was placed in unusual positions.
WIDE SHOT

Wide shots were used a lot throughout the series, and they were used with good intention. In this scene the wide shot is used to help set out the geography of the scene. We can see the distance between the two characters, which helps us to understand the intensity of the scene, because we can see how far Walt has chosen to get from the bomb, which suggests how dangerous it might be.
BIRD'S EYE VIEW (ALMOST)

At the end of the scene the director has chosen to use what is almost a bird's eye view shot. These were used a lot throughout the series. In this scene it helps to highlight the fact that Walt has been defeated, because the angle of the shot makes him look small and defenceless. And with that cardboard and bag, I actually think he looks homeless, something that strips his dignity from him.
As I said earlier, editing is something I need to think very carefully about. Similar to my other scene, the pace of the scene is not very fast. There is a contrast between the way each character is edited into the scene. When we are on Gus's side of the story, the shots don't cut too often, they tend to hold on him for at least 5 seconds or so. When we cut to Walt, the shots begin to cut a little more often, probably to highlight how intense his side of the scene is.
In this scene sound design is very important. The scene uses sound effects very effectively. Sounds are used to represent things or match action on screen. For example, as the scene plays out the sound of an ambulance rushing through the city begins to get louder and louder. I think this sound references the theme of death that plays on your mind during the duration of the scene. Another example is how the sound of a passing motorcycle is used as Walt looks from one side of the screen to the other, which highlights that action. When Gus stops, the sound of a car horn can be heard in the background, a sound which suggest that vehicle has been stopped or held by something, much like how Gus is holding up Walt's plans.
And finally, music plays an important part in this scene. It helps to build tension and the tempo changes depending on the content of the scene. For example, when Gus stops, the music slows; as he begins to move again, the music starts to build again. And then at the end of the scene, when Gus walks off, the music, which has build to a very high level, suddenly cuts off, shattering the tension, much like Walt's shattered plans.
Overall both of my chosen scenes are very stylistic and edited in a very specific manner, with sound design being very important. These are two things I will need to keep in mind when shooting and editing my version.
SCENE 1
I began by watching my first scene, where Walt tries to kill Gus in his home.
STYLE/EDITING
I originally chose this as one of my scenes because it gave me the chance to use some trademark "Breaking Bad style" shots, whilst still being able to retain my own vision. Below I have listed the trademark shots that appear in this scene:
POV

As Walt parks up near the house, we cut inside the car and see the house in the distance. We then cut to him and he looks over to the house. It then cuts to a closer shot of the house, and this is Walt's POV. Point of view shots were used a lot throughout the series. A lot of the time, the POV was that of an inanimate object, which is why the camera was placed in unusual positions.
NO FACES

As Walt walks over to the house, we as an audience only see the back of his head. We don't see Walter's face until he is stopped by his ringing phone. The director made a choice, and that choice was to not show the emotion on Walt's face as he walked over to the house. No showing or highlighting the faces of the main characters was a common technique used during the production of Breaking Bad.
WIDE SHOT

Wide shots were used a lot throughout the series, and they were used with good intention. In this shot, the director has chosen to cut to a wide shot when Walt pulls his phone out his pocket. This shot helps to highlight the fact that there is nobody around, and yet Gus knows Walt is there and interrupts his mission with a phone call.
BIRD'S EYE VIEW

At the end of the scene the director has chosen to use a bird's eye view shot. These were used a lot throughout the series. In this scene it helps to highlight the fact that there is nobody around. It also makes Walt look very small and defenceless, which helps to represent how he feels after being defeated by Gus, again.
Editing is something I need to think really carefully about. Even though I haven't shot anything yet, the way in which I plan to edit the scenes together is still something I need to be constantly thinking about. This help me to work out how much coverage I need to get and how long I should hold each shot for. It will also help me set the pace for each scene, something that is very important, especially considering how tense both of my scenes are.
In this scene the editing sets a reasonably slow pace. The shots don't cut too quickly, most are held for more than 5 seconds. And when Walt walks towards the house, that shot is held for almost 30 seconds. Although this sets up a slow pace, this intense, and constantly building music, helps to increase the pace of the scene without having to increase the pace of the cuts. I will need to keep this in mind when I am shooting this scene.
In terms of sound design, this scene relies of ambience and music. The ambience helps to build the nighttime setting. The sounds of crickets in the background, a sound used to represent silence, highlight the fact that Walt is alone on the street. The use of natural sounds throughout the scene, like Walt's seatbelt, the car door and the engine, help to build onto the realistic and natural feel that the show has, and I beleive this helps heighten the intensity of the scene. And finally the music helps build the tension all the way up to the point when Walt's phone rings, when it suddenly cuts out. When Walt puts his hat on, what can only be described as a "Breaking Bad sound" plays, that fits into their convention of using music that adds to the dark humour the show possesses.
SCENE 2
Next I watched my second scene, where Walt tries to kill Gus for a second time.

STYLE/EDITING
I originally chose this as one of my scenes because it gave me the chance to use some trademark "Breaking Bad style" shots, whilst still being able to retain my own vision. Below I have listed the trademark shots that appear in this scene:
NO FACES

As the scene begins, they have chosen not to show Gus's face. His face is not revealed until seconds before he starts to realise something is wrong. No showing or highlighting the faces of the main characters was a common technique used during the production of Breaking Bad.
POV

As the scene progresses, we cut to a POV shot. We see Gus through a pair of binoculars. These binoculars belong to Walt, who is spying on Gus. It then cuts to Walt, who is hiding behind a wall, looking through the binoculars. We know straight away that we're spying on Walt, because the composition of the shot suggests so. Then, by cutting to Walt, the director tells us it is Walt who is spying. All of that is done without any dialogue; it's done using the camera. A lot of the time, the POV was that of an inanimate object, which is why the camera was placed in unusual positions.
WIDE SHOT

Wide shots were used a lot throughout the series, and they were used with good intention. In this scene the wide shot is used to help set out the geography of the scene. We can see the distance between the two characters, which helps us to understand the intensity of the scene, because we can see how far Walt has chosen to get from the bomb, which suggests how dangerous it might be.
BIRD'S EYE VIEW (ALMOST)

At the end of the scene the director has chosen to use what is almost a bird's eye view shot. These were used a lot throughout the series. In this scene it helps to highlight the fact that Walt has been defeated, because the angle of the shot makes him look small and defenceless. And with that cardboard and bag, I actually think he looks homeless, something that strips his dignity from him.
As I said earlier, editing is something I need to think very carefully about. Similar to my other scene, the pace of the scene is not very fast. There is a contrast between the way each character is edited into the scene. When we are on Gus's side of the story, the shots don't cut too often, they tend to hold on him for at least 5 seconds or so. When we cut to Walt, the shots begin to cut a little more often, probably to highlight how intense his side of the scene is.
In this scene sound design is very important. The scene uses sound effects very effectively. Sounds are used to represent things or match action on screen. For example, as the scene plays out the sound of an ambulance rushing through the city begins to get louder and louder. I think this sound references the theme of death that plays on your mind during the duration of the scene. Another example is how the sound of a passing motorcycle is used as Walt looks from one side of the screen to the other, which highlights that action. When Gus stops, the sound of a car horn can be heard in the background, a sound which suggest that vehicle has been stopped or held by something, much like how Gus is holding up Walt's plans.
And finally, music plays an important part in this scene. It helps to build tension and the tempo changes depending on the content of the scene. For example, when Gus stops, the music slows; as he begins to move again, the music starts to build again. And then at the end of the scene, when Gus walks off, the music, which has build to a very high level, suddenly cuts off, shattering the tension, much like Walt's shattered plans.
Overall both of my chosen scenes are very stylistic and edited in a very specific manner, with sound design being very important. These are two things I will need to keep in mind when shooting and editing my version.