EDITING ROUGH CUT
I began the editing process by importing all of my footage into Adobe Premiere Pro. Next I used the bins to organise all of the footage and audio that I had captured. For example, I split my shots up into footage, and sound effects. I also created a series of sequences for different purposes: Final_Rough Cut, Rushes, Sound Effects, and the End sequence.
 |
| My bins |
 |
| My sequences |
Assembly
After I had viewed everything back, I began to assemble the footage. Whilst doing this, I turned all the sound off, as I just wanted to focus on cutting together the visuals. I'll do the sound later. I started to put my shots in order, using all my favourite takes from the rushes sequence. I didn't worry about fine tuning any cuts yet. I also didn't insert the poem yet, I'll do that when I'm working on sound design.
Fine Tuning
Next I watched the sequence back and began fine tuning the cuts, using the ripple delete and rolling edit tools. I adjusted some of the cutting points, and replaced some of my takes with others from the rushes. By this point I could see that my project was currently 1 1/2 minutes below the minimum time length, so I went back through the sequence and added in a few shots to extend the time. Once this was complete, I could start working on the sound design.
Sound Design
To begin this process I turned all the sound levels back up, and straight away I could hear a lot of me directing my brother as we filmed. I removed the sound from all of my shots, and decided to build up the world from scratch.
I started with the ambience (i.e inside and outside the car). I had recorded some ambience during the filming process, so I layered these under the footage, and cut it up so it fit with the cuts between the outside of the car, and the inside of the car.
Next I started working on the foley sound effects. Again I had recorded these during the filming process, so I knew they would work with my visuals. I layered them over the ambience sound effects and again cut them to match the footage.
As there is no music in the film, I didn't need to add any music tracks. Finally, I added a series of cinematic impacts and hits, to highlight certain moments in the film when the audience has to focus on a certain element on screen.
Before finishing, I added a recording of the poem to the timeline, and cut it to fit the timing of the shots in the film. I used the EQ audio effects, to attempt to make it sound like it was coming from the radio in the car.
After I had completed all the sound design, I used the clip and track mixers to balance and level everything.
 |
| Using the track mixer |
Colour Correction & Grading
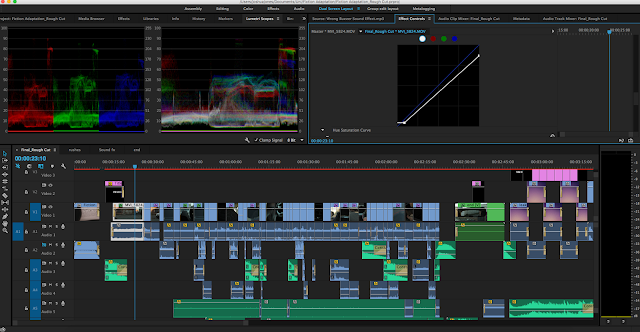
Now I had the sound and visuals completed, I began to colour correct and grade the footage. I started this process by first correcting the footage using the Lumetri Scopes and the RGB curves. I went through each shot and balanced the RGB levels, and the black and white levels, by adjusting the shadows, midtones, and highlights. Once I was happy with the levels, I moved onto grading.
 |
| Colour correcting |
In terms of colour grading, I wanted to make the footage slightly darker, and greyer, with a bit more contrast, and a faded look To achieve this I used the Lumetri Colour tools. I went through the settings adjusting the blacks, whites, contrast, levels, curves, and I added a slight vignette to draw attention to the centre of the screen.
 |
| Before and after correction and grading |
After I had finished colour correcting and grading, I finalised the rough cut.
Finalising
To finalise the rough cut I added some text layers to help emphasise some lines in the poem. I also added some credits to the end of the film, and I added an aspect ratio letterbox. And once this was done, the rough cut was complete.
 |
| Adding text |
 |
| The final timeline |
0 comments:
Post a Comment