Below is the final video produced for the Digital News Unit.
Thursday, 27 October 2016
Digital News: Project Evaluation
DIGITAL NEWS PROJECT EVALUATION
PRE-PRODUCTION
I started this unit knowing who I wanted to work with. I wanted to work with people I hadn't really worked with before, and so I our group consisted of me, Ida, Nisserin, and Becca. We knew from day 1 that time was tight, so we sat down straight away to discuss ideas. We all wanted to do something for students, and so after much discussion, we came up with Student Yak.
And so work on the news stories began. We decided we wanted to do something about viral videos. Whilst the others began to work on the script, I began to work on the graphic, to help us visualise Student Yak. We also started working on the website and social media pretty early, so we could use it for promotion.
As part of our idea, we had to create a viral video, so we also worked on planning, filming, and sharing this. Whilst all of this was happening, Ida was talking to YouTuber Katie Joslin about being our contributor, and I was talking to George Wing about being our co-presenter. Luckily, both of them agreed to take part. I took on the role as the main presenter.
Over the next few weeks, we continued to work on the pre-production, which included finalising the script for the package, live, and studio segments, making call sheets/schedules, buying props, and finalising all the graphics for the final video. We also began to work on our promo.
I think my strength during the pre-production stage was my graphic design skills, which helped the group visualise Student Yak, and therefore aided the pre-production for everything we needed to film, and produce for the unit. I also think my odd sense of humour helped when making edits to the script. And finally, I think my organisation skills helped me say organised, even when the deadlines were tight.
PRODUCTION
When it came to filming and producing the required content for Student Yak, we knew there was going to be a lot, and we didn't want to spend too many days filming so we chose to bundle shoots together. On the first shooting day we filmed the interview, and the news package, and on the second day of filming, we filmed the studio segments, and the live.
The first day of filming went very well. We set up our location a day in advance so we had as much time as possible to film the interview and the package. Katie was a great interviewee, and interviewing her was a fun, and educational experience. When filming the package, we thought carefully about how each location, aided the script, and I think in the end, we picked the perfect locations.
The second day of filming went even better. Again we set up in advance to save time. The location for the live had to be changed due to bad weather, but we didn't let this hinder us, as we had already prepared a backup location. Filming the live ended up going great, and we managed to hit exactly two minutes with no issues. Filming the studio segments and the promo went well, and it became clear in the edit, that we had lit the green screen just right. At the start of the day we had some sound issues, but these were fixed very quickly with some help from Ferg.
Overall, the production process went very well. I'd say my strength during this part of the unit was my presenting skills. The way I come across on camera, and the speed at which I work, I think aided us in ensuring we could fit a lot of filming into such a small amount of time. I think the entire group worked together brilliantly during the filming process, and each person played their part well.
POST-PRODUCTION
During the post-production process I was the main editor, and the group acted as secondary editors, watching back each rough cut and making the relevant changes. Nisserin also acted a the main colourist, doing all the colour correction.
To begin this process I first put the rough cut together. We then sat down as a group and made some changes, as well as sitting down with Helen for some feedback. Next we made changes to form the fine cut. After a feedback session with Helen, we made a few more changes and the final production was finished.
There isn't much to say about the post production process that I haven't already said in other posts. I think my main strength during this stage was my editing skills, in particular my After Effects skills, which I think were really tested. I've never created so many graphics for one project. I had to use processes I'm not used to, so I did learn a few new things. I really enjoyed working in After Effects, and creating original graphics, we didn't use any templates.
OVERALL EVALUATION: CRITICAL REFLECTIONS
Strengths-
- My organisation skills made every stage of this process very easy and quick, which was important considering we had such a small amount of time to complete this unit. We were able to work as a group to sort everything out on time, and we were prepared for every situation. This also aided me during the editing process, and made editing a lot easier because I was able to stay organised.
- I think my editing skills were also another strength. I no point was I every worried, or stressed out about the edit, because we had planned it all out in advance, and I knew what I was doing. I have now really honed in my editing skills, especially on After Effects.
- Communication was key on this unit as it was a group project. I think unlike previous projects, I was able to work really well in a group. I think this shows I have developed since the last project. Our group was constantly in communication with one another, and this meant we always all knew what was going on.
- Overall I think my production skills were a strength. I carried out every task in a professional manner. I was able to keep organised and on top of everything. I did not get stressed, or worried at all throughout this project, and that made it a more enjoyable experience.
Weaknesses-
- As a presenter, I need to work on not being so reliant on an autocue. I didn't really have time to remember any of the studio script, and so whilst we were filming, I completely relied on the autocue.
- During the interview, I only stuck to the questions, and we realised in the edit that this slowed the pace down a bit. In future, if I interview anyone again, I should try and be a bit more relaxed and conversational in my interview style.
Possible Development- What did I learn?
- If I were to do this again, I would:
- Make time to remember the script.
- Think more about, and do more research into my interviewee to aid the conversational interview style.
- I would look at working with professionals, instead of just students as presenters. However saying that, we had reasons behind using students as our presenters.
CONCLUSION
Overall, I am extremely happy, and proud of the final product. As a group, we have decided that if we have time, we will continue Student Yak, as we believe we have come up with a brand that has real potential, which can be seen by the interest we have already received from others. We're very happy with the news package, interview, live, and studio segments. I can't say I was ever stressed or worried about anything, which actually made the project easier and more enjoyable. To summarise, I think we should all be very proud of what we have achieved, and we should look forward to the future of Student Yak!
Digital News: TV/Film Yak Article For Website
For our website, I was asked to write an article for TV/Film Yak.
ARTICLE FOR WEBSITE
I decided to write about the recent premiere of 'The Walking Dead' Season 7. I chose to write about this because it was a popular topic on the internet at the time, due to the deaths of two beloved characters. I am also a big fan of 'The Walking Dead', and the episode left me with a lot to say.
I did a bit of research into the episode and found out that in the US, over 17 million people had tuned in to see it. I felt I wanted to include this in the article, to show why we were writing about it.
I basically used the article as a way for me to express how I felt about the episode, as it upset, and angered me, much like it did to everyone that watched it. I really enjoyed working on this article, as it helped me let out some of the anger the episode gave me.
To see the article go to:
http://studentyak.wixsite.com/studentyak/single-post/2016/10/25/SPOILERS-The-Walking-Dead-Returned-And-I-Cried
Digital News: The Jokes
Our final production has a lot of jokes in it, some of which are not immediately obvious, below are all of the jokes:
STUDENT YAK JOKES
Viral Video sound bites- During the introduction, we've added sound bites from some popular viral videos, which are 'Charlie Bit My Finger', 'David Went To The Dentist', 'Pen, Pineapple, Apple, Pen', 'Keyboard Cat', 'Damn Daniel', and 'The Harlem Shake'. We reference all of these videos, because we are talking about the history of viral videos on YouTube, and these are some of the most popular/most famous ones.
Katie's Intro- Katie has a very dramatic introduction, which is a reference to the introductions they create for musicians on The X Factor. We felt this was the quickest, funniest, and best way to tell our audience a bit about Katie before her interview began.
Katie's Interview- During Katie's interview, a number of graphics appear on screen. These graphics reference things she is saying. We chose to do this, to help keep the audience interested, as the interview slows down the pace of our episode.
Shia LaBeouf "DO IT"- During step 3 of the news package, we used a clip of Shia LaBeouf saying "Do It!". We chose to include this there because it correlates with what I'm saying on screen, and it references a stack of viral videos from a few years back when people used this clip alot.
"About A Week Ago"- During the reveal of our viral video view count, we cut to a clip from a song where the lyric is "about a week ago". We do this as I'm talking about how long ago we uploaded our viral video, and we thought it'd be funny if we referenced that song, instead of just having me say it.
Bottle Flip Joke: After the live segment, George throws a bottle of water over to me in the studio. I then drink from it, and throw it off screen. It then cuts to the bottle landing on a table upright. This is a reference to a number of viral videos, which show people 'faking' the bottle flip challenge by cutting two shots together so it looks like they flip the bottle.
FRED joke- During the final moments of the show, I speak about the live bottle flip challenge. As I do this, it cuts to a replay from the live, and some of the audience members have had their faces replaced with that of the YouTuber FRED. I also say "she can't even flip a bottle for Fred's sake". We added this reference to FRED as another nod to the history of YouTube, as FRED was very popular back in the day.
MEME OF THE WEEK- Memes are a very popular internet phenomenon, and something we would like to include on the show every week. For this weeks meme of the week, we scrolled through the most recents memes on Reddit, which is the front page of the internet. We eventually settled on on about North Korea and we thought it was pretty funny.
Bye Felicia & Don't Make Me Snap- To close the show, we reference two more viral phenomenon. Firstly, 'Bye Felicia' is a reference to a popular internet meme with Ice Cube taken from one of his movies. Secondly, 'Don't Make Me Snap' is a music video that went viral a few years back. We thought this was a funny way to close the episode.
And that's it, all the jokes in Student Yak that relate to the world of the internet.
Digital News: Fine Cut Feedback
Before the hand in, we had one final feedback session with Helen.
FINE CUT FEEDBACK
Prior to the meeting, we sat down as a group to identify any issues:
- Change the FRED joke.
- Continue with colour correction
- Make a few additional changes to the interview to help increase the energy.
After we made some changes, this was the feedback we got from Helen:
- Make sure we write on our blogs about all the work that went into the production, as it's clear that there is a lot.
The final video is now complete!
Images:
Wednesday, 26 October 2016
Digital News: Rough Cut Feedback
Once the rough cut was ready, we sat down as a group with Helen to get some feedback.
ROUGH CUT FEEDBACK FROM THE GROUP
Prior to the meeting, we sat down without Helen and watched the rough cut through a few times to identify any issues, this was the feedback:
- Fix one of the social media logos during the news package, as it blends into the background too much.
- Add in a new hashtag during the bottle flip segment in front of the green screen.
- Add the YouTuber Fred to the replay of the live, as I mention his name in that part of the script.
- Replace the shots of me holding a pineapple, with clips from the original pineapple pen video.
- Add a slow motion replay in during the live segment.
- Fix a few colour issues.
After our initial meeting, we sat down with Helen to receive some feedback:
- Helen felt the interview with Katie slowed down the pace and energy of our video, we agreed. She suggested that we mess around with the interview and make it a bit silly or energetic. Unfortunately, during the interview, I only stuck to the pre-written questions, and this adds to the reduction in energy.
- A few shots need to be colour corrected as they either do not match, or do not look true to real life.
- Add in a few graphic during the live segment to help explain the aim of the challenge. Also look at maybe adding some additional sound effects to bring up the energy levels.
We will now work on this feedback by:
- Nisserin will work on colour correcting the footage as she has a better eye for it than me.
- I will add #flippidyflip to the bottle flip green screen segment, as it references something George says on screen.
- I will replace the pineapple shot, and fix the social media logo by changing it's colour scheme so it doesn't blend in.
- We will work on the Fred shot as a group to perfect it.
- I will add a slow motion replay of a bottle flip to the live challenge.
- We will watch the interview back, and think about how we can improve its energy levels.
- And finally I will add those additional graphics to the live segment.
Apart from those changes, everything else is fine.
Images:
Digital News: Editing Full Video & Promo (Rough Cut)
After I had edited the news package, and the live, it was time to edit the full episode, including the green screen shot, and the promo.
THE FULL VIDEO
Before I began to edit anything, I imported all of the footage into Adobe Premiere Pro, and organised it into bins. These help me keep track of everything. Next I created two sequences, one for the final output, and one for organised green screen footage.
Next I watched through all of the green screen footage and picked out the good takes, inserting them into my gree screen raw sequence. Once I had done this, I began to place clips into the final output sequence.
I went through, adding the green screen clips, and any additonal music/sfx or graphics. I also added in the pre-made news package and live package, as well as all the aditonal footage we filmed for our visual gags.
Once all the cuts had be fine tuned and finalised, I began to edit the backgrounds on all the green screen footage. I carried out the same process I used for the green screen footage in live piece, using After Effects. First I used Keylight to remove the green, then after some fine tuning, I added the studio background, adding a camera lens blur to create a depth of field effect.
Once I had replaced all the backgrounds, I went through and worked on the sound levels, trying to find a good balance between dialogue, music, and sound effects. Finally, added a few additional After Effects graphics to clips that needed them, like the view count reveal, and the FRED joke during the live replay.
After our rough cut feedback, Nisserin used the Lumetri Colour tools to work on colour correcting some of our footage.
After all of this had been completed, the final cut was ready.
PROMO
The final part of the editing process for this unit was putting together our 30 second promo. For the promo we decided to do a 1950s/60s style product advert. We filmed the footage in front of a green screen so we could change the background. We wanted the advert to take place in a kitchen, so I created a set for one on Sweet Home 3D. I then used the same green screening process as before to replace the background on the necessary clips.
In Premiere Pro, I put the promo together, starting first with our opening green screen shot. Next I added in a few clips from the Student Yak episode, that I felt best represented the show. And finally, I imported an image I had created that simulated Student Yak, as a beer bottle in the kitchen from the beginning. We felt a beer bottle was the best representation for our brand, as it's something a lot of students love.
I then opened the final bottle shot in After Effects and added some text animations to fit with what the narrator was saying. This included the show title, and social media links. I also messed around with the image a little, blurring out the kitchen behind the bottle, to create a depth of field effect.
Next, I opened the entire sequence up in After Effects, and created the effect of the promo being played on a 50s/60s style TV. The camera pulls away to reveal the clips playing on the TV, before pushing back in for the final bottle shot.
Finally, I added all of the pre-recorded narration, and a black and white to colour effect that lined up with the narration, and the promo was complete.
Overall, our group is very happy with both the full episode, and the promo.
THE FULL VIDEO
Before I began to edit anything, I imported all of the footage into Adobe Premiere Pro, and organised it into bins. These help me keep track of everything. Next I created two sequences, one for the final output, and one for organised green screen footage.
 |
| My bins |
| My sequences |
I went through, adding the green screen clips, and any additonal music/sfx or graphics. I also added in the pre-made news package and live package, as well as all the aditonal footage we filmed for our visual gags.
Once all the cuts had be fine tuned and finalised, I began to edit the backgrounds on all the green screen footage. I carried out the same process I used for the green screen footage in live piece, using After Effects. First I used Keylight to remove the green, then after some fine tuning, I added the studio background, adding a camera lens blur to create a depth of field effect.
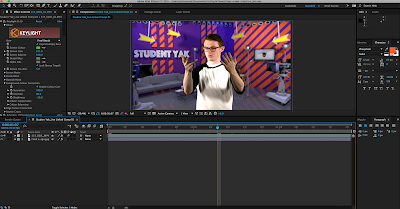 |
| Editing the green screen footage |
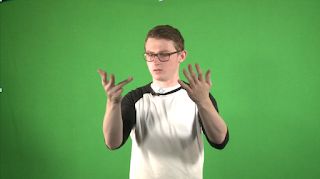 |
| Before |
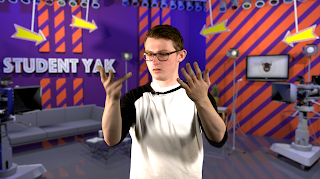 |
| After |
Once I had replaced all the backgrounds, I went through and worked on the sound levels, trying to find a good balance between dialogue, music, and sound effects. Finally, added a few additional After Effects graphics to clips that needed them, like the view count reveal, and the FRED joke during the live replay.
After our rough cut feedback, Nisserin used the Lumetri Colour tools to work on colour correcting some of our footage.
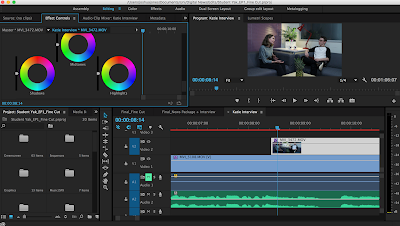 |
| Using the Lumetri Colour tools |
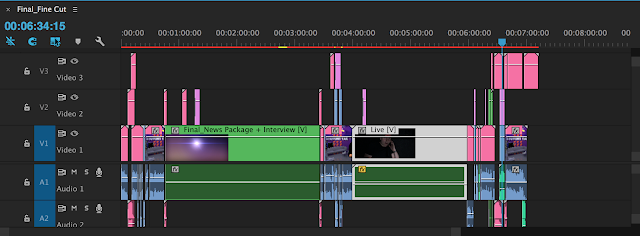 |
| The final sequence |
PROMO
The final part of the editing process for this unit was putting together our 30 second promo. For the promo we decided to do a 1950s/60s style product advert. We filmed the footage in front of a green screen so we could change the background. We wanted the advert to take place in a kitchen, so I created a set for one on Sweet Home 3D. I then used the same green screening process as before to replace the background on the necessary clips.
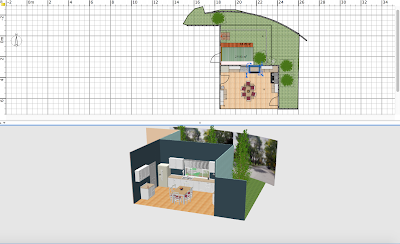 |
| The kitchen set |
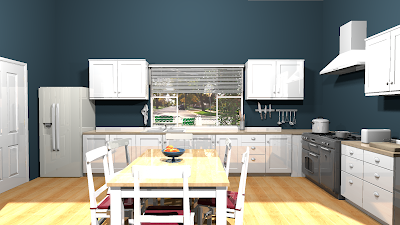 |
| A 3D render of the set |
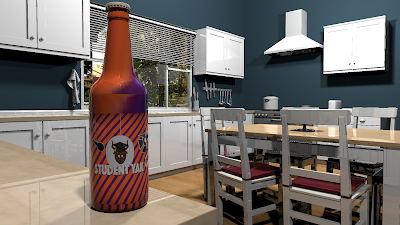 |
| The bottle shot |
Next, I opened the entire sequence up in After Effects, and created the effect of the promo being played on a 50s/60s style TV. The camera pulls away to reveal the clips playing on the TV, before pushing back in for the final bottle shot.
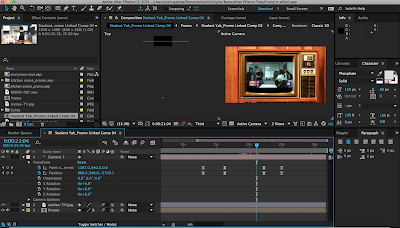 |
| Creating the TV effect |
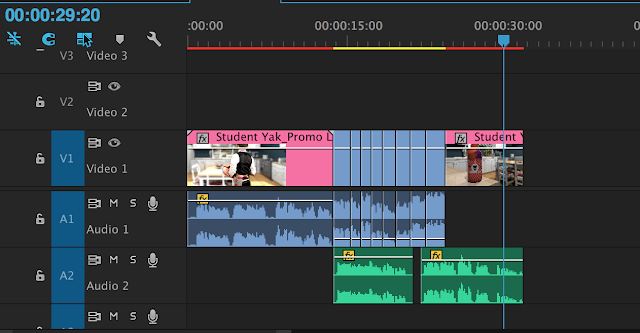 |
| The final timeline |
Sunday, 23 October 2016
Digital News: Editing Live (Rough Cut)
To edit the live package together I decided to try something new, using the multi camera set up in Premiere Pro.
Next I brought the footage of the live from both cameras into my sequence. I then used the multi camera option, and the in points of the clips, to create a multi camera sequence. This setup allows you to view both feeds at the same time, and make cuts simply by clicking on the shot you want in the program window.
Once I had done this, and I could see the clips were synced up properly, I began to go through the footage, and make cuts between the two camera feeds, as though it was live. After I had carried this out, and I was happy with it, I began to add all the live graphics.
These graphics included:
- the live graphic
- scoreboard
- challenge title
- timer
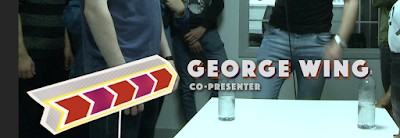
- George's lower third
I had already created all of these graphics in after effects so all I had to do was import them into the project and position them in the sequence.
Next I added in a shot before the results of the challenge are revealed. In this shot, it cuts back to me in front of the green screen adding up the scores on my fingers. For this shot I needed to replace the background. To do this I used After Effects.
First I imported the clip, and the studio background that I had created in Sweet Home 3D. Next I used keylight to remove the green screen. After messing around with the keylight settings I was able to achieve a nice look. Finally, I added the studio background to the composition. To make it look like it was actually behind me, I added a slight camera lens blur, to create a depth of field effect. After this was done, I went back into Premiere Pro and added the clip
Finally, I added in some music to help increase the action and tension throughout the challenge. I also messed around with the audio channels from the live so that the sound could cut between George's clip mic, and the handheld mic when needed. To finish the sequence off, I colour corrected the footage from the two cameras so they would blend better, and then the sequence was complete, and ready to be imported into the final video production.
EDITING THE LIVE
Before editing anything, I sorted all of the media into bins to make finding things and organising things a lot easier during the editing process.
 |
| My bins |
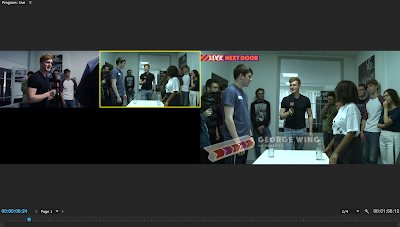 |
| Multi camera setup |
These graphics included:
- the live graphic
- scoreboard
- challenge title
- timer
- George's lower third
I had already created all of these graphics in after effects so all I had to do was import them into the project and position them in the sequence.
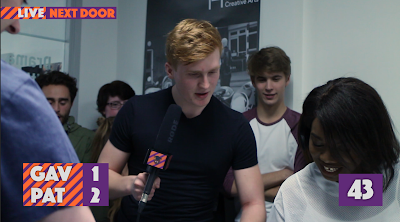 |
| live graphics |
 |
| George's lower third |
First I imported the clip, and the studio background that I had created in Sweet Home 3D. Next I used keylight to remove the green screen. After messing around with the keylight settings I was able to achieve a nice look. Finally, I added the studio background to the composition. To make it look like it was actually behind me, I added a slight camera lens blur, to create a depth of field effect. After this was done, I went back into Premiere Pro and added the clip
 |
| Editing in After Effects |
 |
| The final result |
 |
| The final sequnce |
Digital News: Editing News Package (Rough Cut)
EDITING NEWS PACKAGE
All the footage has been filmed, it's now time to edit together a rough cut. I began by editing the news package together, which consists of our interview with Katie Joslin, and our Step by Step guide to making a viral video.
Before I began to edit anything, I first created my bins and sequences. These help me organise all the media needed for the edit. I created bins for all the media, and I created multiple sequences to make editing a lot easier.
INTERVIEW WITH KATIE
I started by editing Katie's interview together. I imported all of her close ups into a sequence called 'Katie_IVs'. I then synced the clip mic audio, and the footage from the dolly camera up with her close ups. Next I did the same with my close ups and I put them into a separate sequence.
Next I watched through all of the synced up clips and cut them down to what Becca suggested we needed for the final cut. I did the same with my close ups. After that I began to assemble the interview in another sequence. To do this I cut together Katie's close ups, my close ups, and the wide shots to make it a seamless sequence that looked like it was all filmed at the same time. I think I achieved that effect. Finally, I colour corrected the three different shots so they all looked the same, and followed the same style, thus helping them blend together even more.
Once this was done, this sequence was complete.
STEP BY STEP GUIDE
The next part of the news package was the step by step guide. Before I began to edit, I went through the footage and picked out the best takes. I then put these into a separate sequence and synced up all the sound from the clip mic. Next I began to assemble the guide in a separate sequence, using all the clips I had picked out.
Once I had assembled the clips, I went through and added visual effects to the clip that needed it. Steps 1, 3, and 4 needed some form of visual effect or graphic. To do this I used After Effects. For step 1 I needed to add a lightbulb to represent the theme of coming up with an idea. As the shot was filmed on a dolly, I decided to use the camera tracker to make it look like the lightbulb passes the camera as it comes towards me. For step 3, I had to use Keylight to edit a green screen clip of Shia LaBeouf into the shot. And for step 4, I had to use position tracking and motion blur to add some social media logos to the shot.
And finally, I added the prepared "Let's go viral" bumper graphic, and I added some music to help with the pacing of the sequence. Once this was done, the step by step guide was complete.
Finally, I created another sequence, and put the interview and step by step guide together, ready to be inserted into the final video production. I also added in the prepared X Factor style intro for Katie, along with it's voice overs, which had been edited using a reverb effect. As well as this, I added a lower third that reveal Katie's YouTube URL to the audience so they could check her out.
All the footage has been filmed, it's now time to edit together a rough cut. I began by editing the news package together, which consists of our interview with Katie Joslin, and our Step by Step guide to making a viral video.
Before I began to edit anything, I first created my bins and sequences. These help me organise all the media needed for the edit. I created bins for all the media, and I created multiple sequences to make editing a lot easier.
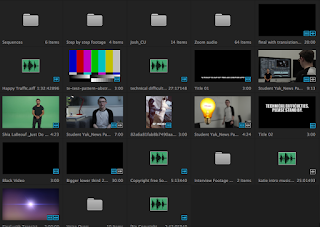 |
| My bins |
| My sequences |
I started by editing Katie's interview together. I imported all of her close ups into a sequence called 'Katie_IVs'. I then synced the clip mic audio, and the footage from the dolly camera up with her close ups. Next I did the same with my close ups and I put them into a separate sequence.
Next I watched through all of the synced up clips and cut them down to what Becca suggested we needed for the final cut. I did the same with my close ups. After that I began to assemble the interview in another sequence. To do this I cut together Katie's close ups, my close ups, and the wide shots to make it a seamless sequence that looked like it was all filmed at the same time. I think I achieved that effect. Finally, I colour corrected the three different shots so they all looked the same, and followed the same style, thus helping them blend together even more.
Once this was done, this sequence was complete.
 |
| The interview sequence |
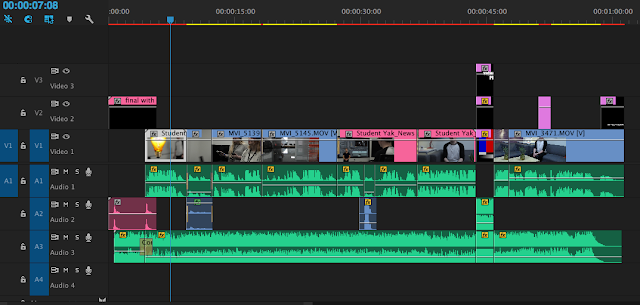
The next part of the news package was the step by step guide. Before I began to edit, I went through the footage and picked out the best takes. I then put these into a separate sequence and synced up all the sound from the clip mic. Next I began to assemble the guide in a separate sequence, using all the clips I had picked out.
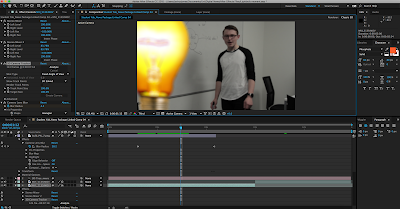
Once I had assembled the clips, I went through and added visual effects to the clip that needed it. Steps 1, 3, and 4 needed some form of visual effect or graphic. To do this I used After Effects. For step 1 I needed to add a lightbulb to represent the theme of coming up with an idea. As the shot was filmed on a dolly, I decided to use the camera tracker to make it look like the lightbulb passes the camera as it comes towards me. For step 3, I had to use Keylight to edit a green screen clip of Shia LaBeouf into the shot. And for step 4, I had to use position tracking and motion blur to add some social media logos to the shot.
 |
| editing in After Effects |
 |
| The step by step guide sequence |
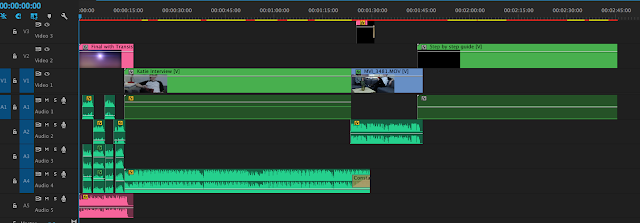 |
| The final sequence |
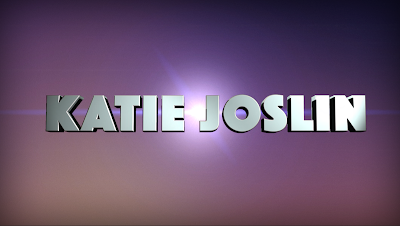 |
| X Factor style intro |
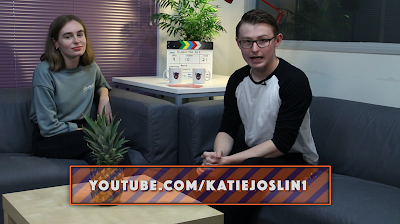 |
| Lower third |
Digital News: Filming Day 2 (Green Screen/Live/Promo)
For our second filming day, we would be filming all of our green screen scenes, our live package, and our promo
FILMING DAY 2- LIVE
We had originally planned to film out live segment outside the studios in the car park, but unfortunately, due to a very heavy rainfall, we had to make alternative arrangements. Instead we ended up filming the live in production room 1.
Before we invited any of the talent into the room, we set up, which involved removing all the chairs, and placing a table in the centre of the room. We then set up the two cameras we were using, one in front of the table with a wide shot of the room, and the other on a shoulder rig, so we could use it for multiple shots.
Once everything was set up, we invited our presenter, George, into the room to run through the blocking of the live, the script, and the timings. Becca decided to give 30 seconds for the intro, 1 minute for the challenge, and 30 seconds for the outro. After we ran through it with George a few times, we invited our two contestants into the room. Becca explained what was going on, and allowed them to get a little practice. She also explained the rules to them.
Before inviting our audience in, we filmed a rehearsal as a backup in case the real thing went wrong. This also allowed Becca to test out her timings. Once all this was done, we invited the audience in, positioned them, and began filming. We explained to George that Becca would keep track of the 2 minutes, and Patricia's score, and that I would keep track of the 1 minute challenge time, and Gavin's score. We showed him the hand signals we'd use to communicate with him during the recording, as we could not speak.
The recording ended up going really well. The audience and the contestant really enjoyed it, and George was a great presenter. Unfortunately, we did finish 8 seconds ahead of schedule but, we can fix this in the edit. This was due to the 1 minute challenge ended slightly before 60 second was up because of a hand signaling mix up. This didn't really matter to us through because the live went really well and we're really happy with it. During the live Nisserin operated the shoulder rig camera, and Ida operated the main wide camera.
FILMING DAY 2- GREEN SCREEN
Images:
FILMING DAY 2- LIVE
We had originally planned to film out live segment outside the studios in the car park, but unfortunately, due to a very heavy rainfall, we had to make alternative arrangements. Instead we ended up filming the live in production room 1.
Before we invited any of the talent into the room, we set up, which involved removing all the chairs, and placing a table in the centre of the room. We then set up the two cameras we were using, one in front of the table with a wide shot of the room, and the other on a shoulder rig, so we could use it for multiple shots.
Once everything was set up, we invited our presenter, George, into the room to run through the blocking of the live, the script, and the timings. Becca decided to give 30 seconds for the intro, 1 minute for the challenge, and 30 seconds for the outro. After we ran through it with George a few times, we invited our two contestants into the room. Becca explained what was going on, and allowed them to get a little practice. She also explained the rules to them.
Before inviting our audience in, we filmed a rehearsal as a backup in case the real thing went wrong. This also allowed Becca to test out her timings. Once all this was done, we invited the audience in, positioned them, and began filming. We explained to George that Becca would keep track of the 2 minutes, and Patricia's score, and that I would keep track of the 1 minute challenge time, and Gavin's score. We showed him the hand signals we'd use to communicate with him during the recording, as we could not speak.
The recording ended up going really well. The audience and the contestant really enjoyed it, and George was a great presenter. Unfortunately, we did finish 8 seconds ahead of schedule but, we can fix this in the edit. This was due to the 1 minute challenge ended slightly before 60 second was up because of a hand signaling mix up. This didn't really matter to us through because the live went really well and we're really happy with it. During the live Nisserin operated the shoulder rig camera, and Ida operated the main wide camera.
FILMING DAY 2- GREEN SCREEN
Before we could begin filming, we had to set the green screen up. First we cleared the room and then we set the green cloth up on the C-Stands. We used sandbags to weigh the screen down and remove any creases that may be visible on camera. Next we set up the lighting. To do this we used to wide LED lights to light the green screen, and two spot LED lights to light me. We angled the lights to help reduce the amount of shadow on the green screen. Finally, we set up the camera, and the auto cue. We chose to use the auto cue to make presenting a lot easier for me, which would help us speed through each shot a lot quicker, ensuring I say the same thing each time.
Once all of this was set up, we got on with filming. We ran through the script in order, filming each segment a few times so we had a few takes. For sound we used a clip mic that was linked straight for the camera to make editing a little easier. This also allowed Ida to monitor sound as we filmed.
Everything went really well, and we had no issues during the filming. We managed to film everything during the time we had. All of the footage came out really well, and we beleive we should get a good key off the green screen as we lit it well, and all the lighting was well balanced.
FILMING DAY 2- PROMO
For the promo, we decided to film in front of the green screen so that I could replace the background during the editing process. As we decided our promo would be in the style of a 1950s/60s TV advert, I dressed as a businessman who was baking social media in his kitchen.
Filming the promo was pretty easy and simple as we had already set everything up for the green screen shoot before it. We used the auto cue for the promo as well as it was still attached to the camera.
Overall we were happy with the shots we got for the promo. Quick and easy.
MORE PHOTOS FROM THE SHOOT
 |
| Our setup |
 |
| Framing the camera |
 |
| Reading from the autocue |
Images:
Credit- Ida Frank
Digital News: Recording Voiceovers
We had a spare half an hour at the studios, so Nisserin and I decided to record the voice overs for our digital news production.
RECORDING VOICE OVERS
Unfortunately, the sound recording setup in production room 2 wasn't functioning properly so we quickly booked at a Zoom H4N from Ferg and wired the Rode Mic up to it. We only needed to record the voice overs for Katie's X Factor style intro, for the Meme Of The Week graphic, and for our promo trailer.
Once Nisserin had set everything up, we got the script out and began to record the voice overs. For Katie's intro, we wanted to record one serious introduction, and one silly introduction so we had a choice in the final edit. We recorded the intro a few times in a few different ways and then we moved on to the next voice over.
For the next voice over, we wanted to record me saying "Meme Of The Week", for our meme of the week segment. Same as with the intro voice over, we recorded a few serious and a few silly ones so we had a choice. And finally, we recorded the voice over for our promo. As our promo has a 1950s advert style to it, I did the voice over using my best 1950s salesman impression.
Overall we were happy with the final voice overs, and we were glad we decided to use this spare time to do them.
Digital News: Filming Day 1 (Interview & News Package)
So the time had come. We had written the script, gathered our contributors, and collected our equipment. It was time for our first day of filming...
FILMING DAY (INTERVIEW & NEWS PACKAGE)
The day before the shoot, we set up the room we were using for the interview, so we would have more time to set up the equipment on shoot day. We wanted the interview to have a relaxed, and friendly vibe to it, so we set the room up as a living room, with two sofas, a coffee table, and some nice decoration that fit with our brand. On the table between the two sofas we placed two branded mugs, and some branded cue cards, as well as a clapper board to match the behind the scenes vibe the show has. We hid references to two viral videos on the set. The first was the pineapple on the coffee table which relates to 'Pen, Pineapple, Apple, Pen', and on the clapper we wrote the numbers '9, 10, & 21' which relate to a viral video from last year.
We set up the lighting using ourselves as stand-ins. We wanted the room to have a warm vibe, so we put the tungsten balanced filters on the lights, so they were warmer. We also placed a lamp on the table and pointed it toward where Katie would be sitting to bounce more warm light onto her face. And finally, we framed up the two cameras we were using, one with a CU of Katie, and the other on a dolly with a wide of the me and Katie.
Once everything was set up, we realised we still had about 2 hours until Katie would arrive for the interview, so we decided to start filming the news package. The final step of our step by step guide was set in the same location, so whilst we weren't using it for anything else, we filmed step 4. To do this we used both cameras to get two angles for the package. Ida set up the sound and clip mic, and Nisserin and Becca operated the two cameras. As I was the presenter, I only had to focus on remembering the script and presenting it to the camera. After we finished filming this, we took lunch.
After lunch Katie was ready for her interview. We got her to come in, and Ida mic'd her up. Before we started the interview, we explained to her what we were doing and I gave her an idea of the sort of questions I was going to ask her. We wanted her to feel as relaxed as possible so we were very friendly and tried not to put any pressure on her.
We ran through the questions, cutting a few times to allow the director to give some feedback to Katie and I. Throughout the interview Katie was very relaxed and gave some great answers. We were very happy with her performance. And once we were done, she headed off. After she had left, we filmed all of my reverse shots, so we had good close ups of me asking the questions. And once this was done, we moved onto filming the rest of the news package.
To finish filming the news package, we had to move around to three different locations. We started by moving to production room 1 to film step 1. Nisserin set the camera up on the dolly, and operated the camera, as Ida and Becca were in the shot with me. We filmed a few takes and once we were happy with it, we moved to the next location.
For step 2, we filmed in the library. This shot was supposed to look like I found the camera in that room and picked it up to talk to it. To achieve this effect, Nisserin put camera on a table, and kept her hands on it when I pretended to pick it up so it looked like I was holding it, but she actually still had control of it.
Finally, we moved into production room 2 to film step 3. Step 3 is about editing so it made sense for me to sit in front of an editing suite. We filmed a few takes and once we were happy with it, we packed up, reset the lecture room we used for the interview, and went home.
Overall our first day of filming went really well and we managed to get everything we needed in the time we had. Katie was great in the interview and I think she enjoyed working with us. Becca was a great director, and she kept everyone up to date on the vision of the piece. Nisserin did a great job operating the cameras, and all of our footage came out great. Ida was brilliant on sound, and she acted as a vocal clapper which will make editing much easier. And finally, I'll let the rest of the group decide if I did a good job as a presenter!
Below is an outtake from our filming, which gives you a good idea of our camera, sound, and lighting set up.
FILMING DAY (INTERVIEW & NEWS PACKAGE)
The day before the shoot, we set up the room we were using for the interview, so we would have more time to set up the equipment on shoot day. We wanted the interview to have a relaxed, and friendly vibe to it, so we set the room up as a living room, with two sofas, a coffee table, and some nice decoration that fit with our brand. On the table between the two sofas we placed two branded mugs, and some branded cue cards, as well as a clapper board to match the behind the scenes vibe the show has. We hid references to two viral videos on the set. The first was the pineapple on the coffee table which relates to 'Pen, Pineapple, Apple, Pen', and on the clapper we wrote the numbers '9, 10, & 21' which relate to a viral video from last year.
We set up the lighting using ourselves as stand-ins. We wanted the room to have a warm vibe, so we put the tungsten balanced filters on the lights, so they were warmer. We also placed a lamp on the table and pointed it toward where Katie would be sitting to bounce more warm light onto her face. And finally, we framed up the two cameras we were using, one with a CU of Katie, and the other on a dolly with a wide of the me and Katie.
Once everything was set up, we realised we still had about 2 hours until Katie would arrive for the interview, so we decided to start filming the news package. The final step of our step by step guide was set in the same location, so whilst we weren't using it for anything else, we filmed step 4. To do this we used both cameras to get two angles for the package. Ida set up the sound and clip mic, and Nisserin and Becca operated the two cameras. As I was the presenter, I only had to focus on remembering the script and presenting it to the camera. After we finished filming this, we took lunch.
After lunch Katie was ready for her interview. We got her to come in, and Ida mic'd her up. Before we started the interview, we explained to her what we were doing and I gave her an idea of the sort of questions I was going to ask her. We wanted her to feel as relaxed as possible so we were very friendly and tried not to put any pressure on her.
To finish filming the news package, we had to move around to three different locations. We started by moving to production room 1 to film step 1. Nisserin set the camera up on the dolly, and operated the camera, as Ida and Becca were in the shot with me. We filmed a few takes and once we were happy with it, we moved to the next location.
For step 2, we filmed in the library. This shot was supposed to look like I found the camera in that room and picked it up to talk to it. To achieve this effect, Nisserin put camera on a table, and kept her hands on it when I pretended to pick it up so it looked like I was holding it, but she actually still had control of it.
Finally, we moved into production room 2 to film step 3. Step 3 is about editing so it made sense for me to sit in front of an editing suite. We filmed a few takes and once we were happy with it, we packed up, reset the lecture room we used for the interview, and went home.
Overall our first day of filming went really well and we managed to get everything we needed in the time we had. Katie was great in the interview and I think she enjoyed working with us. Becca was a great director, and she kept everyone up to date on the vision of the piece. Nisserin did a great job operating the cameras, and all of our footage came out great. Ida was brilliant on sound, and she acted as a vocal clapper which will make editing much easier. And finally, I'll let the rest of the group decide if I did a good job as a presenter!
Below is an outtake from our filming, which gives you a good idea of our camera, sound, and lighting set up.
Images:
Credit- Ida Frank
Digital News: Interview Footage Review
The day after we filmed our interview with Katie Joslin, we met up at the studios to review the footage and decide what to put in the final edit.
INTERVIEW FOOTAGE REVIEW
By this point, I hadn't had a chance to edit any of the footage together as we only filmed it the day before, so we had to just view the raw clips back.
We went through each clip and listened to what Katie said, as well as looking at how the footage from our two cameras could be cut together. During this review, Becca kept notes on the answers she would like to use in the final cut. These decisions were made by ensuring we had all we needed to answer the key questions our news package aims to answer. We only needed about 1 minute worth of footage from the interview, so it was essential that we cut some of her answers down or out of the final cut.
During the meeting, I kept a note of everything that was said to me, so I knew what to and what not to use in the edit of the rough cut. Having this viewing was a really good idea, as it helped us understand whether or not we got what we needed from the interview. It also helped Nisserin and Rebecca decide if we needed to change any parts of the script to match the answers Katie gave in her interview.
Digital News: Shot List
SHOT LIST
So that we are ready to film our digital news production, as DOP, Nisserin has put together a shot list:
This shot list will come in handy during our two filming days.
So that we are ready to film our digital news production, as DOP, Nisserin has put together a shot list:
The shot list gives us as a group a good idea of how the final video production will be framed and filmed. It will also help director Becca decide what the presenters should be doing and how they should be doing it so the framing works.
This shot list will come in handy during our two filming days.
Digital News: Final Script & Structure
As we prepare to film our green screen scenes for our digital news production, we have made some final changes to the script and structure.
FINAL SCRIPT & STRUCTURE
To create the final version of the script, these are the changes we made:
- We added a new question to the package introduction- "and what does it take to make a viral video"
- We added a new joke about something Katie said during her interview- "#morepeoplemorepressure"
- And finally, we changed to view count reveal, and conclusion to match the results of viral video attempt, and world record attempt.
We are very happy with the final version of the script!
FINAL STRUCTURE
Below is the final structure for Student Yak EP1- Let's Go Viral
- Pre-titles (cold open)
- TITLES
- Intro/news package intro
- Interview with Katie/News package
- Live Intro
- Live challenge
- Conclusion
- OUTRO TITLES
FINAL SCRIPT & STRUCTURE
 |
| Page 1 |
- We added a new question to the package introduction- "and what does it take to make a viral video"
- We added a new joke about something Katie said during her interview- "#morepeoplemorepressure"
- And finally, we changed to view count reveal, and conclusion to match the results of viral video attempt, and world record attempt.
We are very happy with the final version of the script!
FINAL STRUCTURE
Below is the final structure for Student Yak EP1- Let's Go Viral
- Pre-titles (cold open)
- TITLES
- Intro/news package intro
- Interview with Katie/News package
- Live Intro
- Live challenge
- Conclusion
- OUTRO TITLES
Digital News: Story Change
As we were finalising the script for our green screen shoot, we decided to slightly change the story.
STORY CHANGE
Our original story involved us producing two online videos in an attempt to go viral, a cat video, and a humorous video of someone having paper balls thrown at them on a daily basis. As we had already decided not to focus on production value of a viral video, we agreed that we didn't to use both videos in the final show. We decided not to include the cat video anymore as it wasn't performing very well online. By this point the cat video had only reached about 350 views, where as the other video had reached over 1000 views.
Instead we will now only focus on the view count of the paper ball video, as its view count is much more impressive than the cat video. We will however keep the video on our Facebook page as it's another piece of original content that represents our brand. In the final video, we will only reveal the paper ball video view count, and use that as a basis for our main story, and live piece.
Sunday, 16 October 2016
Digital News: Script Re-writes & Promo Script
SCRIPT RE-WRITES
As we get closer the filming our green screen segments for digital news, we have re-written a few elements of our script.
For this draft of the script these are the changes we made:
- Updated the introduction to the news package to add a little bit of history on viral videos.
- Updated the reveal of the view count on our viral video as we have changed the structure and content of that section.
- And finally, we updated the conclusion to include the new research we discovered after our interview with Katie Joslin, which includes her favourite viral video.
- We also added multiple new references to popular internet phenomena.
PROMO SCRIPT
We realised that we hadn't yet put a script together for the promo, so we sat down as a group a put one together. Before doing this we decided that we wanted to advertise our channel in the style of a 1950s advert for a product. We thought this would be quite funny, especially considering nothing like this would have existed in the 1950s.
We ran a few ideas past one another, wrote the script and ended up with this:
We are going to film this in front of the green screen so we can add in the backgrounds we like in post. This promo should be humourous and engaging, so hopefully it will make people check out our channel and our content.
Digital News: Call Sheet/Schedule
As part of the pre-production for our Digital News unit, we put together a call sheet/schedule for our two filming days.
CALL SHEET/SCHEDULE
The call sheet and schedule are important in ensuring that everyone knows when and where they need to be at all times. They also help everyone prepare for each segment of filming, as they list exactly was is being filmed, and when it is being filmed. They also include important information that everyone need to know, including contact details, transport information, and maps of the location.
Below are screenshots from the call sheet/schedule that was sent to all cast and crew:
Digital News: Live Rehearsal
To prepare for the filming of a live segment, we met up with our co-presenter George for a full rehearsal.
LIVE REHEARSAL
We started off by running George through the lines and the marks he needed hit at certain points during the two minutes. Although we didn't have any cameras set up, we used our phones to show him where the cameras would be so he knew where to look.
After running through the script with him a couple of times with ourselves as contestants, we asked two first years to stand in and help out for a full live rehearsal. We timed this rehearsal to see how long it would take, and amazingly it lasted exactly two minutes which is the length of time we have been given for the live.
We are very confident that George is going to smash the live segment and we can't wait to film it!
Digital News: Green Screen Workshop & Test Shoot 2
We recently had a green screen workshop in the studio, to help us learn how to set up and then use a green screen.
GREEN SCREEN WORKSHOP
We started the workshop by watching one of the groups set the green screen up. To do this they attached the green screen to two C-Stands, and then raised the C-Stands so the green screen could stand up high enough for someone to stand in front of it.
Next they began to set up the lighting. When using a green screen, it is important that the screen is has a balanced amount of light on it, otherwise it will be difficult to edit out the background. To do this they used to white LED lights on the green screen, one on each side. They then used one LED light to light the talent.
I volunteered to stand in as a presenter whilst they tested the green screen, and the autocue. They had to mess around with a few settings on the camera, and the lighting, before they could begin as I was looking a little purple on screen. Once they had done this, we recorded a few test shots using a pre-loaded script on the autocue.
Before my group (Nisserin, Ida, Becca) could use the green screen, we had to learn to set up the autocue. Sam ran the group through the process, showing us how to attach it to the tripod, and how to attach it to the camera. Once this was done, we uploaded our script to the autocue, and filmed a few test shots.
Once we had finished filming the test shots, we used After Effects to replace the background with our pre-rendered studio background, below is a before and after:
Overall we were very happy with how the green screen footage came out in the edit. It was a very clean shot and it wasn't difficult to delete the background. If we can replicate this set up during our real shoot, we should be fine.
GREEN SCREEN WORKSHOP
We started the workshop by watching one of the groups set the green screen up. To do this they attached the green screen to two C-Stands, and then raised the C-Stands so the green screen could stand up high enough for someone to stand in front of it.
Next they began to set up the lighting. When using a green screen, it is important that the screen is has a balanced amount of light on it, otherwise it will be difficult to edit out the background. To do this they used to white LED lights on the green screen, one on each side. They then used one LED light to light the talent.
I volunteered to stand in as a presenter whilst they tested the green screen, and the autocue. They had to mess around with a few settings on the camera, and the lighting, before they could begin as I was looking a little purple on screen. Once they had done this, we recorded a few test shots using a pre-loaded script on the autocue.
 |
| The green screen set up |
 |
| Filming in front of the green screen |
 |
Overall we were very happy with how the green screen footage came out in the edit. It was a very clean shot and it wasn't difficult to delete the background. If we can replicate this set up during our real shoot, we should be fine.


