For this project, it is very important that I get the costume design right. Below I have listed my plans for costume design.
Walter White:
In my chosen scenes Walt has an overall dark theme. Both scenes are heavily linked to death and murder. At this point in the show, Walt is turning into a very sinister man; his character is doing things he'd never have done previously; and now Walt is at a dark point in his life. Walt's costume design, with the dark colours, perfectly embodies this. Here are some examples:
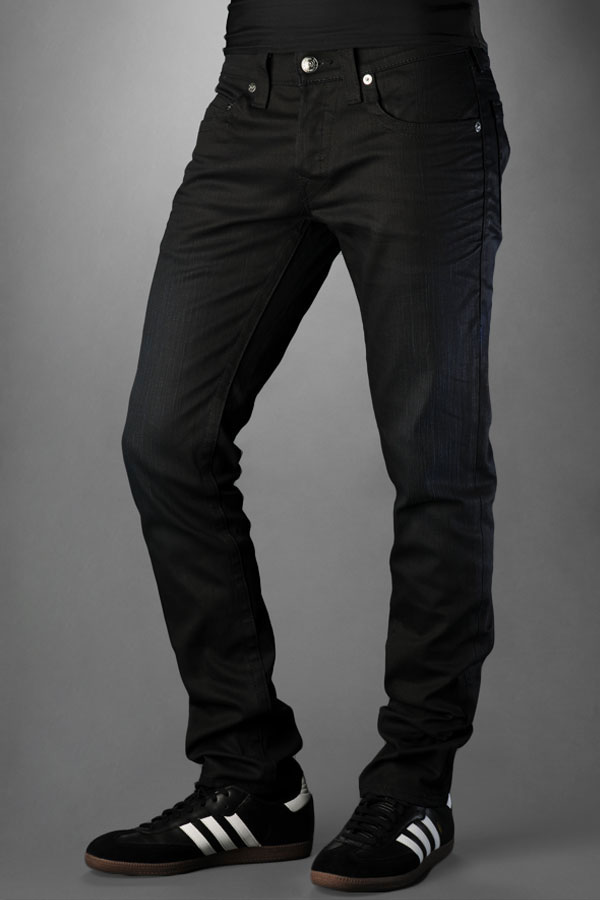
Black Shirt
Black jeans
Black shell jacket
Black boot shoes
Gus Fring:
In my chosen scenes Gus is dressed in one of his many suits. His suit in this scene is grey. Grey is the colour between black and white, or the way I see it, Gus is the man in the middle of good and evil. On the good side, Gus runs a fast food chain and nobody suspects a thing. On the bad side, Gus is the head of a major drug operation and has murdered numerous people to stay at the top of the chain. Gus's costume design in this scene perfectly represents this. Here is an example:
Grey Suit
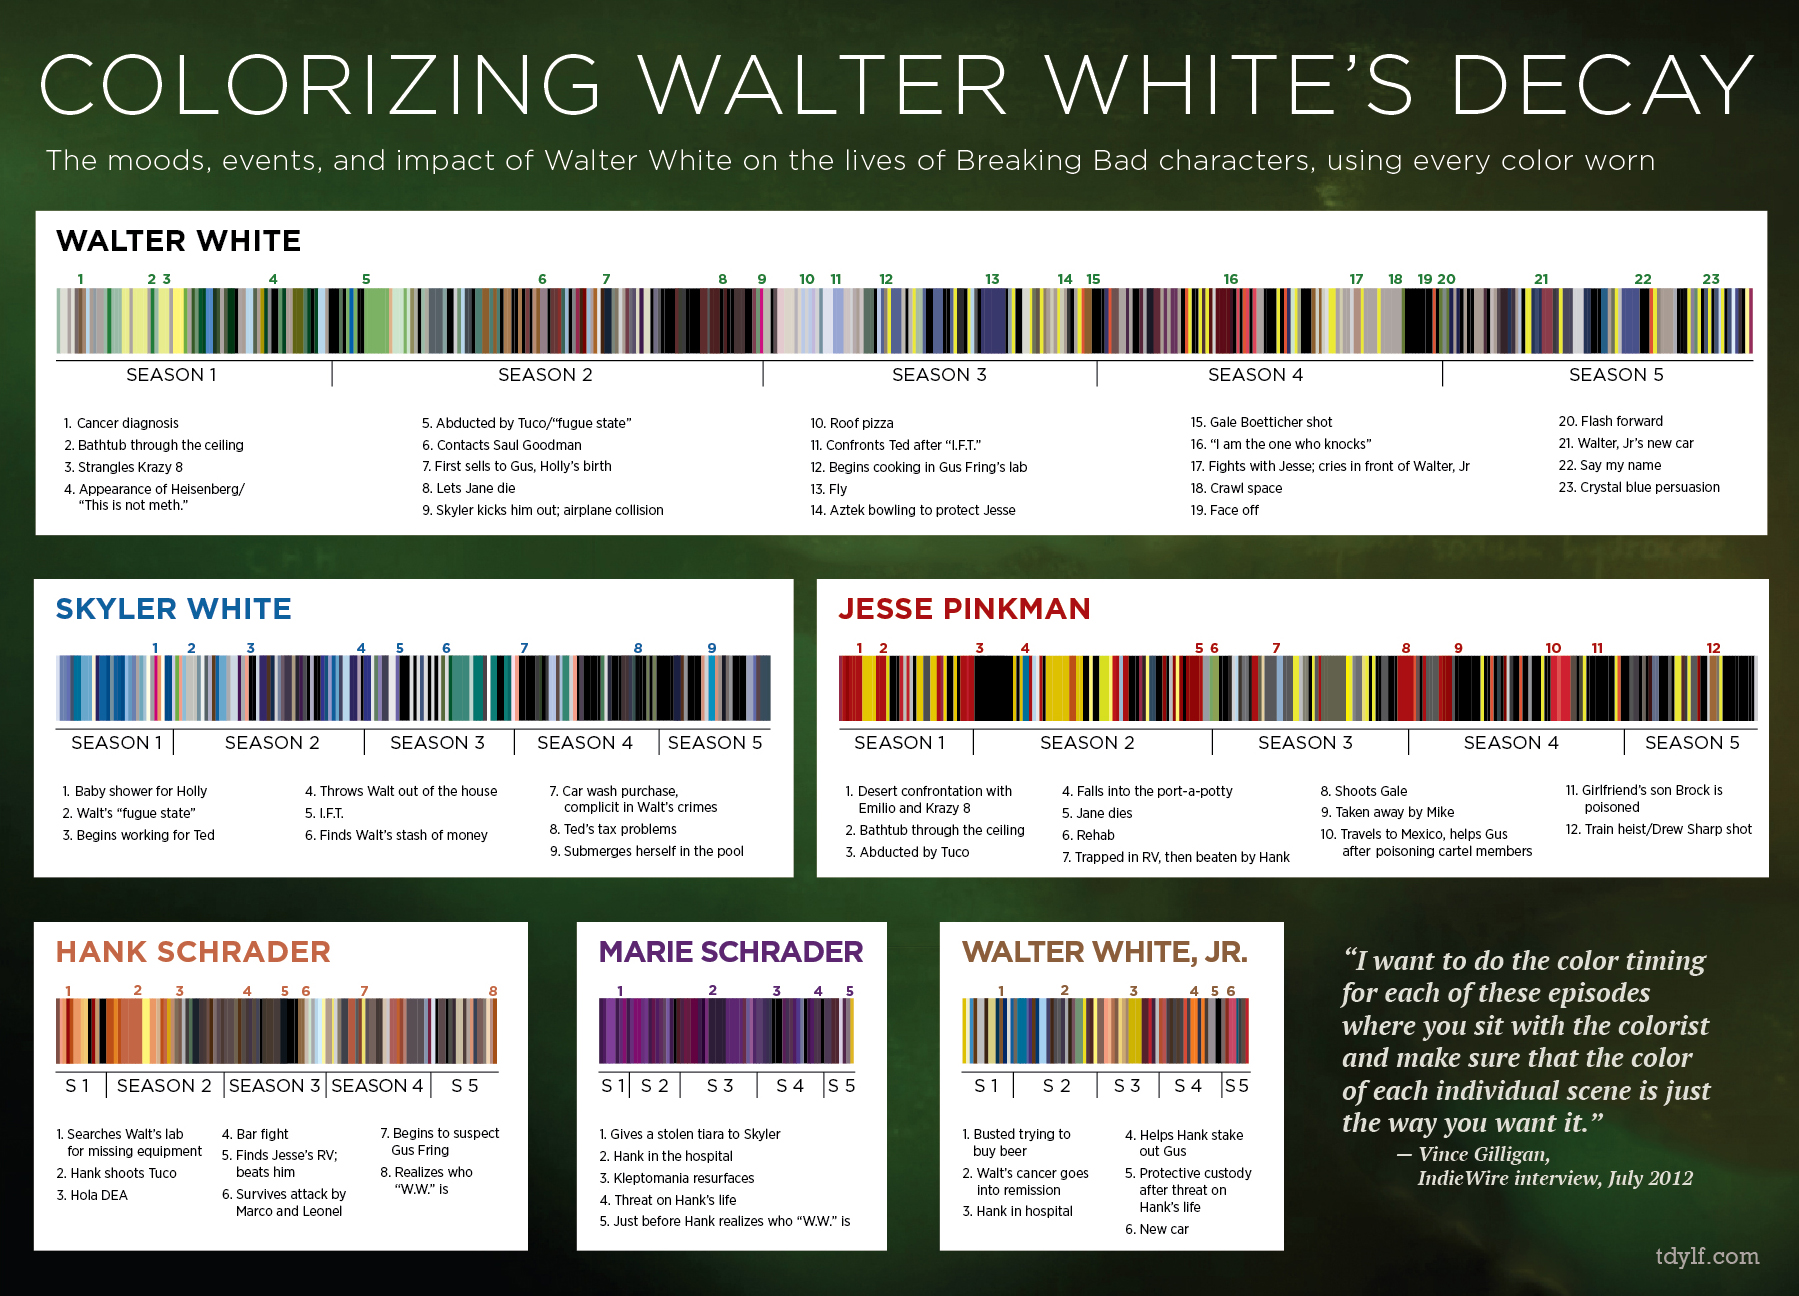
And finally, here is something I find quite interesting. It's a colour chart that documents the changes in colour schemes for each of the main characters throughout the run of the show. It shows you how important costume design is and shows you how each character's colour scheme represents how they were feeling at certain points throughout the story.
During its original run, Breaking Bad stood out because of it's great storylines, great characters and great visuals. These elements were very unique, especially the visuals. Breaking Bad had it's own style. When I redirect my scenes I need to keep it's unique style in mind, because even though I'm directing it, I still have to pay homage to the incredible work that directors like Vince Gilligan and Michelle MacLaren, and cinematographers like Michael Slovis (ASC) produced when they worked on Breaking Bad.
Michelle and Vince directed the episodes I have
taken my scenes from
Michael Slovis on set with Bryan Cranston
So what is the "Breaking Bad style"?
The "Breaking Bad style" is very unique to the show, and it's easily recognisable. It doesn't look like anything thing else on TV, and here are the reasons why:
The Handheld Look
Breaking Bad was shot almost entirely handheld. The camera was only every static, or on a dolly, or crane, if the story asked for it. Camera movement was motivated by the tense storylines. The handheld look put the audience into the show. We were always very close to the action, with the camera getting in the actors faces. This, mixed in with the directors allowing the actors to take the scene in the direction they saw fit, made the show feel very real and intense.
The show also tended to use a two camera setup, which allowed them to shoot multiple angles at once. This again helped the actors because they could go off script and develop the scene themselves without having to worry about staying in frame. There was always a least one camera on them.
Unusual Places
Breaking Bad loved placing the camera in unusual places. Sometimes they would put it under a surface or on the end of the gun. It was always somewhere that looked odd, somewhere you wouldn't think you would be able to place a camera. This is probably one of the most memorable trademarks of the show.
Placing the camera inside a barrel
Or on the end of a shovel
POV
Breaking Bad loved to use the characters points of view to help tell the story. They would show the character reacting to something and then cut to what they're seeing, a technique used a lot in film and TV. Somehow Breaking Bad did it differently. They used the technique very effectively to tell a story with the camera. Their version of a POV shot was usually from an angle that nobody could actually see something from, and this relates back to their tendency to put the camera in unusual places.
Extreme Long Shots/Wide Shots
Breaking Bad didn't care about sticking to the conventions. On many occasions they would use a wide shot where everyone else would use a close-up. They would tease the audience by taking them away from the action, but they did it so well that you would still know what was going on. And sometimes they'd take you away for a reason, because they wanted to hide something from you.
They'd also use wide shots and long shots to help establish the location of a scene. If you'd found an incredible location, like many of the ones in Breaking Bad, you'd want to show it off by taking the camera as far away as you possibly can.
In this wide shot from season 3, we were taken away from a murder taking place, yet because of sound, we knew it was happening.
Bird's Eye View
Sometimes they'd stick the camera on a big crane, or take it up a scissor lift, to put you above the action. If they did it, it was either to help you see the distance between characters; to show you things you couldn't see if you were on the ground; to show you how small a space is; or to make the characters on screen look small and powerless.
Use of bird's eye view in Breaking Bad
No Faces
When watching Breaking Bad, we often don't see the faces of the main characters. Vince Gilligan spoke about how everyone knows who they are and so we don't really need to see their faces. The show enjoyed putting characters in a silhouette or only slightly lighting characters faces. They tried to focus more on the emotion of the scene, not the emotion of the characters face. If they could tell a great story in a pitch-black room, they would.
In this scene, Walt's face is almost not lit at all because they
wanted you to focus on what he was doing
Sound
Breaking Bad uses a lot of natural sound. This adds to the very 'real' feel that the show has. It helps to build the world that these characters exist in. This therefore helps to pull the viewers into the world as well.
Breaking Bad uses music very well to build onto very tense and important scenes. The music used throughout the show's run perfectly complimented the bleakness the show posed. In a lot of cases they also complement the show's dark sense of humour. One of my favourite songs used in Breaking Bad is Out of Time Man by Mick Harvey. The song was used at the end of the pilot episode and it perfectly encapsulated the situation Walt was in. Music plays an important part in making Breaking Bad an incredible show.
Lighting/Colour
How the colour schemes of the characters changed throughout the run of the show
Breaking Bad also had a unique lighting and colour set up. Yellow and brown hues played a big part in the colour scheme of the show. When colouring the show, they liked to make colours that didn't exist. In the example below, Michael Slovis said they created golden, orangey, yellowy colours that didn't exist in real life. They wanted to approach each scene with an expressionistic view, and to achieve this it had to look different from everything else, hence why it was coloured in the way it was.
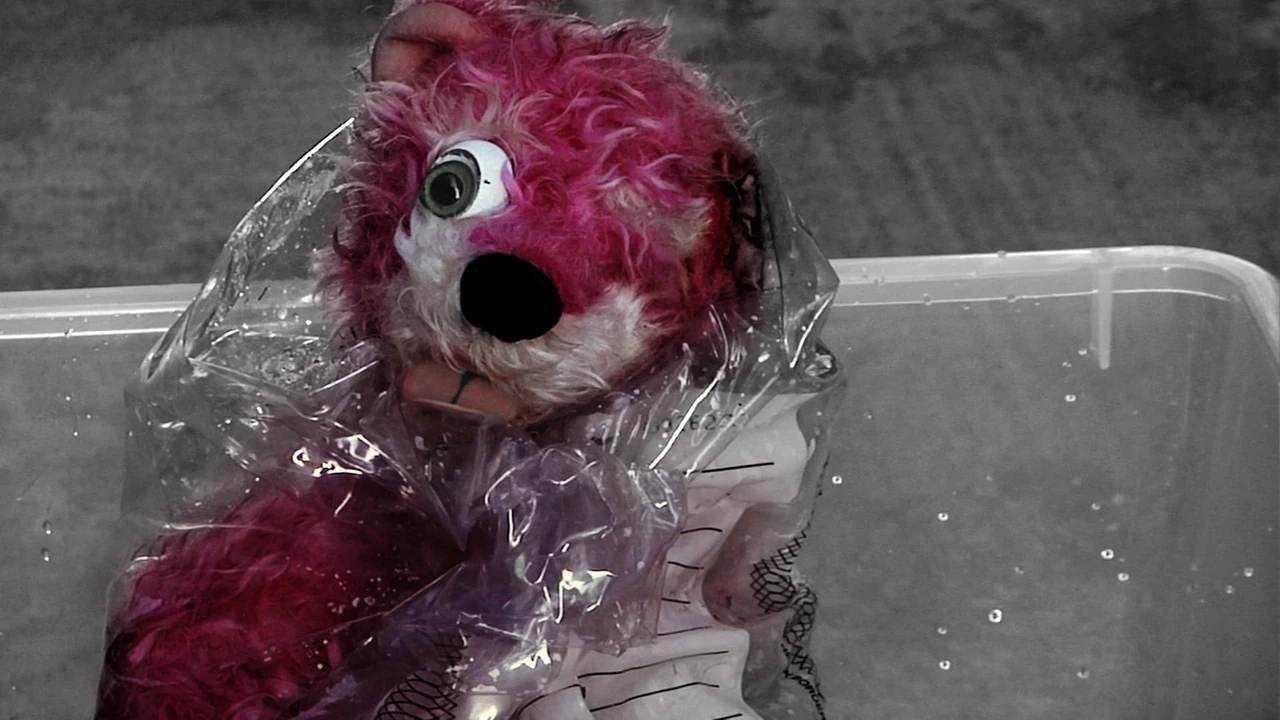
Colour was often used to show a change in time, or location. For example, in season 3 some scenes take place in Mexico. Michael chose to use a completely different palette of colour to show this change in location. Or during the second season, they used a lot of black and white during scenes that were supposed to show future events, events which that season was building up too.
In season two black and white was used to show future events. However, the famous "teddy bear" was kept in colour to highlight its significance.
In terms of lighting, the show always tried to be creative. They kept it as practical looking as possible whilst still keeping it unique. When building, or dressing sets, they would try and incorporate as much of the lighting set up as they could into the set. This allowed them to film where they saw fit, without having to worry too much about how their position affected the lighting. When shooting exteriors during the day, they tried to use the natural sunlight as much as possible, using only reflectors to help light the actors. Often the lighting was in contrast to the colour, especially in some interior scenes like the one below.
An example from season 4 of a contrasting lighting set up.
Now I have a completed the script writing process, I can begin to breakdown the script into sections to help with the pre-production process.
Scene 1- LOCATION/SETTING:
Inside Walt's Car/Outside Gus Fring's House.
Late Afternoon
CHARACTER(S):
Walter White
ACTION:
Walter arrives outside Gus Fring's house. He hides his gun, puts his hat on, and prepares to kill Gus. After exiting his car, he heads towards Gus's house. Moments before reaching the house he is stopped by his ringing phone. He answers it. It's Gus, who tells him to go home. Walt stands there, wondering what he did wrong.
THEME (LIGHTING/COLOUR/MOOD):
Sunsetting.
Lots of yellow.
Dark mood. Walt is preparing to kill someone.
Natural lighting.
Sun lights the road.
FRAMING:
Tight frame. Walter is trying to stay hidden so we stay close to him at all times.
Handheld.
Camera inside the car with Walt.
Camera follows Walt towards the house.
Told from Walt's perspective.
SOUND DESIGN:
Sounds of the breeze in the air.
Not much ambience. It's a quiet, empty street.
Natural sound.
Car engine. Seatbelt click. Car door. Phone ringing.
Maybe the slight sound of birds chirping away in the fields.
Tense music that builds as the scene builds.
COSTUME:
Walt is dressed in dark colours.
He is wearing a black jacket, black shirt, black trousers and black shoes.
He wants to blend into the shadows.
Black could also represent death.
PROPS:
Walt's glasses.
Gun.
Heisenberg hat.
Walt's phone.
QUESTIONS:
How does Gus know Walt is coming to kill him?
Why does Walter feel he has to wear the hat before killing Gus?
How does Walter feel after Gus stops him?
Why is Walter trying to kill Gus?
Why is Walter being very sneaky?
Scene 2- LOCATION/SETTING:
Industrial Site.
Day.
CHARACTERS:
Walter White
Gus Fring
ACTION:
Walter spies on Gus as he approaches a car rigged with explosives. Unfortunately, Gus foils Walter's plans by deciding not to get into the car. Walt fails to kill Gus for a second time.
THEME (LIGHTING/COLOUR/MOOD):
Natural lighting.
Sun lights the area.
Lots of grey. Concrete.
Hints of yellow.
Dark mood. Walt is trying to kill someone.
Lots of shadows.
FRAMING:
Many wide shots to show the distance between the two characters. Audience feel like they're spying with Walt.
Tight shots on Gus to show how tense the atmosphere around him is. Show how close he is too the car and, if he decides to get into the car, his death.
Handheld.
Camera follows Gus as he gets closer to the car.
Long shots of Gus. Audience feel like their looking through the binoculars.
SOUND DESIGN:
Tense music that builds as the scene builds.
City ambience.
Maybe some industrial noises.
Walkie talkie sound. Gus's footsteps on the concrete.
Planes flying. Helicopters flying.
Natural sound.
COSTUME:
Walt dressed in the same dark clothes as in Scene 1. Black jacket, black trousers, black shirt, black shoes. He is hiding. Black could also represent death.
Gus is wearing one of his many suits. Also quite dark (grey) to represent his sinister demeanor.
PROPS:
Gus's glasses.
Walt's glasses.
Walkie Talkie.
Binoculars.
Los Pollos Hermanos air freshener.
QUESTIONS:
Why is Walter trying to kill Gus?
How does Gus know that something is wrong?
How does Walter feel after Gus spoils his plans?
Why does Gus wait a while before suddenly leaving the site?
If Gus knows he is trying to kill him, why doesn't he kill Walt?
I will now use this script breakdown to start working on my shot lists and 'camera scripts'. I have already sorted out my costumes and props, so I don't need to worry about them. I will also think about how I can use my storytelling skills to answer the questions that the scenes leave behind.
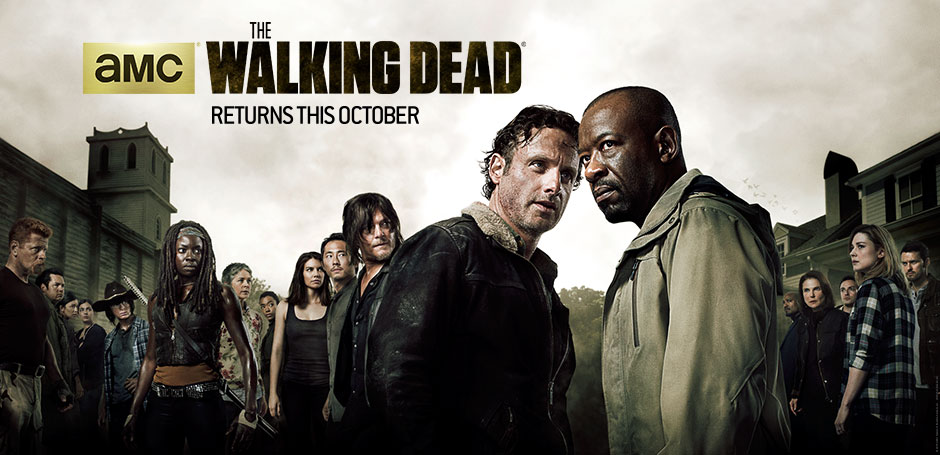
As part of my research process for the directions unit I have chosen to look at The Walking Dead (2010). My main reasons for choosing it are because I am a fan of the show and it's style, and because it is produced by the same network (AMC) as Breaking Bad (2008).
A poster for the current season of the show
A bit of background info...
The Walking Dead is an American horror drama tv series based on the comic book series of the same name. It follows a group of people who have to battle to survive in a post-apocalyptic world overrun with zombies. The main character, Rick Grimes, is played by British actor Andrew Lincoln. So far the show has run for six seasons, with the first season premiering in October 2010. The show was developed by Frank Darabont who based it on the comic book series created by Robert Kirkman, Tony Moore and Charlie Adlard.
Frank Darabont on set with the famous Dead Girl, the first 'walker' to be seen on The Walking Dead
Over the years the show has been directed by numerous directors. The season 1 premiere was directed by developer Frank Darabont. Recurring directors include Ernest R. Dickerson, Greg Nicotero, and Guy Ferland. Michelle MacLaren, who has directed many episodes of Breaking Bad, has also directed 3 episodes of The Walking Dead.
How does The Walking Dead influence me?
Similar to Breaking Bad, The Walking Dead has its own signature style. It's handheld and grainy style influences me because it's the kind of style I aim for with my own work. They're able to achieve this look by shooting on 16mm film. When testing cameras out, the team looked at shooting both digital and film, but eventually found that 16mm allowed them to achieve the grainy look that allowed the make-up effects to be most believable. Whilst shooting The Walking Dead, they tend to use a multi-camera setup (usually 2 or 3), because it allows them to capture something from many unique angles without having to keep running through a scene.
One DOP on The Walking Dead who likes using 3 cameras is David Boyd. He has directed numerous episodes over the years. He likes to use the third camera to tell the story in a different way to the other two cameras. He uses cameras A and B to capture the ordinary and compulsory medium shots, close ups and over the shoulder shots. He then uses camera C to capture something odd. He uses it to show what the characters are thinking, usually something that finds them looking or finding something in their hands. He says it's the key that opens the door to something deep that you don't get with the usual shots.
Another DOP on The Walking Dead is Michael Satrazemis. He likes to shoot long takes and allow the actors to explore a scene themselves. They don't have to stop when the director shouts "Cut!", instead they can continue if they think the scene could develop more. He doesn't like to cut too often, sometimes something can be done in just one take and look great.
This scene from S5E16 was shot in one full take. The camera was on a technocrane which followed her into the hole before pulling out to reveal her surroundings.
Behind the scenes look
In terms of lighting, The Walking Dead has always been very dark. The show uses shadows and light very well, and loves to use exteriors for night scenes, something most would steer away from because of low lighting.
So to answer the question, this is how The Walking Dead influences my work:
I am planning to shoot mostly handheld. This is a technique that The Walking Dead uses very well, however sometimes they do use many other techniques, like a dolly or a crane. Every time they stick the camera on a tripod, there is a good reason. So I will think about when I will and when I won't use a tripod. To tell a good story visually, I may need to keep the camera still and only move it if the movement is motivated by the story.
I will attempt to achieve the gritty and grainy look. It's a look I think will work very well in my scenes, especially Scene 2. If I can't achieve it in camera, I will play about with the footage a little to see what I can do.
As I have said before, I will consider shooting with two cameras because it can help save time and allow me to capture some more unusual angles that stray away from the usual conventions of TV drama.
I will think about shooting long takes that allow the actors to explore and develop the scene. I can then cut in different angles in the edit if I think they are required to build the scene.
And that's how The Walking Dead influences my work.
I recently visited both of my chosen locations and noted down possible risks so I could fill out my risk assessments. These assessments have to look at all the hazards a cast and crew could face, all the way from minor ones to major ones.
LOCATION 1: Jayar Car Parts. SCENE(S): Scene 2
Whilst on location I noticed a few possible risks-
Roads and cars
Pedestrians and staff of location
Overgrown areas
Weather
Trip hazards: cables, curbs, steps
Uneven ground
Spiky fences
Potholes
I have assessed all of these risks, and more, and created this risk assessment-
Page 1
Page 2
LOCATION 2: Ursuline Drive. SCENE(S): Scene 1
Whilst on location I noticed a few potential risks-
Uneven ground
A nearby generator site
Pedestrians (residents, school children, dog walkers...)
Roads and cars
Tripping hazards (curbs, cables, steps...)
Weather
Overgrown weeds
I have assessed all of these risks, and more, and created this risk assessment-
Page 1
Page 2
After assessing both locations, I have decided that they are safe and so I will be going ahead with my shoot on Monday 8th February 2016.
Overall I think my risk assessments were very thorough and I think I had thought of everything that could possibly happen.
For our second workshop with Steve Finn we looked at directing a script.
Directing Workshop 2
We began the workshop by looking at a script that, apart from one line of action at the start, only had dialogue. We started by reading it through and then asking ourselves some questions about the characters. Before we could even think about how we could shoot the scene, we needed to know who the characters were. This would help us when it came to choosing whose perspective to shoot the scene from.
Robert
We started by looking at Robert. This is what we thought after reading between the lines:
Because he has his own office, he must have some high status?
If he is leaving, maybe he has done something wrong?
Was he fired, or is he retiring, or is he leaving for another reason?
Helen
Next we looked at Helen. This is what we thought after reading between the lines:
Helen uses slang. Maybe she is younger than Robert?
She seems passionate and honest.
She thinks that whatever Robert has done was wrong.
She wanted to punish him but failed. Instead she is emotionally/personally punishing him by admitting that she stitched him up.
The Task
Next Steve gave us a task. He told us to go away and prepare to direct the scene, using everyone else as our cast and crew. He gave us a piece of advice, which was to think about the location carefully. We were in a small office like room. He said the first thing you should do is stand in the furthest corner and look for depth, as this can help you work out if a location is suitable, and help you decide how to layout the room and where to place the camera and actors. Also make note of where the doors and windows are as it can be important to know.
I began my prep by following Steve's previous advice, which was to draw a 'camera script'. In my notebook I drew a plan view of the room and used it to decide where I would place furniture, and cameras. I then went through the script and wrote an action next to each line to ensure the actors had something to do throughout, and weren't just standing and chatting. I then added shots to the script by putting a number next to each line which represented a camera position I had drawn onto my 'camera script'. Here is the 'camera script' a created, and the script I annotated:
The 'camera script'
The script
When it came to shooting the scene I began by shooting the opening shot which involved Helen knocking on the door and coming into the room. I then shot the same thing but this time from over Robert's shoulder. I then had to stop shooting so others could have a go. Steve asked me how I would develop the scene using different shots and I explained to him how I would do this using my 'camera script'. He reminded us all that it was best to think about your 'master shot' first. This would help establish the geography of the scene and give you a reference point for the action in all your other shots.
I'm glad we did this workshop because it reminded me that using a 'master shot' was really important, and you should really always do it first. You don't have to shoot the scene in order. You could shoot your 'master shot' first and then shoot your opening shot. It also taught me about how to act on set when working with actors and a crew, something I am not used to doing for my own work. It was nice to be in charge because it meant I could push for my own vision, however I still kept my mind open to suggestions, hence why I took suggestions from Steve, something that some others didn't seem to want to do.
Overall I enjoyed the workshop and learnt a lot about how to read between the lines and breakdown a script when preparing to film.
Steve finished the workshop by giving us a script each. We have been sent off to prepare to shoot this script in a future workshop.
As part of this unit, we spent some time with Director Steve Finn, who taught us everything he knows about being a Director. Steve has worked on numerous programs, but has spent most of his time directing Eastenders. Below are my notes from the first workshop.
Steve Finn
Directing Workshop 1
Steve started by telling us about how he became a Director. He told us about how he spent most of his years working as an Assistant-Director, and how he became a Director by accident. He was asked by a production company to fly out to Spain to find out why a show they were making was really behind schedule. Whilst there the Director fell ill and so Steve had to direct some of the shoot. After that day, the company gave him a job as a Director. Since then he has worked on numerous programs, including Eastenders, The Bill, Holby City, Casualty & London's Burning.
We began the workshop by looking at an un-edited Eastenders scene that Steve had directed a few years ago. In the scene a character is mugged outside the Queen Vic. He showed us the footage he filmed, which in total added up to 12 shots. He then showed us the edited version so we could see how the footage was used and what was added before it could be aired on TV. He shot the scene using a multi-camera set up, which meant although there were 12 shots, most of them were shot simultaneously. He told us the scene took about 30 minutes to shoot. When we watched the scene back we noticed that a few FX had been added, and music had been added, although it was integrated into the scene by making it seem as though it was coming from inside the pub. FX like the sound of a train passing were used to build tension. And the music used had a specific tempo which also helped build tension.
He then told us about how sometimes he could shoot about 15 pages a day, and even more if we was filming in the studio. He also spoke about using movement in a scene as a cutting point, a technique we had spoken about in an editing workshop.
One of Steve's camera scripts
Next we looked at a 'camera script', which is essentially a plan view of camera and actor placement during a scene. We looked at a scene from a while back which involved a house explosion on the square. He used the 'camera script' to help everyone understand how he wanted to shoot the scene. This helped everyone else understand how the scene would be put together, and this was very important for the stunt team because it would have helped them decide where they could use doubles, and how they could set up the explosion and fire so no one would get hurt. Steve spoke about how he used handheld cameras, a steadicam, minicams, and a chest-rig to shoot the scene. He said the scene took two days to film, with the explosion being shot on the first day and the fire being shot on the second. When preparing for something like this he said it is important to block the scene in your head, and in some cases act every part out to ensure it will work on the day of the shoot.
It was so great to see this 'camera script' because it gave me an idea of how Steve preps for and directs a big scene. It also helped me because it was something I had thought about doing for my own shoot. I'm a fan of Eastenders and I remember the scene very well, so it was cool to learn a bit about how they shot the scene.
Here is the start of the scene:
Here is a little behind the scenes look at the explosion:
Next we looked at the role of the Director. He gave us this:
He then told us about how he preps for Eastenders. He usually gets 4 weeks prep time for four episodes. Normally, he receives a draft script at the start of those 4 weeks. He then oversees the creation of the next 4 drafts, creating notes each time. By the end of the 2nd week he normally has a script that is ready to be used for production & rehearsals. He told us about how he chooses locations by working with the location manager. By the 3rd week he begins casting (if needed), he meets with makeup and wardrobe and he meets with the props department. By the 4th week he has a production meeting. And then the week after that they rehearse and then record all 4 episodes.
As a Director he says you must remember that you are in charge, and you don't ask people to do things, you politely tell them to do things. When on set you must be open to ideas, be flexible, use your time well, and have an idea of how long things will take. He also said that when it comes to editing, you must be prepared for changes to occur.
Finally we looked at directing actors. He started by talking about working out in your head who and what your characters before you think about casting. Once on set he said you should brief the actor and tell them about the character and the characters circumstances. The most important thing he told us about actors is that you need to give them something to do, because character is action, and actions speak louder than words. How a character does something, is more important than what they say.
To help us with our productions, as we are working with non-professional actors, he told us to focus more on shots and storyline. If we rely too much on the actors, it could ruin the film.
And that's it! We learnt quite a lot in one workshop and I found all of it incredibly helpful. I will definitely keep all of this in mind when I'm preparing for and directing my project.
For this lecture we looked at editing and sound design, two things a director has to think about carefully when creating a film.
Editing
We began the lecture by looking at directing the edit. We focused on:
Continuity editing-
Predominant form of editing style in narrative film and TV.
Taking discontinuous shots and creating a continuous flow.
Montage Theory-
Used in early Russian cinema.
Four distinct forms:
Metric- Cutting to a set amount of frames.
Rhythmic- Cutting based on time and visual composition.
Tonal- Using the emotional meaning of the shots.
Intellectual- Creating a higher meaning.
Continuity editing: Story-
First layer creates a continuous story.
You create the story of the scene through temporal and spatial editing.
If it's not needed, cut it.
Continuity editing: Drama-
Creating drama through pacing, rhythm and emotion.
Quickness/slowness of cuts.
Think about: what are you showing? How long are you showing it? Why are you showing it?
Think about use of POV. Going from CU to POV puts audience in position. Whose POV?
Tension can be created by holding shots and cutting quickly.
Match on action-
Allows for dramatic and artful shifts in time and spatial narrative.
Matching action in one shot, with a similar one in another shot.
Cross-cutting-
Helps create suspenseful action sequences.
Cutting between two or more scenes that are occurring at the same time in the story.
Montage-
Collection of shots showing a series of similar shots over a period of time.
Can be used to show time passing or character development.
Fade/Dissolve-
Can show time passing or end of a scene.
Dissolve is the merging of two shots (slightly different to fade).
We then looked at the stages of editing:
Log: Log and arrange footage. Work out wheres and whats.
Assembly Cut: All the scenes assembled in the right order.
Rough Cut: Cut into assembly, adding shots in, cutting and removing.
Fine Cut:Cutting into scenes, and creating drama.
Final Cut:It's all done, though you may still tweak a few things.
Sound Design
For the second half of the lecture we focused on sound design:
Sound design makes up 50% of the film.
It is the capturing, layering and mixing of individual sound elements.
Sound Layers-
Dialogue: All recorded dialogue from the shoot (V.O. has different track)
Sync:Sound from shoot that is not dialogue.
ADR:Dialogue re-recorded or dubbed, after shoot.
FX: Sound effects recorded for production or taken from library.
Foley:Cover personal action elements. Specific sounds.
Atmos:Sound elements that make up the atmosphere of the location.
Music:Diegetic and non-diegetic music in the film.
Good sound design adds depth, feeling and emotion to a picture.
You can add details the audience can't see.
The Task
We were then given a sound design task. The task involved taking a silent clip from a film and then adding all the sound back in using sound effects. We were given a clip that had already had the sound removed, so we had to use the visuals to work out how it might sound.
I started by taking the clip into Premiere and then adding cuts on the track that lined up with the cuts in the actual clip. This would help me lengthen and shorten sound effects so they cut with the shots. I then focused on atmos first. I used the YouTube Audio Library to find atmosphere sound effects that I thought worked with the scene. Once I had insert all my atmos, I moved onto foley. I started by using sfx to create footsteps. There was a lot of walking in the scene and that's why I focused on this first. I then went through and added in FX. For example, I added in the sound of a phone ringing just before the man in the scene answers his phone.
I then went through all the sound layers and messed with the balance and volume of each sound so it fitted into the scene. I wanted to add depth, and messing with these settings helped achieve that.
Here is the final product:
If I were to continue working on this, I would work on improving the footsteps. I would also think about adding in dialogue and maybe so music, to give the scene a meaning and add some more tension.
I found the project very enjoyable and it made me realised how important sound design is. For this project I will think very carefully about how I can use sound design to add some depth, feeling and emotion to my scenes.
In my chosen scenes there are a few important props that I needed to get hold of. To ensure I didn't miss anything, I created a list of props, using my scenes and script to find out what I needed.
Props List
On the list I wrote a description of the prop, how it is used, and what scene it appears in. This list will help me keep track of what props I have and what props I need.
UPDATE: I have managed to get hold of everything I need for my shoot.
Casting for this project was very important. The actors had to look the part and they had to fit the personalities of the characters they were playing.
After spending some time looking through the applications I received, I have chosen these two guys to play Walter and Gus:
WALTER WHITE: Philip Holden
GUS FRING: Chris Rochester
Both actors has confirmed that they are free on my shooting date. I have sent a copy of the current script to them and I am currently working on the call sheet.
I think Philip fits the part of Walter White, and he seems really up for it so hopefully the shoot will go well. After looking at Chris's showreels I decided that he could play the part of Gus Fring really well, especially in terms of action as Gus has no lines.
I will now keep in contact with both actors to ensure they are prepared for my shoot.
For my project I really want it to feel like it is a proper episode of Breaking Bad. To make it feel more real I wanted to use the Breaking Bad opening titles as a way to start my film off, like an episode would. However, I didn't just want to use the normal titles; I wanted them to have my name on them. So to do this I used After Effects.
In After Effects I imported the original opening titles and created some additional layers. I started by adding in "Joshua Jones Directs" above the Breaking Bad logo. I then added a dissolve transition so the text would appear on the screen in the same way that the words "Breaking" and "Bad" do.
Next I wanted to replace the second half of the opening titles were it says "Created by Vince Gilligan". Instead I wanted it to say "Based on Thirty-Eight Snub & End Times", so people would know where I took the scenes from. To do this I used a smoke asset to recreate the original transition from the logo to the "Created by..." part, expect I made it transition into a new composition. Inside this new composition, I used a special "Breaking Bad" font to add my text. Behind this text I added in the background from the original opening titles, except I had removed the "Created by..." part.
I then added motion blur and rendered the project. Here is the final result:
After reviewing my plans for this project, I have decided to make a few changes to my script:
Change 1:
I have decided to remove Gus's bodyguards from Scene 2. The reason I have done this is because I want Gus to seem more vulnerable at the start of the seen, before he works out what is going on. I feel the bodyguards remove this vulnerability, because he has protection if something does go wrong. Also when you watch the original scene you can see that the bodyguards have no purpose; they just stand in the background, not knowing what is going on. This makes me think they can be removed without affecting the tension of the scene.
Now in Scene 2 Gus will emerge with no protection, he will be on his own. He will work out what is going on by himself, and protect himself by not getting in the car.
Change 2:
After reviewing my feedback and my schedule, I have decided to change the time setting of Scene 1. Instead of it being set at night, it will now take place in the late afternoon. I think the scene can still work, no matter what the time of day is. My main reason for changing this is because of lighting. I fear I may not have been able to light the scene well at night, and this could have ruined my footage, and the entire scene. This is a risk I am not willing to take, as I would not have time for a reshoot.
The scene will now take place as the sun is going down, which means I won't have much time to shoot it. I will have to stick to a strict schedule to ensure I complete filming before it goes dark, and I believe I can do this.
Draft 2
To implement these changes I have:
Removed the description about the bodyguards in Scene 2 and replaced it with an alternative that relates to Gus.
Changed the scene heading and description for Scene 1, from a night setting to a late afternoon setting.
Recently I visited my chosen location for scene two to take photos and fill out risk assessments. My final location for scene two is Ursuline Drive in Westgate-on-Sea.
The Location
I have chosen this location because I feel it has a similar vibe to the one used in the original Breaking Bad episode, and I hope this comes across on screen. It is also right next to a large field which gives me an opportunity to shoot some really nice long shots of the location. The houses on the street are single level, similar to Gus Fring's house in the show. I think once I place this street into my Breaking Bad universe, it'll look great.
Whilst I was at the location I noticed a few issues, like the dog walkers and school children that are about during the late afternoon. I will go into detail on these issues in a future post about risk assessments.
As part of my research for the directions unit I have decided to look at Better Call Saul (2015). My main reason for choosing it is that, because it is a spinoff of Breaking Bad (2008), it is very similar in terms of writing, directing & editing. This means it influences my own choices quite a lot.
Logo
A bit of background info...
Better Call Saul is an American drama spinoff of the AMC drama series Breaking Bad. It was created by Peter Gould and Vince Gilligan, who also created Breaking Bad. The show is set in 2002, and follows James "Jimmy" McGill, six years before he appeared in Breaking Bad under the name Saul Goodman. Saul Goodman is played by Bob Odenkirk who played him in the Breaking Bad series. So far the show has had one series, premiering on February 8th 2015, however since then a second season has been commissioned, due to start on February 15th 2016.
Bob, Peter and Vince on the set of Better Call Saul
Each episode in the first season was directed by a different person, with the premiere directed by Vince Gilligan, and the finale directed by Peter Gould, the shows creators. Breaking Bad regular Michelle MacLaren directed episode two. The cinematographer for the entire first season was Arthur Albert, who helped Mike Slovis direct the final two episodes of Breaking Bad.
How does Better Call Saul influence me?
To start with, it influences mostly in the same way Breaking Bad does, because the shows are so similar, and yet they're shot very differently. The style of Better Call Saul is very unique, and this is on purpose. The shows cinematographer, Arthur Albert, said he wanted to honor the looking of Breaking Bad without it feeling like the same show. Vince and Peter have both also said that they didn't want the show to look like anything else on TV.
Unlike Breaking Bad, Better Call Saul scrapped the fully handheld look. Albert wanted only wanted the camera to move if it needed to, which was very different from Breaking Bad, which was shot almost entirely hand held. Albert lists his influences for the shows cinematography as film noir and Stanley Kubrick's wide framing and vanishing-point perspective.
Example of Film Noir in Better Call Saul
Also Better Call Saul is shot on Digital using a RED Dragon camera, whereas Breaking Bad was shot entirely on film, and was one of the last TV shows to be shot that way. Better Call Saul uses a two camera set up, something which I did consider for my own project to help me get more coverage in a short space of time.
One Breaking Bad trademark is putting cameras in unusual places, like below a table surface or on the end of a gun, and Better Call Saul uses this trademark too. To do this difficult shots, Albert used the Panasonic Lumix DMC-GH4. A very compact camera, perfect for those kinds of shots.
Similar to Breaking Bad, Better Call Saul also uses a lot of POV, extreme long shots, extreme close ups and birds eye view shots.
In terms of sound design, Better Call Saul and Breaking Bad both use very natural sound. The show has a very 'real' feel to it and this natural sound adds to it and helps build the world these characters live in. This therefore helps pull the viewers into the world as well.
And finally in terms of colour, Better Call Saul is very green and yellow, a lot like Breaking Bad. This colour choice works really well, and is very unique, so I need to use it in my work too, to really give it that Breaking Bad vibe.
I find this video highlights the similarities, in terms of visuals, between the two shows quite well:
So to answer the question, this is how Better Call Saul influences my work:
- Although I'm shooting handheld, like Breaking Bad, I will think carefully about my camera movements and only add specific movement to the camera if there is a reason to, not just because it looks good. And this is because Albert only wanted the camera to move if it needed to.
- I will think about where I can place the camera that is unusual, maybe under a car, or in a tree. But I will only do this if I need to, and if it adds to the story and tension.
- I will try and capture as much natural sound as possible on location, recording my own sound effects after the shoot.
- I will colour correct my footage in a similar way to how Breaking Bad and Better Call Saul are corrected, using a similar colour scheme.
- I will think about how I can pay homage to Breaking Bad & Better Call Saul by using some classic Breaking Bad/Better Call Saul style shots, whilst still retaining my own directorial vision.
- I will try and work a classic Stanley Kubrick tracking shot or extreme camera angle into the film.
- And finally, I will consider using two cameras. If I did this they would be two different cameras, a Canon 7D and a Canon EOS M. Although the cameras are different, their footage is quite similar as they have the same image sensor. Also because the EOS M is smaller, I can use it for the unusual shots. This will help me get more coverage in a short space of time. I will test both cameras together to see if there is a noticeable difference between them, in terms of quality.
Recently I received feedback on the first draft of my script for 'Joshua Jones Directs Breaking Bad':
"Nicely written out script. It's very very detailed, so that will be key that you get that kind of coverage to pull out the emotion and drama of it. Sound design will be VERY important... The night scene in will be tough to film - so think how you can do this with limited light. Also, be good if you can link the scenes somehow.. Key elements: Good casting required, confident. Plus the right ages and look. Great locations and think about the night scene - as in how. Sound design. Good coverage. This is a greenlight project"
I am very pleased with this feedback as it means I can start working on creating the film, knowing I have a good enough script to do so.
I need to think very carefully about my location choices, and I believe the ones I have chosen will work perfectly. I also need to think very carefully about my cast, and again I believe the people I am planning on choosing will work very well, and fit the physical descriptions.
My main concern is the night scene. I have considered changing it to a late afternoon scene instead, when the sun is going down. I will have limited light and time but it won't be as limiting as shooting at night. This is something I will think about.
And finally I need to think carefully about sound design as that is what creates the tension that these two scenes have.
Recently I went to my chosen location for Scene 2 to take photos and fill out risk assessments. My final location for scene two is Jayar Car Parts in Broadstairs. I have gained permission to film here on my chosen dates.
Location Contract
The Location.
Unlike the original show, I am not shooting this scene in a car park. I am instead filming outside and industrial looking building, on a disused road.